


In the first part of this buyer's guide we explained some of the theory behind mountain bike suspension. This time we're looking at six of the most common frame designs and discussing which is best. Next week we'll look at suspension forks and rear shocks.
Suspension designs
There are many rear suspension designs, and they all have slightly different traits. Some feel plusher than others, but the plush feel can desensitise your riding. Frames that feel firmer often feel faster and livelier. Some designs, such as single pivots, can have more flex than other bikes, but a little flex can be good as the bike can contort slightly through rough terrain.
Designs using cartridge bearings may be ultra plush, but they carry a weight penalty – bushings can be as efficient and weigh less, so they have their place. It can be tricky finding the right bike to suit you – the best way is to test ride as many different types as you can. Here's a quick guide to the six most common frame layouts:
1 Single pivot
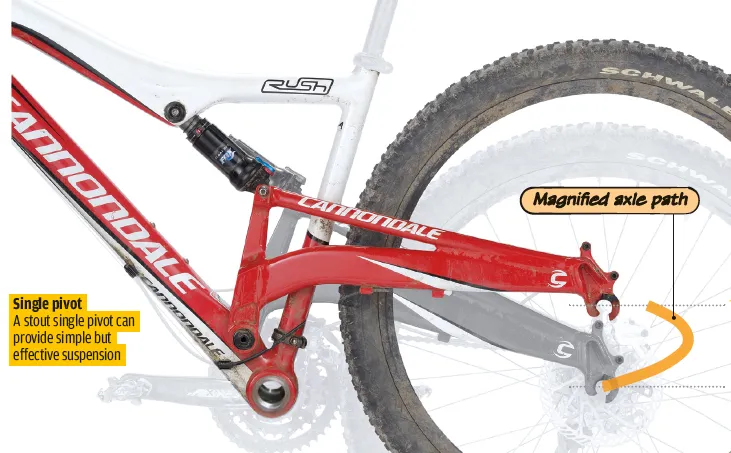
This classic design places the pivot above and in front of the bottom bracket and is very simple and light in weight. A lower pivot gives a more active feel and less pedalling-related bob. A higher pivot suffers from more pedal kickback due to excessive chain lengthening.
- Examples: Orange 5, Santa Cruz Heckler, Santa Cruz Bullit, Diamondback XSL Comp.
- Pros: Simple, minimal pivots, light weight, reduced pedal bob.
- Cons: Prone to pedal feedback and interference from braking forces.
- Buy if: You're worried more about long-term durability than a more refined suspension feel. This is the least technically demanding suspension platform so it's ideal for the tool shy.
2 Faux bar
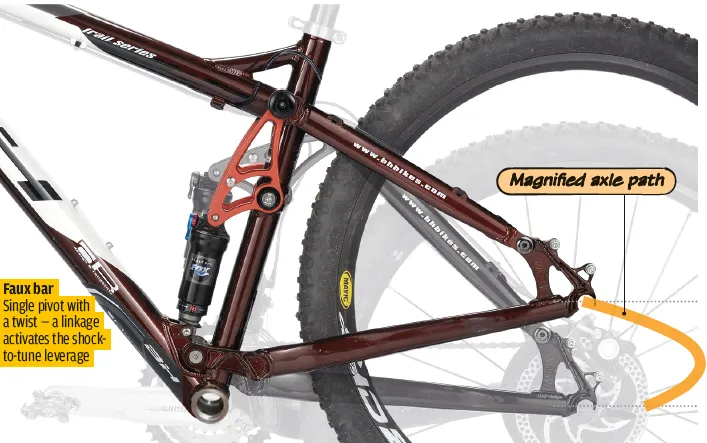
Also called a complex or rocker-activated single pivot, this is a variation of the single pivot but with the pivot placed much closer to the bottom bracket, usually just to the rear of it. The conventional looking rear triangle has a pivot on the seatstay and a rocker linkage to drive the shock to produce a strong and torsionally stiff design. The linkage is used to tune the leverage ratios under compression; by using a longer stroke shock an extremely compliant and plush action can be achieved. The faux bar is often mistaken for four bar designs that use a pivot between the main pivot and wheel axle (ie. on the chainstay).
- Examples: Kona Dawg, Ventana El Ciclon, Scott Spark.
- Pros: Fairly light, low pedal kickback.
- Cons: Prone to bobbing and braking forces.
- Buy if: You like to ride hard and fast. Ideal on hard-hitting trail bikes where absolute subtlety isn't a major concern – what it lacks in sensitivity it makes up for in direct drive feel. More pivots means it needs more regular checking.
3 Standard four bar
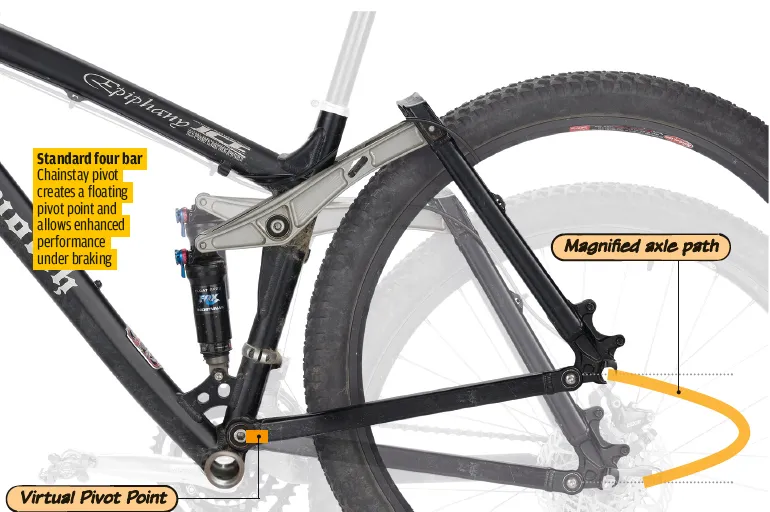
The standard or Horst Link four bar is visually similar to the faux bar except the rear triangle pivot is on the chainstay, just in front of and below the rear axle. It gives a plush ride, its action minimally affected by braking. Specialized own the patent on the Horst Link, but many brands pay for the licence to use it.
- Examples: Specialized FSR Stumpjumper, Boardman FS, Ellsworth Epiphany.
- Pros: Fairly light, limited pedal kickback, improved suspension under braking.
- Cons: Pedal bob. Requires regular pivot checks.
- Buy if: You want better suspension action under braking than single pivot and faux bar bikes; harder, faster trail riders like this design as it allows you to attack the trail without losing rear wheel traction.
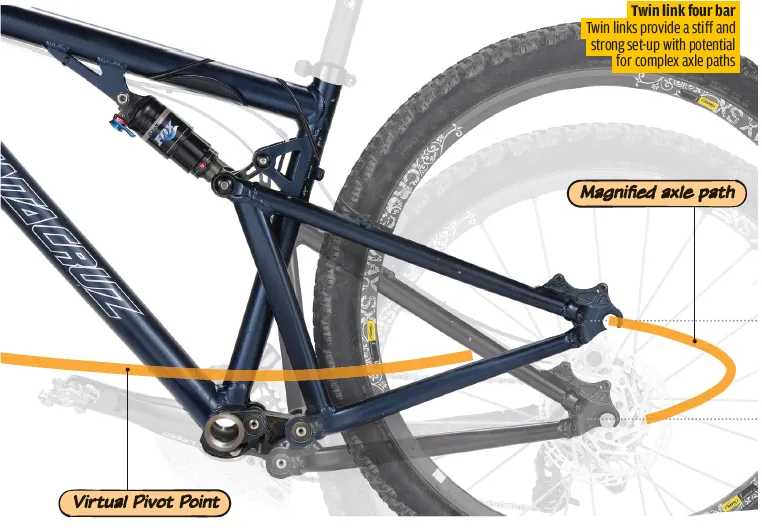
4 Twin link four bar

A recent concept, and variation of the four bar, connects the rear triangle to the front by two short links. This generally allows the floating pivot point to vary quite a lot through the travel. There are various – and subtly different – versions, including: VPP: The Virtual Pivot Point was developed by Outland Cycles in the early Nineties but has been refined by Santa Cruz and Intense Cycles. Twin linkages separate the rear triangle from the front, and allow a certain wheel path that uses chain tension to tame rear end bobbing. Examples: Santa Cruz Blur, Intense Spider 2, Santa Cruz Nomad.
dw-link: Like the VPP system, Dave Weagle's dw-link design uses twin links to isolate the rear end, but the axle path and characteristics differ from VPP. The heart and soul of the dw-link is the anti-squat curve. The Weagle design specifically alters the amount of anti-squat through the travel from where he thinks you need it most, at the start, to where you need it least, deep in the travel where you are less likely to be pedalling.
This upshot of this is that pedal kickback can be reduced while still maintaining a good pedalling performance. This is coupled with precisely tuned leverage ratios in an attempt to make the bike remain fully active in the majority of conditions and gears. A few manufacturers have their own take on this setup with varying degrees of performance, and even the dw-link itself alters according to the type of bike it is on. Examples: Turner Flux, Ibis Mojo, Pivot Mach 5.
Other: Both Giant with their Maestro system and Marin and Whyte with their Quad Link systems use variations on the twin-link four bar theme. Examples: Giant Anthem and Trance, Marin Mount Vision, Whyte E120.
- Pros: Can offer good braking, pedalling and pedal kickback performance.
- Cons: Above pros depend on precise setup, is relatively heavy.
- Buy if: You want a supple ride with a strong climbing capability. Riders of mid- and long-travel trail/all-mountain bikes love the clean feel of the stop/go action for its terrain-eating ability, but it needs careful shock setup to work optimally.
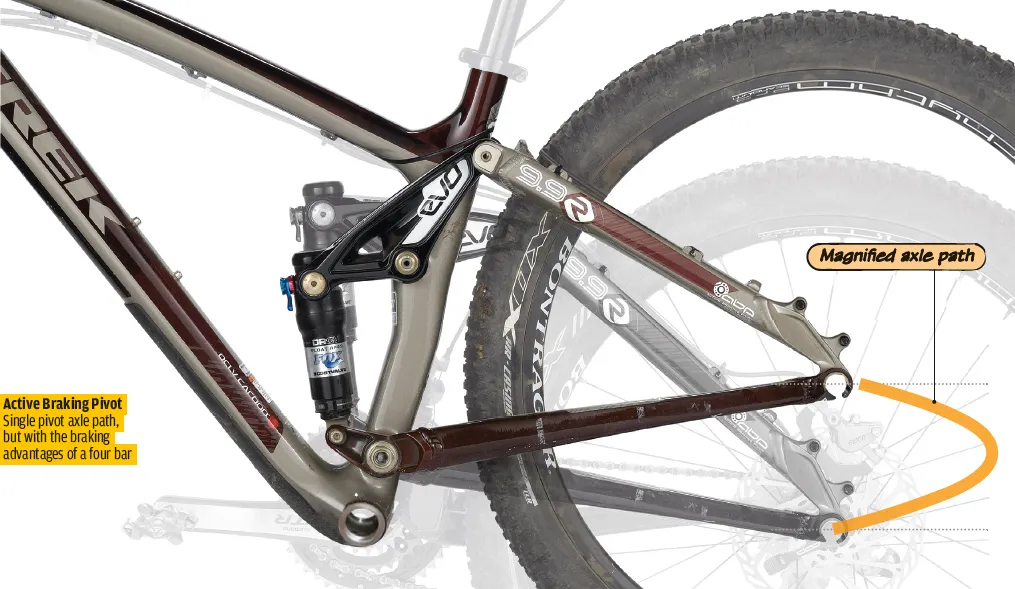
5 Active Braking Pivot (ABP)

Trek’s Active Braking Pivot design mimics the four and faux bar setups, but places the rear pivot concentrically to the rear axle. Technically it’s a faux bar, but it has the braking advantages of the four bar. The shock is isolated from the front triangle and is actuated by both the chainstay- and the seatstay-activated rockers. This offers an incredibly plush ride in all conditions and, combined with the Active Braking Pivot, has the least brake jack of all designs.
- Examples: Trek Fuel EX, Trek Remedy, Gary Fisher Roscoe.
- Pros: Low pedal kickback, very good under braking.
- Cons: Pedal bob, needs unique rear skewer for axle.
- Buy if: You like how faux bars and single pivots ride but want the benefit the ABP gives to retain a supple suspension action even with the rear brake fully on.
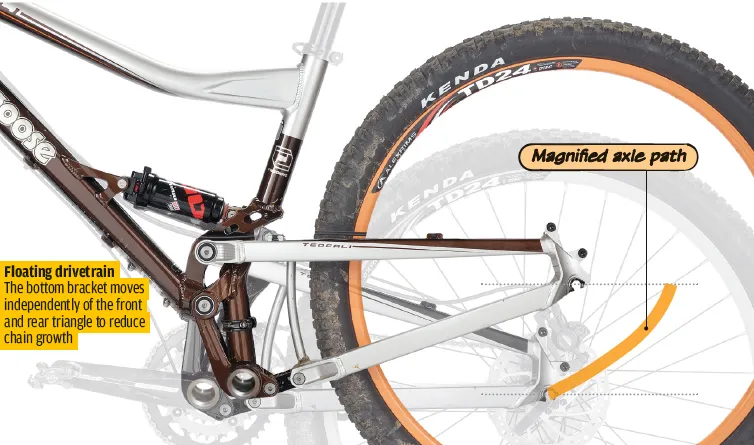
6 Floating drivetrain

One of the earliest types of full-suspension bike design was the Unified Rear Triangle. This incorporated the whole drivetrain on the swingarm, including bottom bracket, which was then attached to the main frame by a pivot. With no pedal kickback due to no chain extension, it was assumed this would offer the best of all worlds. But alas, with your weight on the swingarm when stood up, the performance varied significantly depending on whether you were seated or standing and the design is little used nowadays.
However, GT and Mongoose with their i-Drive and Freedrive systems, and Maverick with the Monolink, have modified the concept to produce a range of floating drivetrain bikes where the bottom bracket is fixed to a link between the front and rear triangles. The goal here is to try to combine the positive characteristics of more than one design.
While the axle path may be a simple arc like on a single pivot design, the bottom bracket itself moves as the suspension compresses. The relationship of the axle to the bottom bracket, and how the bottom bracket moves, produces different pedalling characteristics depending on the linkage setup.
- Examples: GT Sensor, Mongoose Teocali, Maverick ML8.
- Pros: Low pedal kickback, low bob, rearward axle path.
- Cons: Suspension efficiency can lessen when standing, heavy, affected by braking.
- Buy if: You want your suspension to be active across a wide range of terrain types and value traction sensitivity above all else. Again, careful shock setup and pivot care are needed to ensure performance.
So, which is the best?
None of them! Quite simply there's no one design that's better than another in all departments. And we have to remember the second part of the equation – the rider. Personal preference really is the key when it comes down to what works best for you.
Sure, many poor designs have faded from the scene, but what we're left with nowadays is a variety of high performing machines that allow us to choose the very best for our needs. And given that the winners on the racing scene use a mix of machinery from the most basic to the very complex, it reinforces that the rider is the most important part of the picture.
Steve Peat has won World Cup downhill races on a GT Lobo (Horst Link), GT i-Drive (floating drivetrain), Orange 222 (single pivot) and of course the Santa Cruz V10 (VPP). However, small tweaks to the setups to suit your personal riding style can make quite a big difference to how each design type rides.
Maybe you don’t really care about weight? Or a few extra pivots? Possibly you've never noticed pedal feedback, or bobbing isn’t something that concerns you. Perhaps you hate the way some bikes seem to be affected when you brake. Many people simply don’t notice some of these effects, while others are more sensitive. Whatever your cup of tea, there are enough designs out there for you to pick one that suits. Get out there and try ’em.
One of the reasons it’s so hard to say which full sus design is ‘the best’ is that many of them work in different ways in different gear combinations. Typically, a lot of systems are designed to work at their best in the most frequently used gears — middle ring up front, middle sprocket out back — and this is why you see so many main swingarm pivots located in line with the middle chainring.
If you test ride a bike, try it in all possible gear combinations. Many suspension systems tend to respond in a very different way when subjected to steep climbs with excessive granny ring pedal pressure. You’ll almost certainly experience different amounts of pedal feedback in different gears.
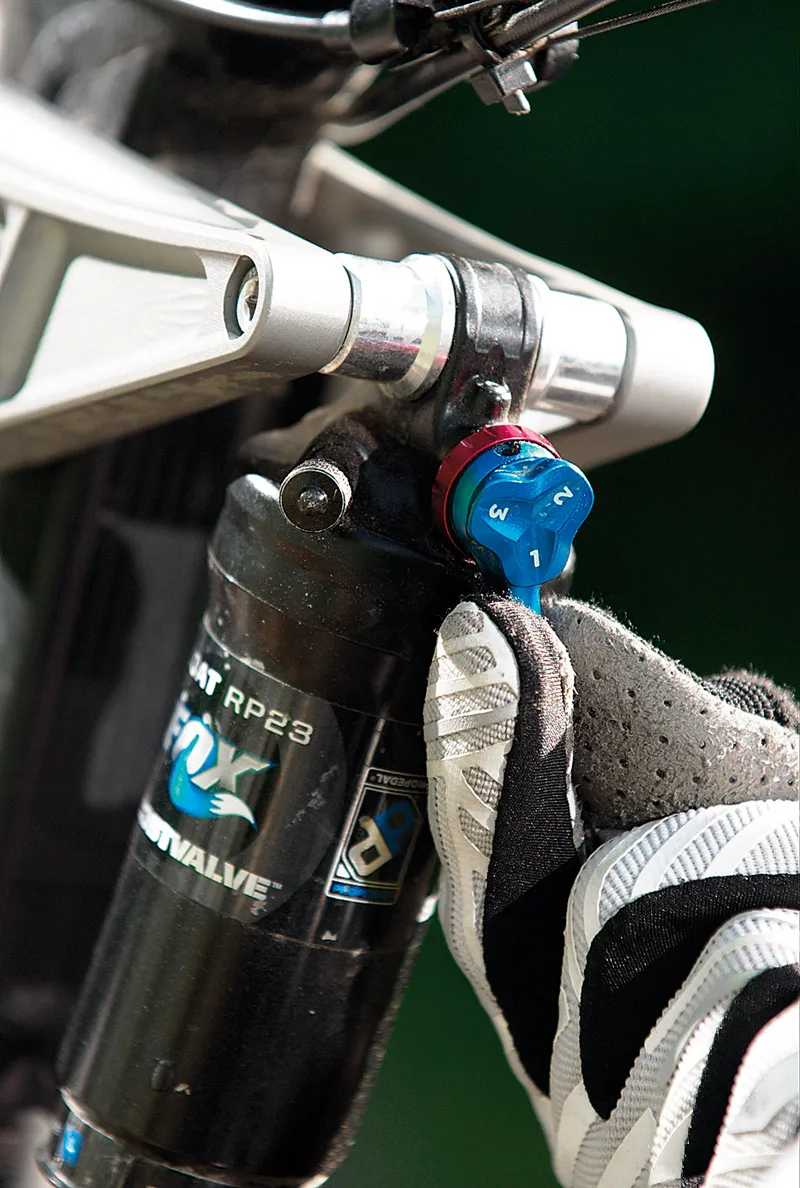
Your choice of rear shock will also have some bearing on the way your suspension system feels. Air shocks have become dominant on all but the hardest hitting downhill bikes and the cheapest superstore bikes, where steel coil shocks are still popular. But air shocks vary a lot too.
Cheaper full-suspension bikes will often come with preset compression and rebound damping, while more costly bikes have adjustable damping so that you can fine-tune the responses of the shock, as well as tuning the basic weight-bearing feel according to how much air you add (you’ll need a proper shock pump for this, a tyre pump won’t do).
Most air shocks these days also come with some form of platform damping system. This is often adjustable on the better shocks and helps to stifle unwanted shock movement caused by pedal forces and weight shifts, but may reduce the compliancy of the suspension over small bumps. A lot of shocks come with a lockout function too.