

Way back in the early nineties, spectators loved hanging around steep banks in downhill races. Back then there were no such things as death-defying gap jumps or huge drops, but even the slightest of banks when hit at race speed would almost guarantee a crash.
There’s probably a jump on your local trail that you know you can clear, but the run-up is spoiling the fun. It’s just a steep bank but you need a bit of speed to clear the jump, and riding off the slope at speed will probably send you to the bottom of it, resulting in a crash. The skill of pre-jumping allows you to maintain your speed without losing control, and will allow you to clear the jump you’ve been eyeing up.
Here’s a step-by-step guide:
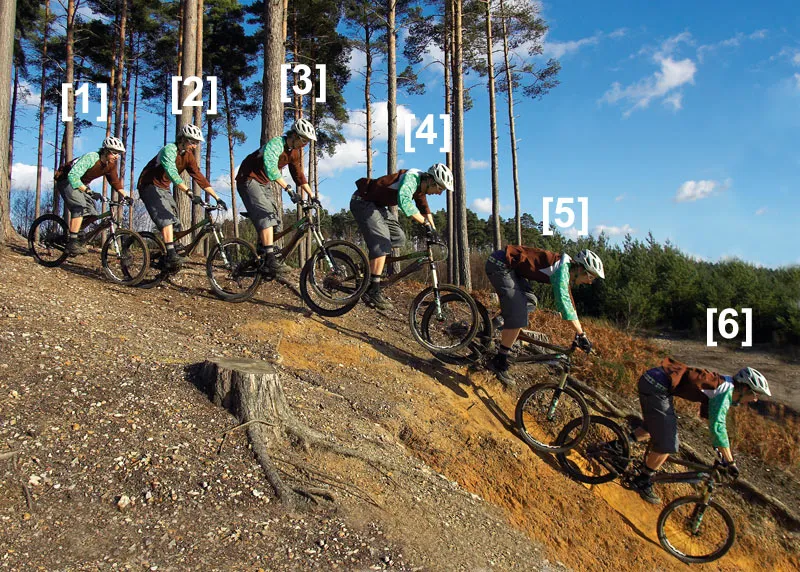
[1]
Approach
As you ride up to the bank you won’t be able to see the slope but, having learnt where you land from a bunnyhop, you can estimate where to take-off with remarkable accuracy. Look for the edge of the drop and prepare to pull up.
[2]
Take-off
This is the important bit. Pull up aggressively into a decent bunnyhop – you should still be able to see the top of the bank in your peripheral vision, but you should be looking further ahead as you leave the ground, in anticipation of spotting the landing.
[3]
Levelling out?
Instead of levelling out, you almost need to tuck the bike up to let the rear end rise. You need to meet with the ground as smoothly as possible, so try to visualise diving into the landing. As with tabletop jumping, try to imagine a dolphin leaping clear of the water and arcing back in again.
[4]
Spot the landing
As your front wheel drops, you’ll see the full landing for the first time. You should have already checked it out for the line you need to take, but subtle movements fore, aft and side to side can be made to adjust your trajectory.
If you’re not nose-diving enough to meet with the landing, extend your arms and tuck your legs up further. If there’s a jump or anther obstacle following the bank, you should have subconsciously spotted your line already and you won’t even be thinking about the landing stage.
[5]
Landing gear down
You really want to be as smooth as possible here, because landing a pre-jump is supposed to allow you to continue riding the trail as fast as your entry into the section. The landing will be easy on the bike and yourself, so try and let the bike take it so you can keep your head up and looking at the line you’re hitting next. When you get this perfected, you can start pedalling when you land if you need more speed…
Pre-jumping basics
- Clear judgement - The pre-jump is basically a bunnyhop before a transition, so you need to be able to judge how far back you need to hop. You can learn this skill in an empty car park. Pick a painted line on the ground and aim to just clear it each time you hop. Get faster each time and, accordingly, bunnyhop further and further back.
- Practise anywhere - You can practise pre-jumping virtually anywhere. Just commuting to work can uncover random banks and slopes, and even the lowered pavement sections on driveways can be used. If you’re lucky enough to have a BMX track or old school skatepark near you then they’re good places to practise.
- First steps - After using the car park technique, find a small bank to practise on. Firstly, jump off it to flat and note how you lose a bit of speed when you land. Next, you need to bunnyhop before the edge of the transition in order to land in it. Have a few run-ups first and use your distance judging skills. When you’re ready, ride up to the bank fairly slowly and then hop into the transition. You’ll notice that you don’t lose any speed – if anything you’ll gain some. Now start getting faster and hopping earlier, just as you did in the car park. Keep going until you’ve gone as far as you dare, or you’re completely confident with pre-jumping. Finally, work on fine-tuning, such as nose-diving into the transition for the smoothest landing possible. This will squeeze every last bit of speed from the move.
- Be positive - As with any jumping technique, you should lower your saddle slightly for your first few attempts, and attack like you are going to land the move first time. If you ride with any kind of vagueness, then you’ll probably crash. Think positive and ride positive. Although pre-jumping is an advanced technique, it’s easy to learn. Just remember that practice makes perfect. When you have the right technique and good speed, you can pre-jump crazy distances.
- Developing your skills - Bunnyhopping isn’t the only way of pre-jumping – there is another technique you can use once you’re confident with the basics. Ride up to the bank and just pull the front wheel off the ground slightly. As it starts to rise up, unweight the rear wheel and push the bike into the transition with all your weight.
- Head for the BMX track - The easiest way to learn this technique is on a BMX track. Find a single jump or mound to start with, and ride up to it briskly. As you hit it, you’ll notice how the bike tries to get airborne. To suck it into the ground, pull the front wheel up just before it hits the jump and then plant it on the backside at the same time as unweighting the rear wheel. As the wheel rolls over the peak, force your pedals down to get the best pump you can. This is the exact technique for pre-jumping without leaving the ground, and it can also be used on all the little mounds and hollows out on the trail to gain speed. Trying to follow a rider who can gain speed without pedalling on a fairly flat section of ground can be tough, so make that rider you, and let your mates suffer trying to keep up.