Whatever the material, there are many things to look out for when buying a second-hand bike. However, carbon has its own peculiarities that set it apart and make it trickier to assess. In particular, there could be hidden damage from a severe impact, which could lead to a sudden failure.
Unless you happen to have access to scanning equipment, you’ll have to rely on a more indirect method, along with close visual inspection.
A bit of detective work will give you a feel for the situation. For example, a mismatched set of wheels, where one or other of the rims has been replaced, might give you a clue as to whether the bike was crashed or involved in a mishap.
Also, ask why the current owner is selling the bike. We’ll cover some of the basics for checking component wear below because excessively worn components can be an indication of a hard life.
If you’re in doubt, have the bike checked out by a pro. Bike shop labour charges are around £35 an hour, so expect to pay anywhere from £15 upwards, because the whole process will take at least half an hour, possibly more.

If you want to be absolutely certain and you have your heart set on a particular bike or frameset, consider sending it to a carbon repair specialist who will be able to diagnose any faults invisible to the naked eye. Repairs to a dearly beloved carbon frame may also be far more affordable than you might imagine.
How to assess a used carbon road bike in 10 steps
Tools required
- Measuring tape
- Chain checker
- Torch (flashlight)
- Multi-tool
- Flat-head screwdriver
1. General inspection
This may sound ridiculous, but first determine the bike is actually the right size for you – even if the build presents a stupendous deal, don’t be tempted to try and make something imperfect work for you.
Next, lift the bike up a few inches and allow it to drop, listening for distinct rattles or clunking. Chain and cable slap is normal but any clear noises from within the frame or fork should be investigated.
With steel, titanium and – to a lesser degree – aluminium, any damage to the frame and fork should be apparent, but that’s not always the case with carbon.

Check the seatpost clamp area, particularly the slot. Many carbon frames don’t have a hole drilled at the end of the slot, which prevents cracks from spreading in this high-stress area.
Rob Granville of Carbon Bike Repair UK (CBR) adds that, while a crack here is "not a dangerous fracture in general", over a period of time, a frame can suffer from what his team calls "carbon creep".
Similar to a crack on a car windshield spreading over time, "the trend is for the small crack at the slot to turn 90-degree to run horizontally, and it eventually will separate as the rider movement on the saddle causes it to come away". He adds that this isn't usually fatal though and can be easily repaired.
If the bike has an external seat clamp, make sure you remove it and check the clamping area on the frame for any damage. If the bike has an integrated seat clamp, check that any bolts aren’t stripped or seized, and that all parts are presents and accounted for.
Check the seatpost hasn’t seized in place: loosen the seat clamp and try to twist the saddle. It should move easily.
A seized seatpost is, at best, a pain to remove and, at worst, can be fatal.
A sticky or seized seatpost will also be an indicator as to how well (or not) the bike has been looked after.
Finally, with the seatpost refitted, lean on the saddle with reasonable force. Check for any distinct clicking or creaking.
2. Check the frame
Closely inspect the surface of the bike's finish. If the paint is in poor condition, this can indicate poor washing technique or a hard life spent in all weathers.
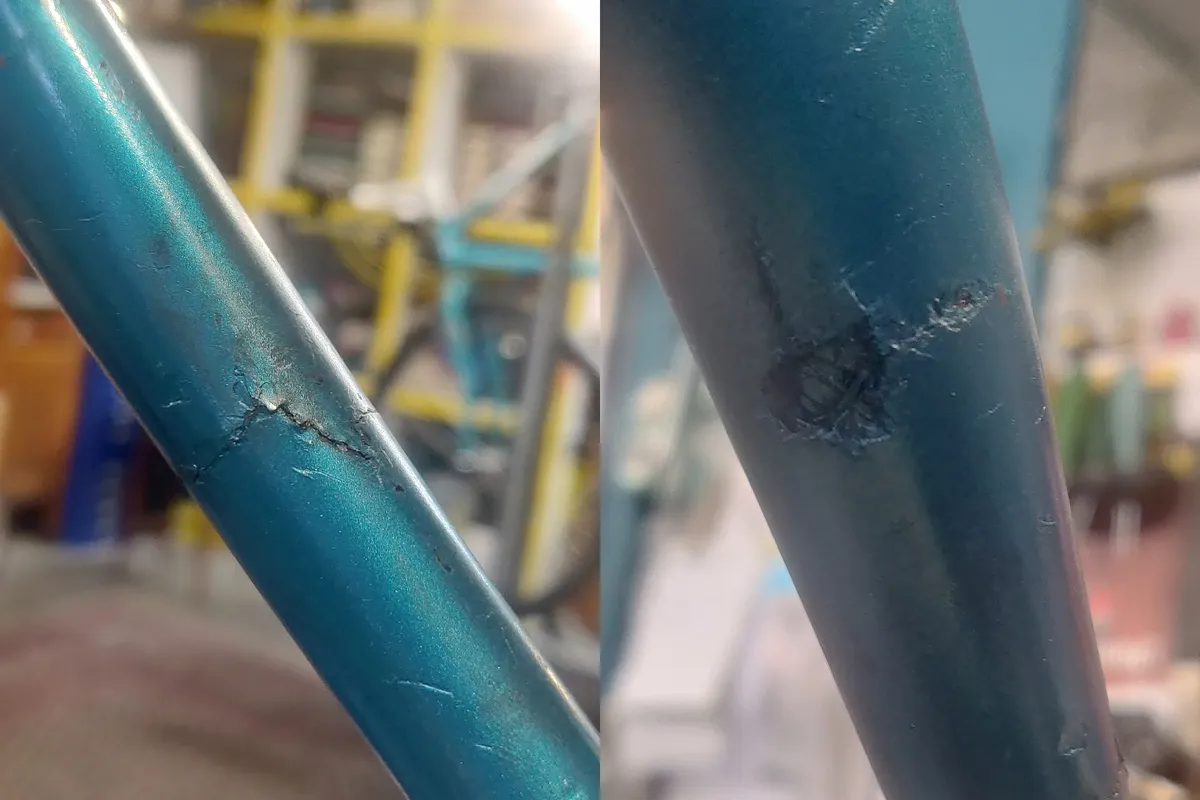
Next, have a very good look at the frame in good direct light. A bright torch can also help highlight any defects. Pay particular attention to the top and down tubes for damage from roof and boot racks – carbon frames are particularly susceptible to crush injuries from clamps.
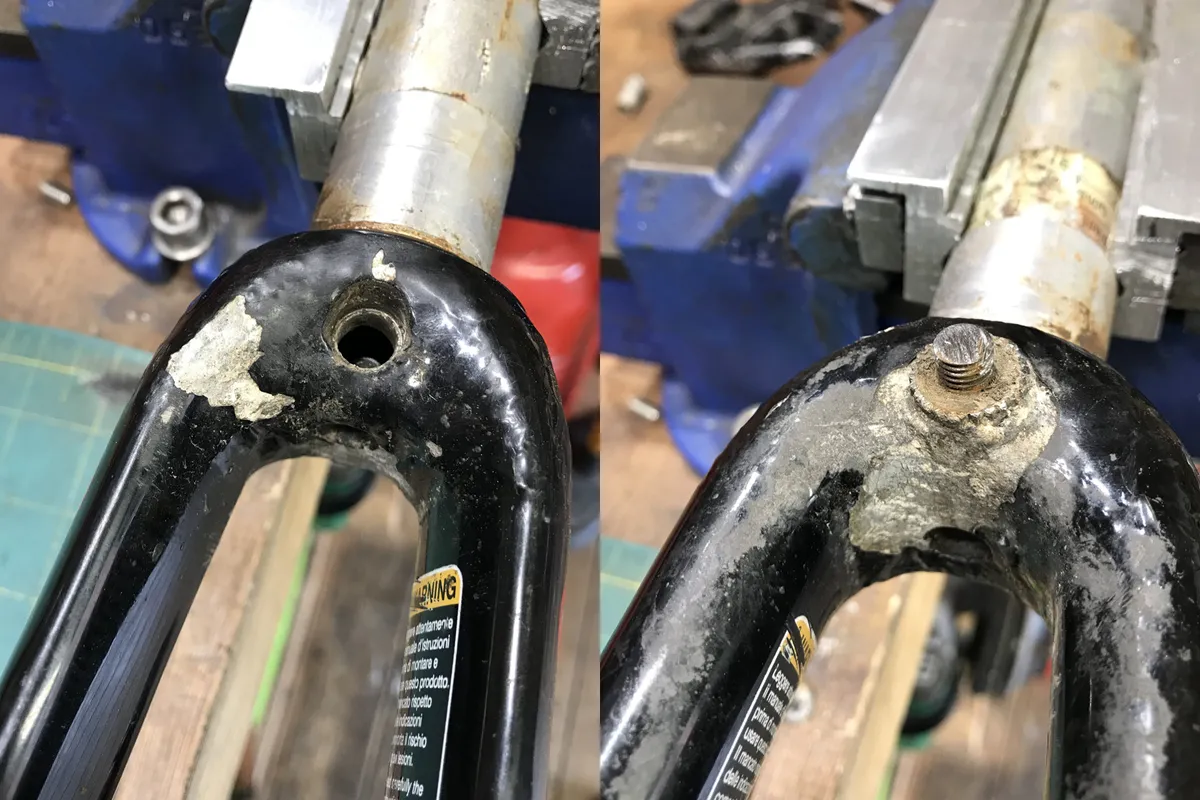
Look closely at all of the tubes and look for ripples or damage. Don’t buy the bike if you see cracks like those in the photos above.
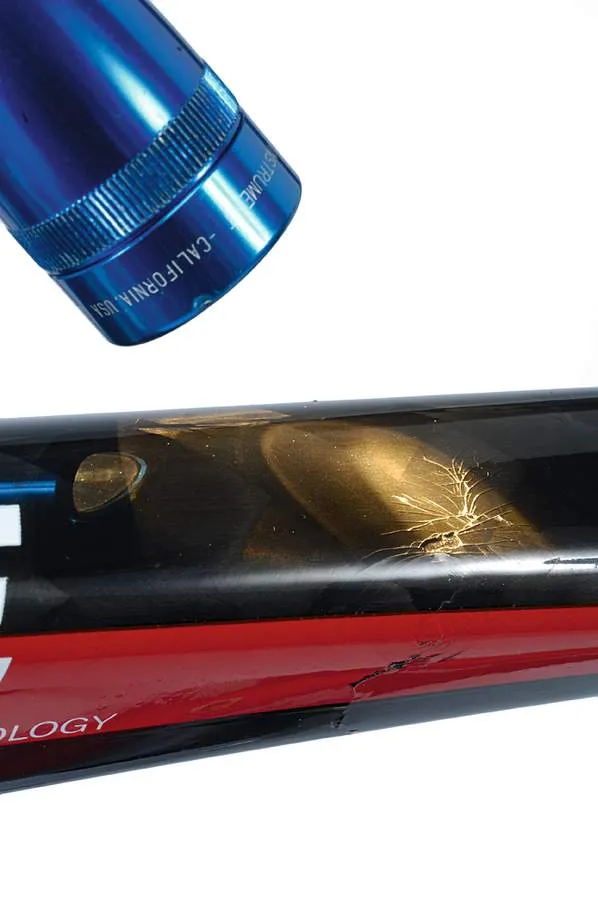
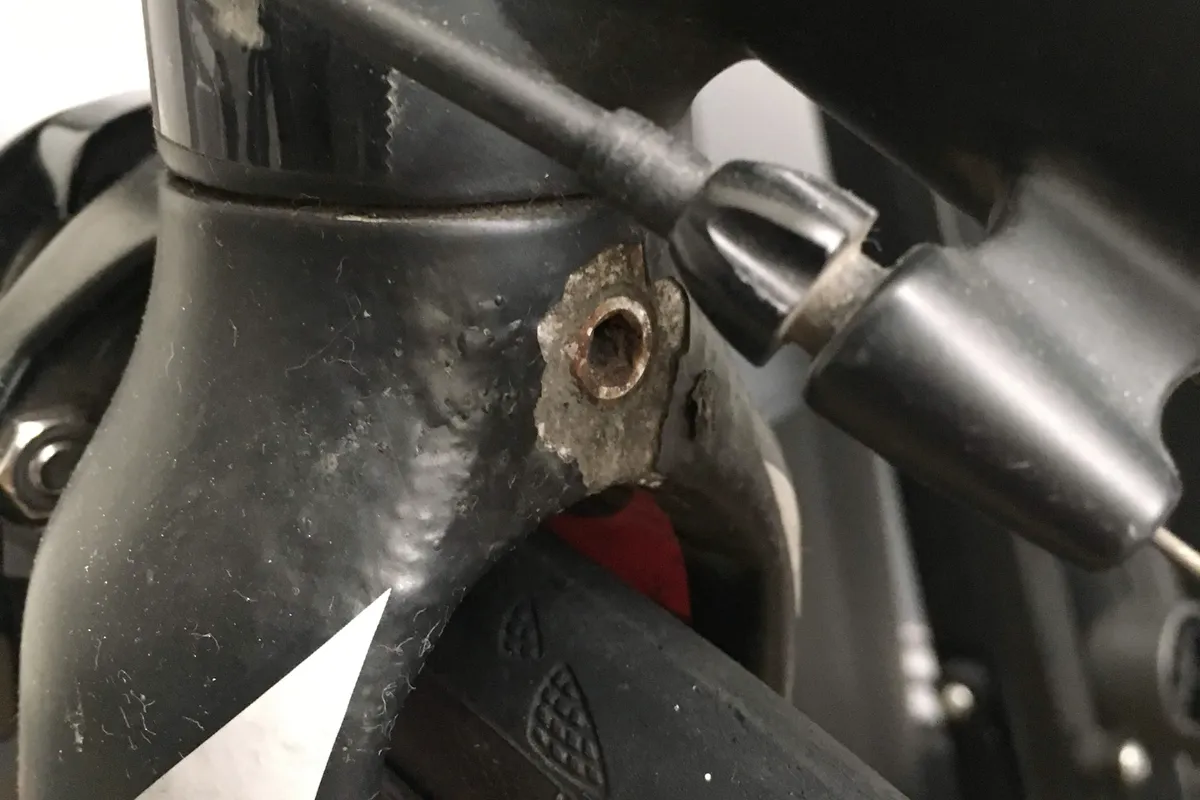
The front derailleur mounting plate, especially if it’s riveted or bonded, should be inspected closely. Bluish-white powdery deposits are sure signs of corrosion and will cause the mounts to break off.
CBR also suggests looking for cracks "coming from the area where the mount and the tube meet. If you see this, walk away".
To be totally sure, grab the end of the cage on the front mech and give it a tug – you shouldn’t feel more than a small amount of movement, and the majority of this should come from the body of the derailleur itself.
Do your homework beforehand and check how closely the current spec matches the original. If the fork or front wheel have been replaced, ask why. Don’t buy the bike if it’s due to a crash.

If you can, drop the fork out of the frame and check the steerer for damage at the stem clamping point and then check the condition of the headset.
If you cannot remove the fork to check the steerer, CBR suggests you straddle over the top tube, as if you are resting after a long ride.
Then, locking the front brake while putting downward pressure on the front wheel, "keep your eyes on the fork and watch it flex. Listen for any nasty rasping noises inside the head tube. If the steerer is fractured you will surely find it through this test". This the first test CBR carries out when initially assessing a bike.
He adds that "the idea is to put flex through the steered between the top and lower head tube bearings, which simulates a frontal impact. This is a deadly hidden problem for any bikes with partial fracturing around the crown race and upward".
To double-check for wear or poor adjustment of the headset bearings, lift the front wheel up and allow the bars to swing from side to side – if it feels notchy or rough that could indicate the headset is worn.

If there is excessive fore and aft movement, check the headset bearing seats and the head tube for wear. Worn bearing seats could be fatal damage or, at best, an expensive repair.
Next, check the dropouts for the level of wear caused by the quick release heads or thru-axle. CBR says that a small depression in this area shouldn't be a cause for alarm but, "a light bulb shaped slot could indicate that the wheel has been rocking around and, when fitted, the wheel will be misaligned".
Rub marks on the inside face of the non-driveside chainstay and seatstay are another sure sign of a loose wheel.
[acast acastid="fridayshorts-howtobuyasecondhandbike" accountid="bikeradarpodcast" /]
4. Check attachments/rivets

Check all attachments to the frame: bottle cage rivets, any cable stops on both the top tube and rear derailleur, and down tube cable guides, which are often located in a critically stressed area a couple of inches from the head tube.
We would suggest going as far as taking a multi-tool to each bolt to check everything moves freely – removing a seized cage bolt is an extremely tedious and difficult task.

Have a look at the chain suck zone – the area between the chainstay and the small ring. There is usually a plastic or metal plate here that protects the chainstay from damage. If there isn’t, ensure this area isn’t gouged.
A few surface scratches of the lacquer are okay, but anything more substantial should raise alarm bells.
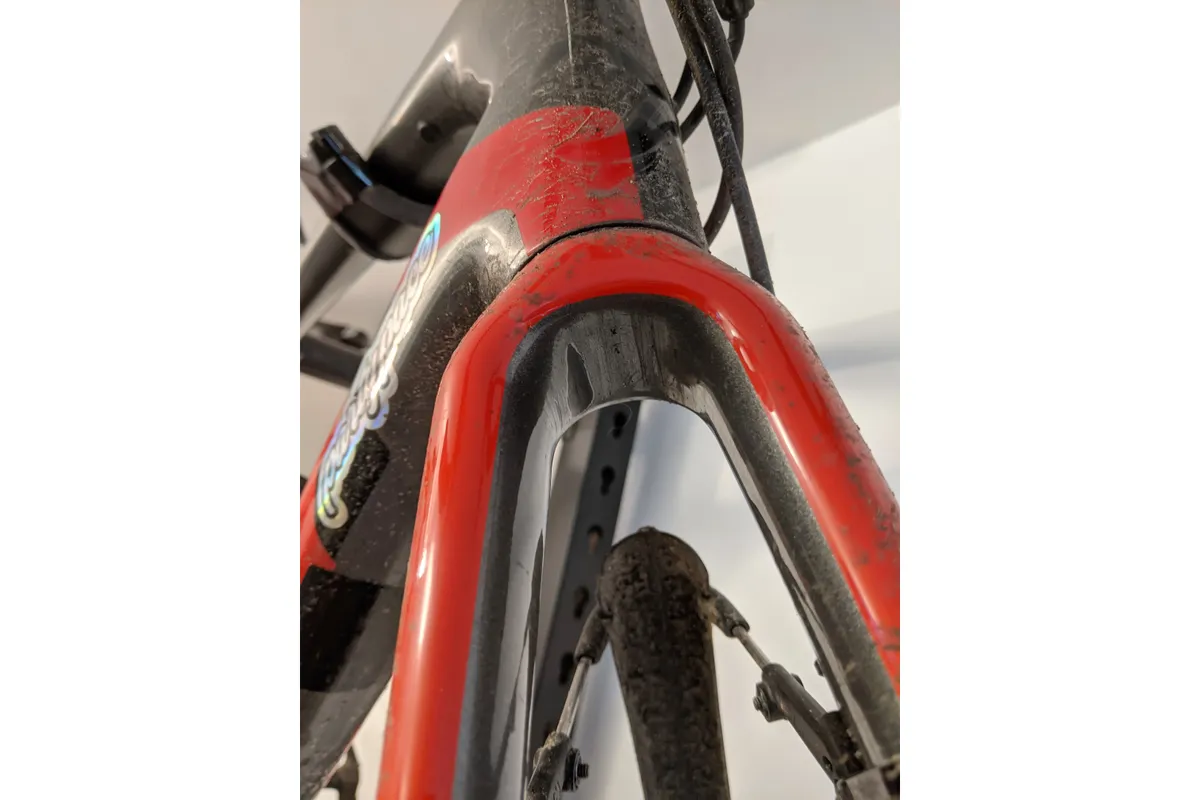
5. Check bonding zones
Joining methods vary depending on frame design. Even modern monocoque designs can incorporate bonded, riveted or bolted metal elements, and they’re even more common on older frames.
Check locations where carbon or aluminium tubes are bonded together into their joints. The combination of dissimilar materials (carbon/aluminium) and an electrolyte (salty road spray) combine to create what is, in essence, a big battery. This can produce galvanic corrosion.
A little oxidation or peeling finish is likely okay, but be wary of large gaps or thick bubbling of paint. Besides the dropouts, check around the bottom bracket shell and just below the headset.
A word of warning
Before we move onto assessing the bike as a whole, bear in mind that even the most fastidious eye won’t be able to pick up invisible damage below the surface of a carbon frame.
If you are in any doubt – or if you have crashed a bike yourself – consider whether sending it to a carbon repair specialist could be a good idea. They will use ultrasound and other methods for assessing the frame that no local bike shop is likely to have access to.
If there is damage on the bike and you absolutely have your heart set on it, call around to get quotes for repair – it may well be more affordable than you think and is better than potentially consigning the bike to the bin.
6. Contact points

Contact points are a potential minefield from a safety standpoint. With carbon bars or seatposts, check for the same signs of stress as in step two.
It’s hard to put a recommended lifespan on either alloy or carbon finishing kit, but check for corrosion, particularly around where the shifters clamp onto the bars. Peel back the hoods to check.
Also check around the clamping area for any deep gouges, marks or crush injuries.
CBR says that on carbon bars it is not unusual to see "a depression in the clamp area of the bar when removed". This is caused at the manufacturing stage "when the bars are fitted before they are fully cured".
To check whether this is damage, CBR suggests "stressing the bar and looking for movement as carbon does not stay deformed without fracturing or heat damage – there are no exceptions".

To be doubly certain, remove the faceplate from the stem and look for heavily worn spots or grooves, identifiable by worn anodising and exposed raw aluminium or, on carbon bars, deep scratches.
Also look for signs of crash damage, such as scrapes on the brake levers, bar ends, saddle edges and rear derailleur.
Check also for wear or damage to a carbon seatpost and that the head is in good condition – a saddle pack can cause a surprising amount of wear. Consider replacement and its cost if you’re in doubt.
7. The wheels

Important for the overall performance of the bike, and crucial for controlling costs, the wheels and tyres need to be true and in good shape.
Check for oxidation and cracks at spoke holes on the rim and hub, and the spoke nipples. Also, ensure worn pads haven’t been allowed to score the braking surfaces on rim brake bikes and that the braking surface isn’t concave due to wear.
Look out for signs of damage to carbon rims like deep scratches, nicks or cracks in the lacquered outer surface.
CBR suggests that if you see "any blistering on carbon wheels" you should walk away from the deal immediately. A wheel failure is not something you wish to take a chance with.
Give the wheels a spin and eyeball the gap between the rim brake pads. A slight out of true of about 1mm or so is okay if it’s gradual and occurs evenly. If it’s intermittent or occurs at a different spot on each revolution then this is a sign of bearing wear, which usually means at least a hub service, and often a new wheel. Equally, a rumbling sensation felt in the fork leg or tip is a sure sign of dry or worn bearings.
Spin the wheels slowly and look for wear to the tyres. You may need to budget to replace them if the tread is wearing thin. Uneven wear with flat spots or the casing showing through the tread might be due to uneven brake action or poor wheel alignment.
If the bike has rim brakes, check the pads for wear. They’re cheap to replace, but a very worn pad can cause the metal brake shoe to rub against the rim or tyre, leading to damage and a possible – and extremely serious – failure.
If the bike has disc brakes, check that the rotors spin freely, are centred between the pads and aren’t worn excessively. Check the pads in the calipers are at least 3mm thick and don’t need replacing. Make sure all the bolts on the rotors and calipers are present and tight.
Also check that the brake hoses on hydraulic brakes are in good condition. Hold the brakes on hard and make sure that they stay engaged and that there’s no tendency for the levers to edge towards the bars. Make sure they don’t feel spongy. Both may indicate air in the system and could mean you need to bleed or replace the hoses or other components.
8. Drivetrain

Now use your handy chain checker to detect any chain wear.
If you don’t have a tool to hand, simply lift the chain away from the large chainring. It shouldn’t lift past about two-thirds of the way above the ‘valley’ between the teeth, or you’ll need to replace it. Also, the tooth profile should be even on both sides and the forward edge not hooked.
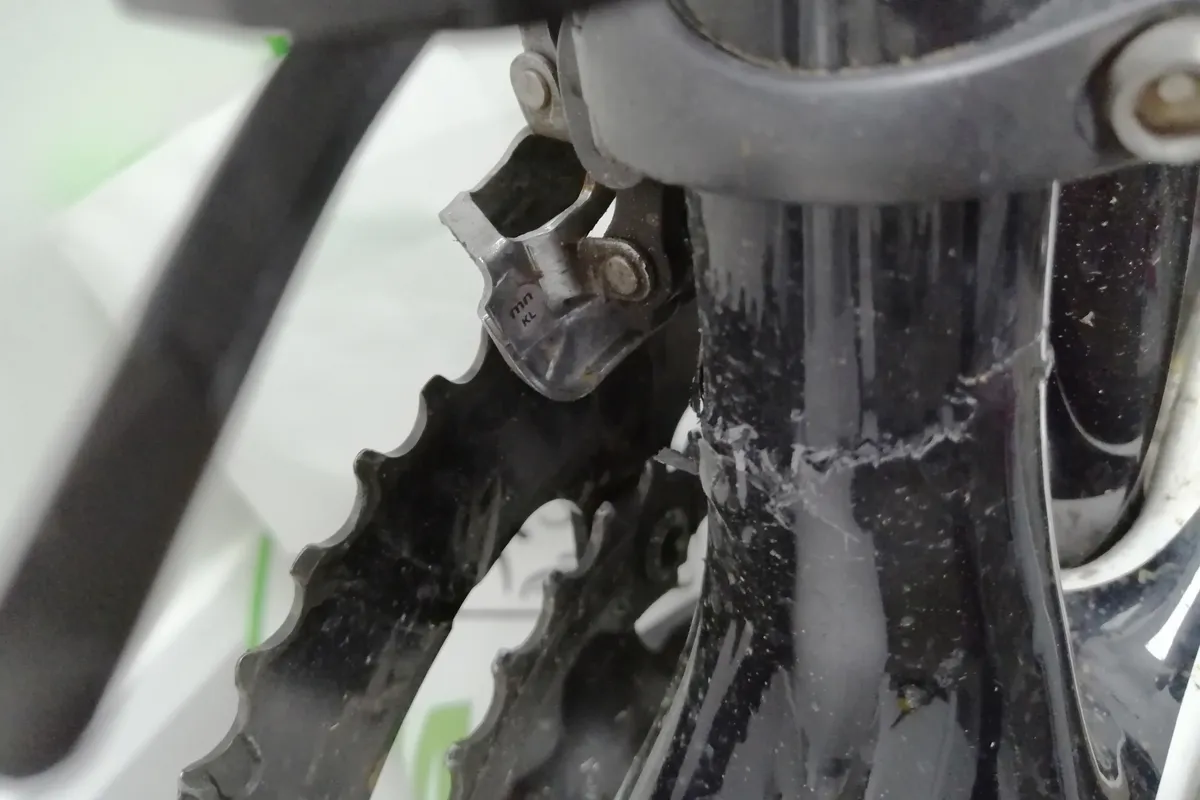
Cranks have a way of breaking at the worst possible time, so check the inside of the crank arms at the point where the specs (arm length, brand and so on) are etched or engraved, since these can lead to cracks. Inspect the pedal thread size engraved near the pedal threads and for gouges caused by a lack of pedal washers as well.
Also check for play in the bottom bracket bearings by trying to wiggle the chainset arms in and out. Check for corroded bearings too by turning the cranks and feeling for resistance.
If a bottom bracket has been left to run loose within the shell, this can damage threads or press-fit interfaces. Avoid if you can see the bottom bracket moving within the frame.
9. Cabling and controls

If the bike has external cables, inspect closely to ensure they are not splitting or fraying. Check where the cables could have been rubbing against the frame and make sure any marks are no more than superficial.
With derailleurs and rim brakes, check for pivot and joint wear or sloppiness in the bushings. Make sure that the rear derailleur jockey wheels are in good shape and not gunged up – a dirty bike should always be a warning sign as you don’t know what could be hiding beneath.
Grab the rear mech by the lower end of the cage and move it in and out towards the wheel. It shouldn’t feel too baggy, with the combined play in the top and middle pivot along with the parallelogram bushings adding no more than about 2 or 3mm of deflection, (not to be confused with flex in the material).
Lift the bike, spin the cranks and make sure that you can shift smoothly through all the gears. Poor shifting might be a sign of worn cables or lack of lubrication – or just need adjustment of the indexing and stops.
10. Test ride
Before your test ride, grab the bars and twist firmly. No cracking or creaking noises should be heard and it should feel firm(ish), offering resistance to twisting.
Then lock down quick-releases or check thru-axles and find a safe, car-free area. Try riding with your hands off the bars to see if the bike tracks straight.
Stand on the pedals and put a bit of muscle into it while swinging the bike left to right – there should be no cracking or crunching noises.
Test the brakes and try to lock the rear wheel just a bit. Now get a bit of speed going and see if there’s a wobble, caused by a damaged tyre or out of true wheel.
If you’ve decided it rides well, make an offer well below the asking price and let the haggling begin!
Thanks to Rob Granville of Carbon Bike Repair for supplying images and his assistance updating this article.