A bike’s geometry is perhaps the most important aspect of its design.
Below, we define the important measurements that dictate the shape, fit and handling of a mountain bike, and explain how they affect the ride.sag
We’ll start with the basics, including their less obvious aspects, before discussing some rarely mentioned but equally important geometry topics. At the end, we'll dive deep into how the often-misunderstood concept of trail affects handling.
Seat tube length
Definition: The distance from the centre of the bottom bracket to the top of the seat tube.
The seat tube length defines the size of the bike in a more meaningful way than the 'Small, Medium or Large' size structure. This is because it dictates the minimum and maximum height the saddle can be set, and therefore the height range of riders who can comfortably ride the bike, or how low they can drop the saddle for descending.
Two Medium frames, for example, will often have different seat tube lengths that will fit different riders. While the seat tube length doesn't directly affect the handling of the bike, important measurements for handling and fit, such as reach, must be compared to the seat tube length to define how long the bike is relative to the height of the rider.
The ratio of reach to seat tube length is particularly useful – some modern bikes have a longer reach than seat tube measurement.
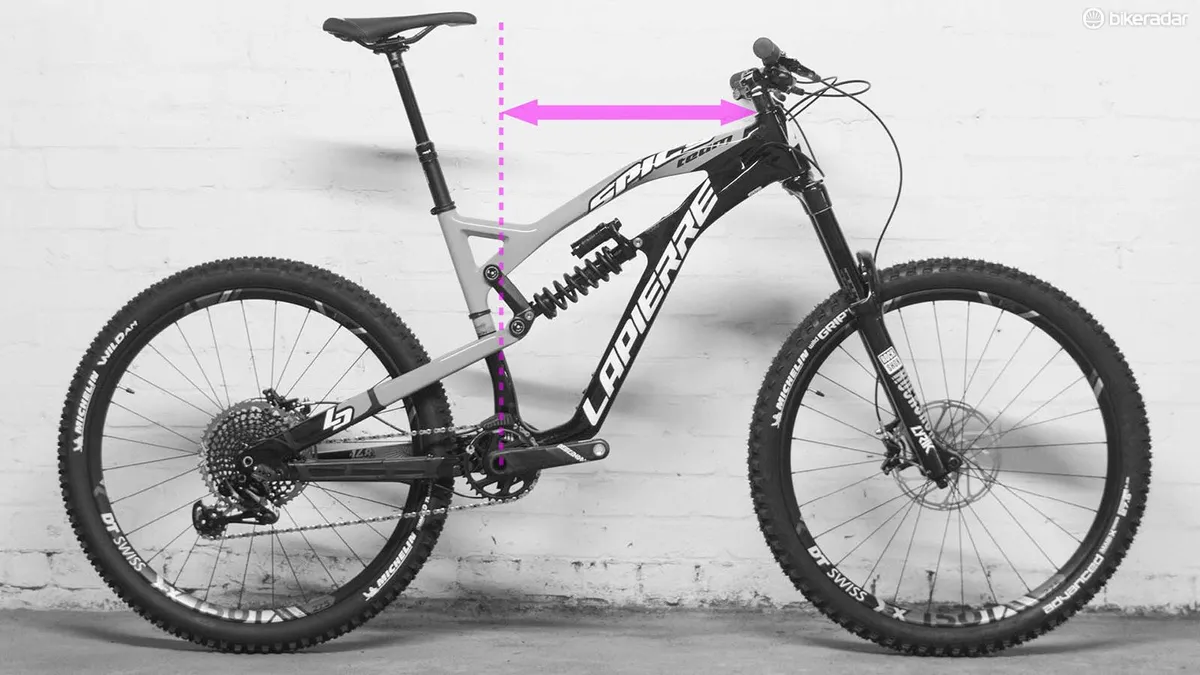
Effective top tube length
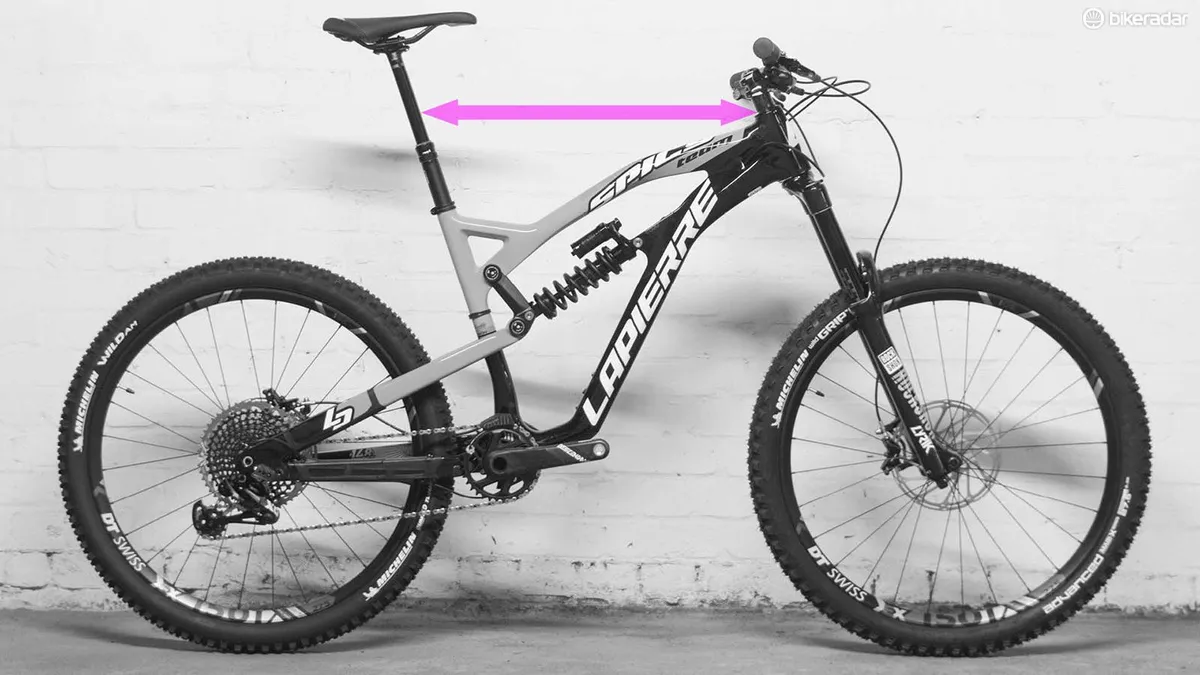
Definition: The length of a horizontal line drawn from the top of the head tube until it meets the centre of the seatpost.
The effective top tube (ETT) provides a better idea of how roomy a bike will feel when you're sitting in the saddle, rather than using the basic top-tube measurement (from the top of the head tube to the top of the seat tube).
Taken together with the stem length and offset of the saddle, it provides a good approximation of how stretched out the bike will feel to ride in the saddle.
Stack height
Definition: The vertical distance from the centre of the bottom bracket to the centre-top of the head tube.
This determines how low the bars can sit relative to the bottom bracket. In other words, it determines the minimum bar height, with no spacers under the stem. Stack also has an important but rather unintuitive relationship with reach…
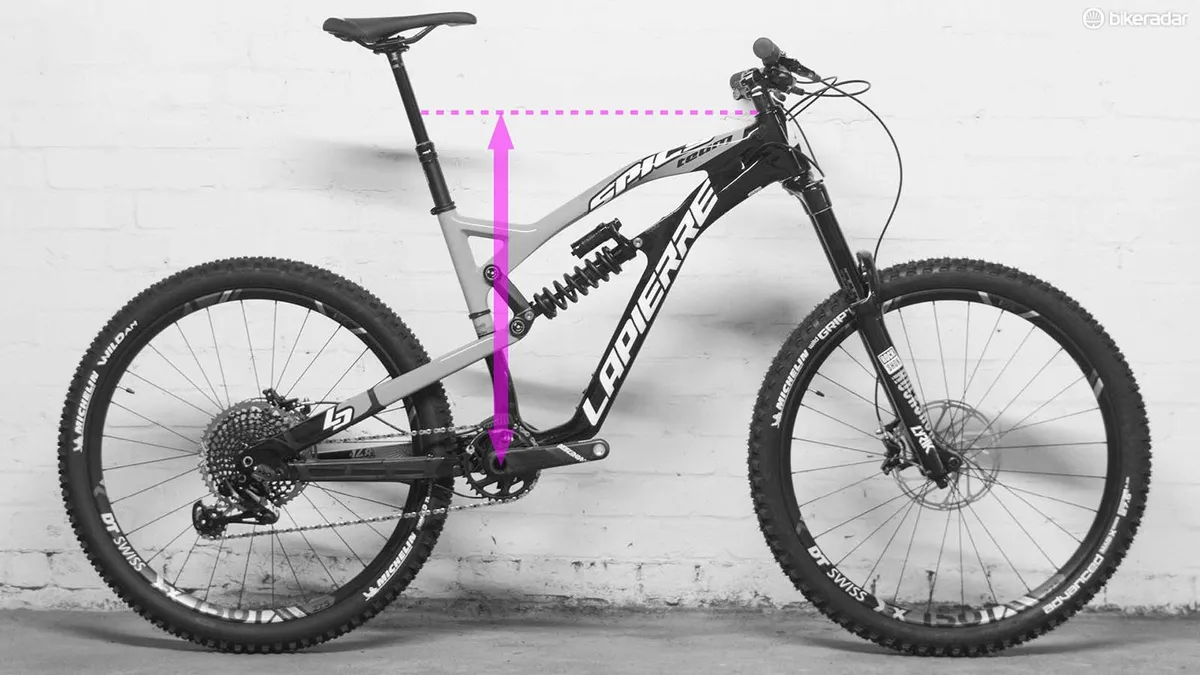
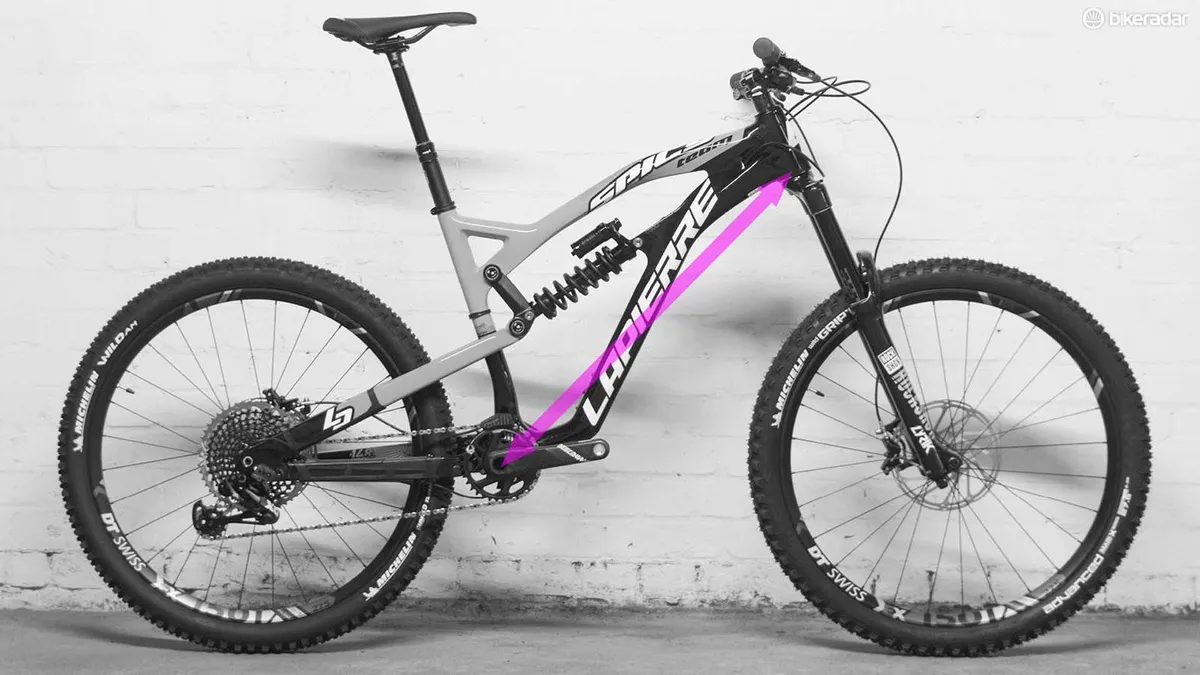
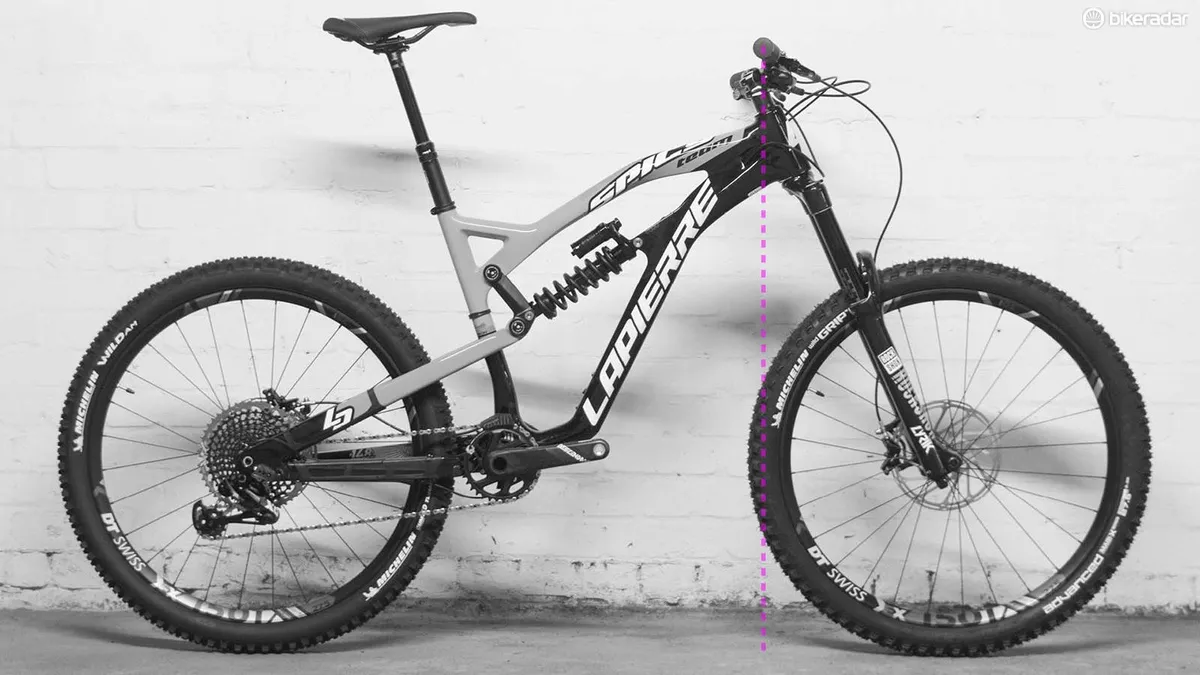
Reach
Definition: The horizontal distance from the bottom bracket to the centre of the top of the head tube.
Of all the commonly available numbers in a bike’s geometry chart, reach provides the best impression of how a bike will fit. Along with the stem length, it defines how roomy the bike will feel when ridden out of the saddle, and alongside the effective seat angle, it determines how roomy the bike will feel when in the saddle too. There is one small caveat to that though, and it’s to do with the stack height.
Take two identical bikes, then make the head tube of one bike taller, so it has a higher stack height. Now if you measured the reach of those two bikes, the one with the extended head tube would measure shorter. That’s because the head angle is not vertical – so, the longer the head tube, the further back the top of it becomes, and so the shorter the reach measurement. But if you used headset spacers on the original bike, such that the bar height was the same, both bikes would feel identical to ride.
This demonstrates how reach measurements are affected by stack height. When comparing reach between bikes remember the one with the higher stack height will feel longer than its reach figure would suggest.
The easiest way to measure reach is to butt the front wheel against a wall, then measure the distance from the wall to the bottom bracket and to the top of the head tube, then subtract.
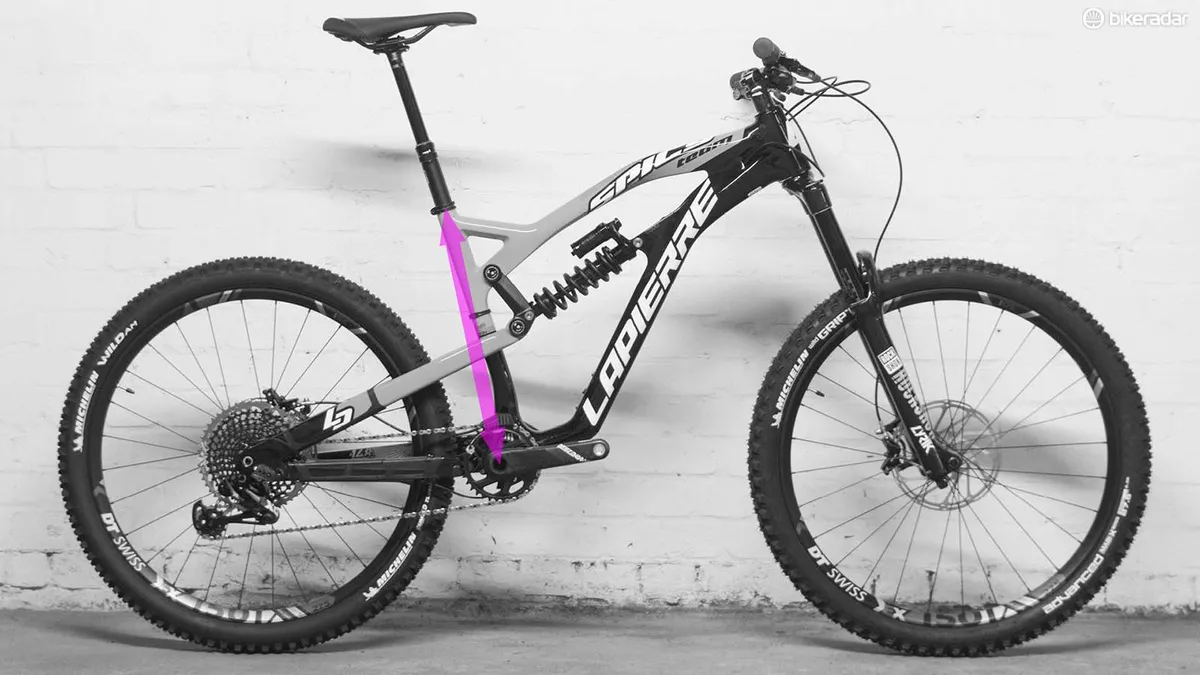
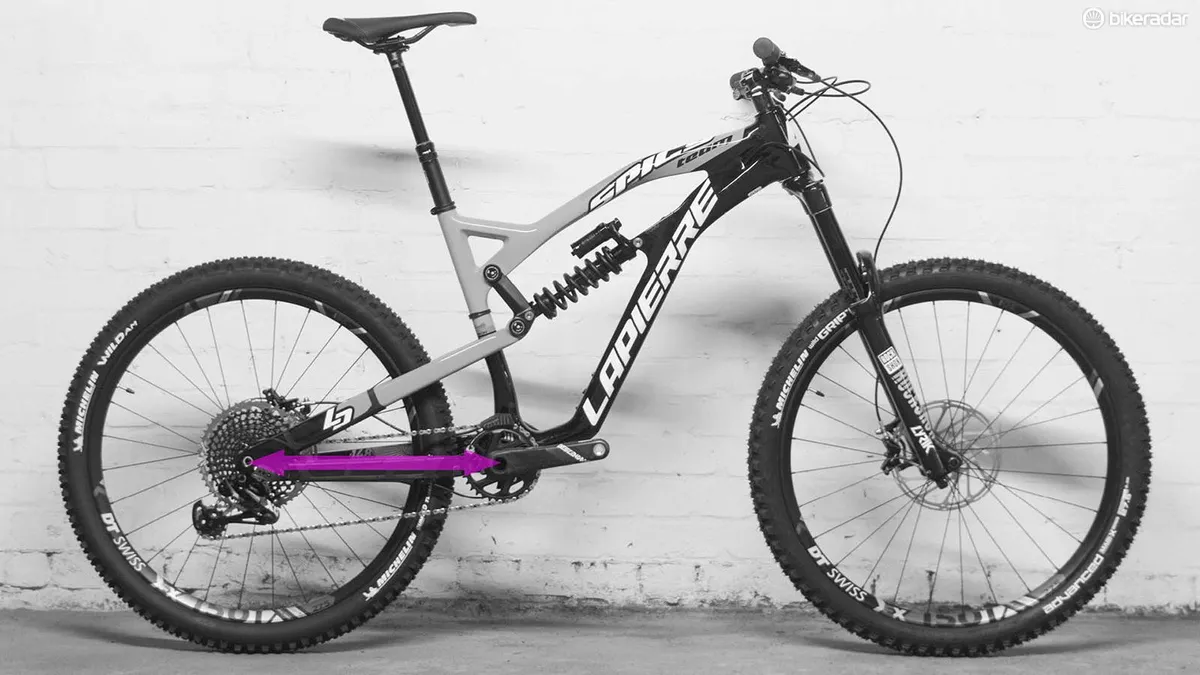
Down tube length
Definition: The distance from the centre of the bottom bracket to the centre of the bottom of the head tube.
Like reach, down-tube length provides an indication of how roomy the bike will feel, but it too is complicated by other factors.
In much the same way as reach is affected by stack height (the difference in height between the bottom bracket and the top of the head tube), down-tube length is affected by the difference in height between the bottom bracket and the bottom of the head tube.
This means down-tube length is only useful when comparing bikes with a similar wheel size and fork length – such that the bottom of the head tube is at roughly the same height. In this case, down-tube length can be a more useful (and measurable) number than reach.
Front-centre

Definition: The distance from the centre of the bottom bracket to the front axle.
The longer the front-centre, the less prone the bike will be to pitching forwards when faced with large bumps or hard braking. This is because the rider’s weight will naturally sit further behind the front contact patch. This is why enduro and downhill bikes, meant for rough and steep terrain, have long front-centres.
For a given rear-centre length, a longer front-centre reduces the proportion of the rider’s weight supported by the front wheel. This can reduce front-wheel traction unless the rider moves their riding position forwards, or the rear-centre is made longer too.
Rear-centre
Definition: The horizontal distance from the centre of the bottom bracket to the rear axle (aka chainstay length).
Because the front-centre is usually significantly longer than the rear-centre, mountain bikes tend to have a naturally rearward weight distribution. This can be countered by the rider consciously putting pressure on the bar, but doing so can be fatiguing and takes practice.
The ratio of rear centre to the total wheelbase defines the front-to-rear weight distribution when all the rider's weight is on the pedals.
A typical mountain bike's rear-centre is about 35 per cent of its wheelbase, so the "natural" weight distribution is 35 per cent front to 65 per cent rear, before the rider puts some weight on the grips.
Having 50 per cent or more weight on the front wheel is usually ideal for cornering, so bikes with shorter rear-centre:wheelbase ratios require more pressure on the grips to achieve this.
On steep descents, the weight distribution becomes more forward-biased anyway, particularly when braking, so this is most relevant for flat corners.
Longer rear-centres therefore make it easier (less tiring) to achieve a more balanced weight distribution, which benefits front wheel traction in flat corners.
However, the longer the rear-centre, the more the rider’s weight must be lifted (with the bottom bracket) to lift the front wheel. A shorter rear-centre therefore reduces the effort to manual, but increases the effort required to properly weight the front wheel through the bar.
Wheelbase
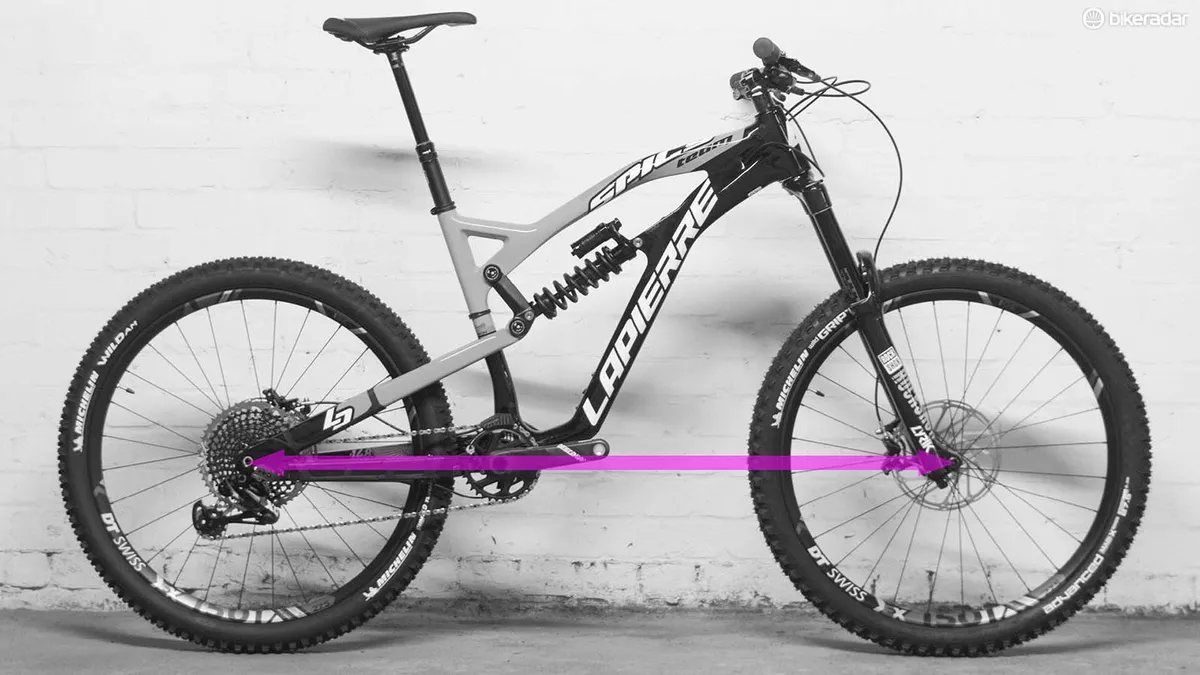
Definition: The horizontal distance between the front and rear axles or contact patches; the sum of the rear-centre plus the front-centre.
It’s difficult to define the effect of wheelbase on handling. Because the wheelbase is made up of the rear-centre and front-centre (the latter is, in turn, determined by the reach, head angle and fork offset), different combinations of these variables could produce the same wheelbase, but different handling characteristics.
Generally, though, the longer the wheelbase the less the distribution of the rider’s weight is affected by braking, gradient changes or bumpy terrain. In this sense, a longer wheelbase increases stability; there's a larger window between the rider's weight being too far forward (pitching over the bars) or too far back (looping out). This can be a bad thing because it takes more effort to manual or nose-pivot.
There is also a downside in tight corners. The longer the wheelbase, the greater the angle through which the bars need to be turned (known as the steering angle) for the bike to follow a corner of a given radius.
Also, the difference between the arcs taken by the front and rear wheels will be greater. This is why long-wheelbase vans are prone to clipping their rear tyres on the inside of corners. Of course, mountain bikes can be cornered differently to vans or even motorbikes – the back wheel can be hopped or skidded round tight corners if need be.
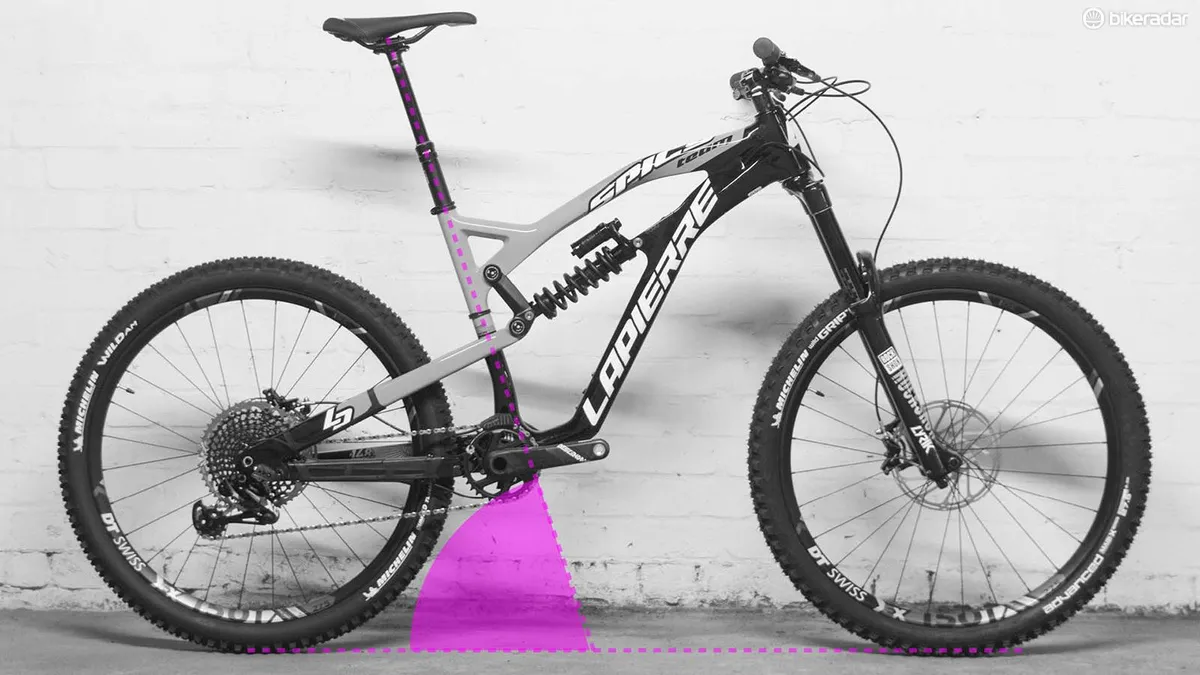
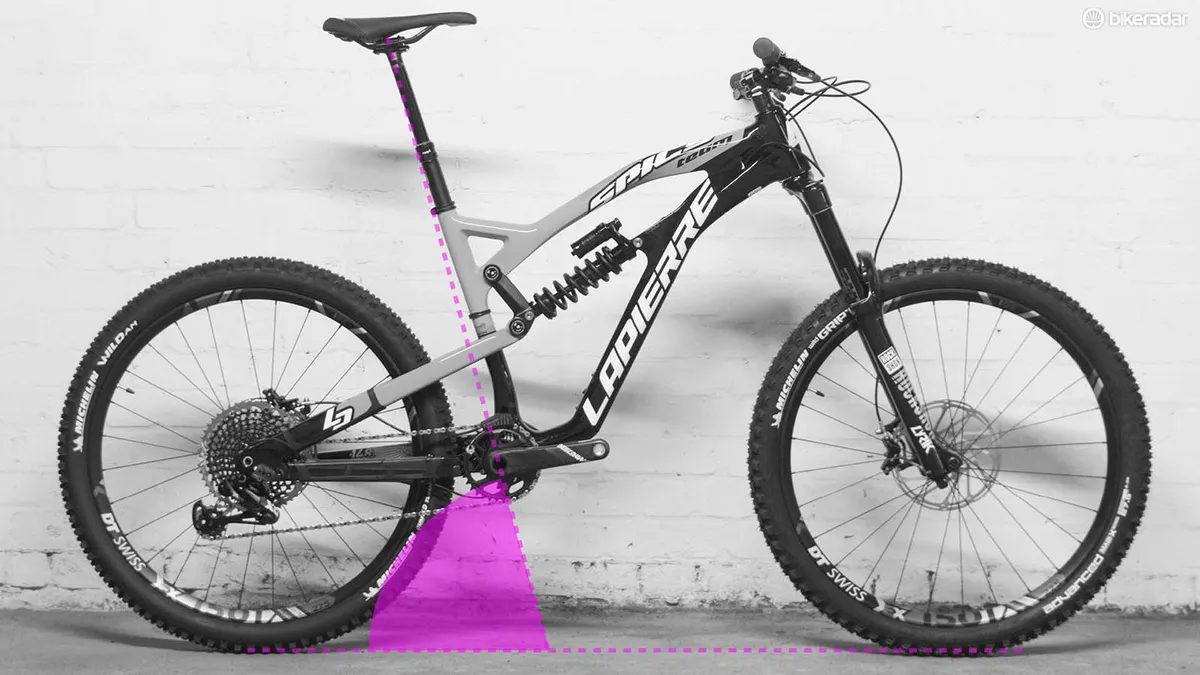
Bottom-bracket height

Definition: The vertical distance from the floor to the centre of the bottom bracket.
The higher the bottom-bracket height, the higher the centre of mass of the rider, and so the more the bike tends to pitch when faced with bumps, hard braking or steep gradients. In this sense, a lower bottom bracket improves stability in much the same way as a longer wheelbase.
Counterintuitively, a lower bottom bracket also makes the bike more agile when turning. When a bike leans into a corner, it pivots around the roll axis (the line connecting the two contact patches along the ground). By lowering the rider’s centre of mass so it's closer to the roll axis, the amount by which the rider’s mass drops as the bike leans into the turn is reduced, and the inertia of the rider when changing lean angles (when swapping from turning left to right, for example) is reduced.
The height of the centre of mass of the rider and bike above the roll axis is called the roll moment – the longer this distance, the slower the bike is to change the direction of lean.
As a result, bikes with lower bottom-bracket heights are generally easier to move in and out of turns.
Bottom-bracket height is affected by suspension sag and dynamic ride height, so longer-travel bikes need higher static bottom-bracket heights to compensate for the increased suspension travel. See the sections on sagged and dynamic geometry below.
The disadvantage of a low bottom bracket is obvious; it increases the chances of catching pedals or chainrings on the ground.
It's also worth remembering that the centre of mass of the bike and rider is typically well over a metre above the ground, so lowering the BB by a centimetre (an amount which will noticeably increase pedal-strikes) makes a small percentage difference.
Bottom-bracket drop

Definition: The vertical distance from the line connecting the wheel-axles to the centre of the bottom bracket.
The bottom-bracket drop itself is less important than some people have supposed. The distance by which the bottom bracket hangs below the wheel axles is seen by some to directly determine the stability of the bike in turns, as if the bike’s roll-axis (the line about which it turns when leaning into a corner) was at the height of the axles.
This argument was used in the marketing of 29in wheels, claiming that because the bottom bracket sat slightly below (not above) the axles, the bike was far more stable.
In fact, the roll axis is – roughly speaking – the line connecting the tyre contact patches. The important measurement for cornering is the height of the centre of mass above this line, and not the height of the bottom bracket relative to the axles.
Fitting smaller wheels reduces the bottom-bracket height but doesn’t affect the bottom-bracket drop. This makes a bike significantly quicker to change direction of lean because the centre of mass of the bike and rider is lower.
Interestingly, some bikes (such as Pivot’s Switchblade) feature height-adjustable 'chips', which compensate for different wheel sizes. Using these, the bottom-bracket height remains similar with the smaller wheel size, but the bottom-bracket drop changes.
This results in a much smaller change in the bike’s handling, suggesting bottom-bracket height is important, not bottom-bracket drop.
Bottom-bracket drop is still a useful measurement, though. Bottom-bracket height is affected by not only wheel size but also tyre choice – comparing bottom-bracket drop between bikes of a given wheel size removes this variable.
Head angle

Definition: The angle (measured from horizontal) of the steerer tube of the fork.
Head angles affect bike handling in a few key ways.
First, the head angle affects the distance by which the front axle sits in front of the rider’s hands. All things being equal, a slacker head angle increases the front-centre, making the bike less prone to pitching forwards on steep descents, but reducing the proportion of the rider’s weight pressing on the front contact patch. Therefore, the rider may need to put more pressure on the bar to avoid understeer in flat turns with a slacker head angle.
Second, slacker head angles result in more trail. (See the section on trail below – this is also affected by fork offset and wheel size.) More trail means a slower, but calmer, steering response. This is why slack bikes tend to have heavier but less twitchy steering.
Third, the head angle also affects the steering response directly. Imagine a 90-degree head angle; if you turn the bars 10 degrees from straight ahead, the contact patch will turn by 10 degrees about the vertical axis relative to the ground, and the bike will steer in that direction. Now imagine a 0-degree head angle, so the steering axis is horizontal; now when you turn the bars the contact patch won't turn at all about that vertical axis relative to the ground, so the bike will go straight ahead.
So, the slacker the head angle, the less the bike steers for a given steering angle at the handlebar. With a 63-degree head angle, turning the bars by 10 degrees will steer the contact patch by 8.9 degrees about the vertical axis; with a 70-degree head angle, the contact patch will steer by 9.4 degrees. In other words, the steeper the head angle, the faster the steering response.
Fourth, telescopic suspension forks operate parallel to the head angle, so the head angle also defines the axle path of the front suspension. The slacker the head angle, the more the axle moves backwards, and the less it moves upwards for a given fork travel.
This is why slacker bikes are less good at dealing with flat landings (because the suspension is stiffer in the vertical direction) and why many bikes have longer fork travel than rear travel. A 170mm fork at a 64-degree head angle will provide 153mm of vertical travel and 67mm of rearwards travel.
Actual seat angle
Definition: The angle (measured from horizontal) of the seatpost.
The actual seat angle alone tells you very little about how a bike will ride. For that, look at the effective seat angle (see below) and ignore the actual seat angle.
The shape or offset of the seat tube will affect the position of the rider as much as the actual seat angle. The effective seat angle takes both factors into account.
Effective seat angle
Definition: The angle of the line connecting the bottom bracket to the centre-top of the seatpost when set at pedalling height.
Unlike the actual seat angle, the effective seat angle (ESA) gives a true indication of the seated position of the rider’s hips relative to the pedals. Note that moving the saddle fore and aft on its rails does allow the ESA to be adjusted by around 3 degrees.
For bikes with a straight seat-tube, the ESA is the same as the actual seat angle. But for those with a kinked or offset seat tube (this applies to most full suspension bikes), the ESA is steeper than the actual seat angle.
This means the ESA becomes slacker the higher the seatpost is set, so taller riders will usually experience a slacker effective seat angle than shorter riders.
On static bikes (like you’d get in a bike-fit or a spin class) most people find an ESA of around 72 to 73 degrees provides the most comfortable, ergonomic and powerful position. This varies depending on an individual’s flexibility and physiology.
However, many mountain bikes are designed to compensate for uphill gradients, as well as suspension sag.
Climbing a 10 per cent gradient effectively slackens the angles by around 6 degrees. For full suspension bikes, the rear suspension sags far more than the front suspension when in the saddle, especially when going uphill. For a typical 150mm travel bike, this could slacken the ESA by a further 3 degrees or so.

Along with the rear-centre, the ESA also determines where the rider’s mass is positioned between the front and rear axles. As a climb gets steeper, there comes a point where the rider’s centre of mass is directly above the rear contact patch. At this point the front wheel will lift, unless the rider deliberately moves their weight forwards, usually by dropping the shoulders and sitting towards the nose of the saddle.
The longer the rear-centre and the steeper the ESA, the steeper the gradient that can be ridden before this issue arises.
The ESA and the rear-centre also determine the horizontal distance between the rear axle and the rider’s weight. The further in front of the rear axle the rider sits, the less they are affected by bumps from the rear wheel. This is because when the rear wheel hits a bump, the chassis of the bike pivots around the front axle.
Therefore, the closer the saddle is to that pivot point, the less it will move up and down for a given movement at the rear axle, and so the more comfortable the ride.
For these reasons, it’s becoming more common for full-suspension bikes to have an ESA considerably steeper than 72 to 73 degrees.
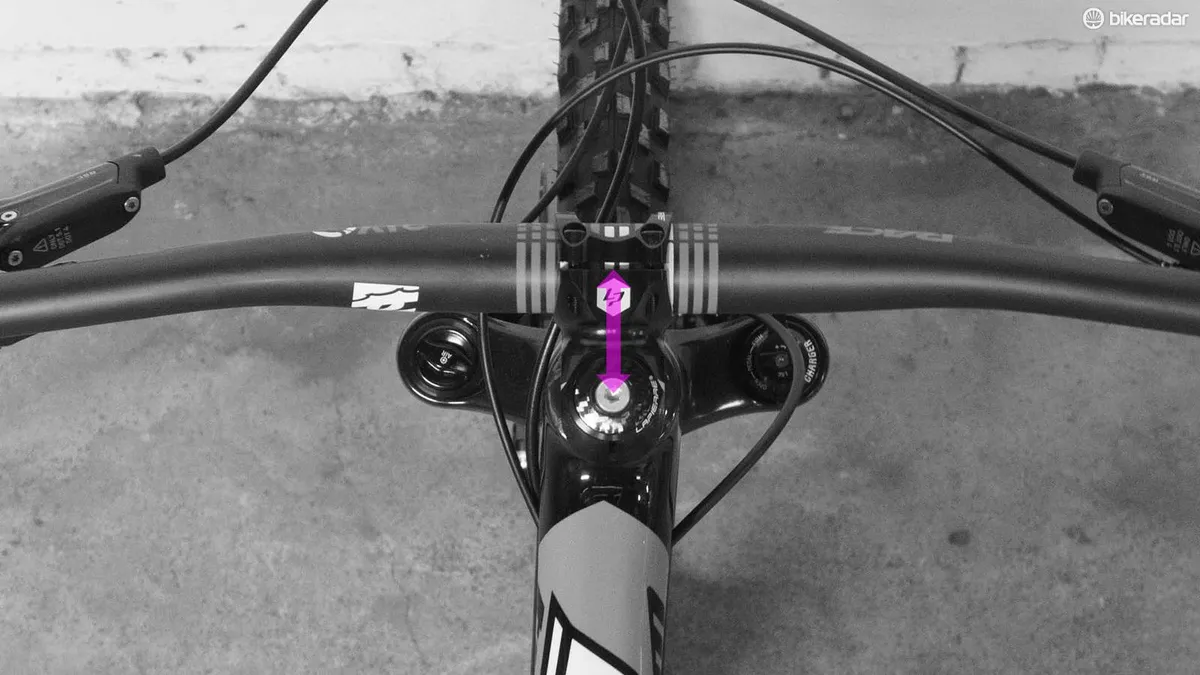
Bar height
Definition: The vertical distance from the floor to the grips.
This is arguably the most underrated aspect of bike handling. Handlebar height can be easily adjusted by switching spacers from above and below the stem, or if necessary, by swapping between handlebars with a different rise.
Raising the bars enables the rider to move their weight back more easily. This may reduce arm fatigue, make it easier to manual and can improve confidence on steep terrain.
On the other hand, a lower bar height encourages a more aggressive stance, which can help to weight the front wheel in flat turns, quickening changes of direction.
Bar height also dictates how bent the rider’s elbows will be in the attack position, and this determines how far the rider can push the front wheel into holes or absorb impacts.
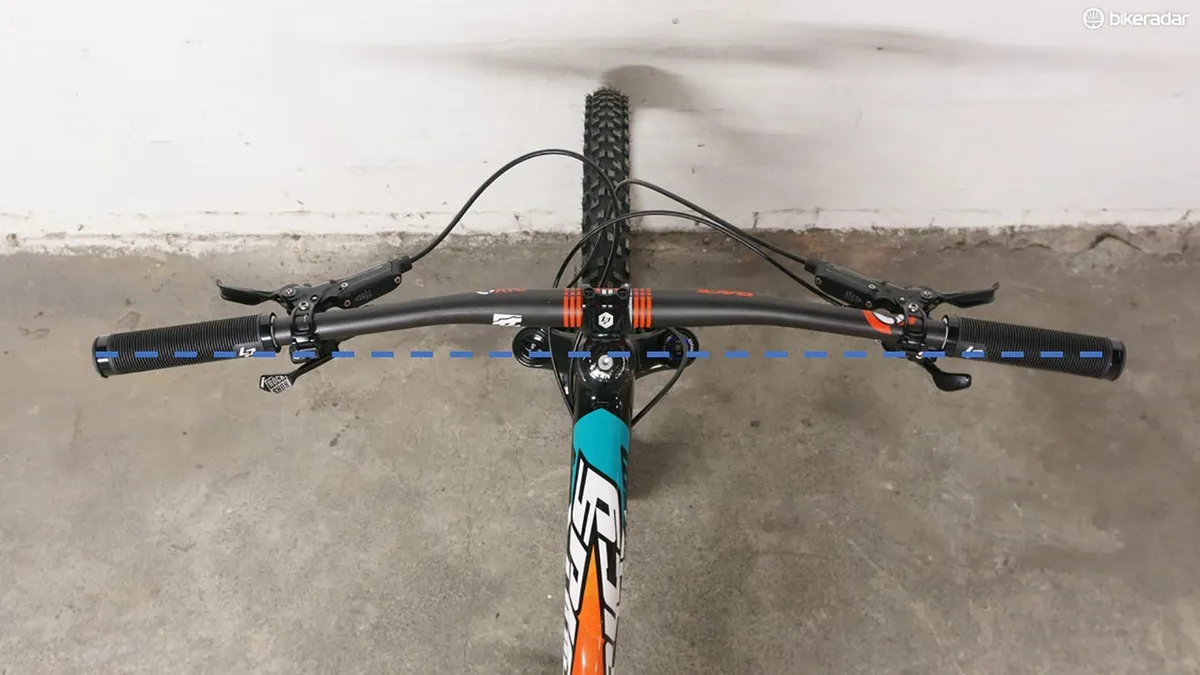
Stem length
Definition: The distance from the centre of the bar clamp to the centre of the steerer tube.
The longer the stem, the roomier the cockpit will feel for a given bike. It may also make it easier to weight the front wheel through the hands on flat terrain by forcing the rider’s weight forwards and decreasing the horizontal distance between the rider’s hands and the front axle.
Shorter stems move the rider’s weight further behind the front contact patch, helping to tackle steep and rough terrain without pitching forward, while reducing the effort required to manual.
However, the shape of the bar is important too. A handlebar with more backsweep has a similar effect to shortening the stem because it puts the rider’s hands further back.
The grips can sit as much as 30mm behind the stem’s bar clamp. This varies greatly between handlebars and is also affected by the roll-position of the bar in the stem.
Fork offset
Definition: The distance between the front axle and the fork’s steering axis (the line running through the centre of the head tube), about which the fork rotates when steering.
Fork offset is made up by the forwards sweep of the fork crown and the placement of the axle in front of the lower legs.
Fork manufacturers now offer some forks with multiple fork offset options. RockShox produces 37mm and 44mm offsets in 650b, and 42mm or 51mm in 29in forks. Fox forks have similar numbers.
Fork offset affects the trail (see below). Longer offset results in less trail, which makes for a lighter but twitchier steering feel. Conversely, shorter offset forks increase the trail, which makes for more stable, heavier steering especially in steep corners or bumpy sections.
The fork offset also affects the front-centre (shorter offset means a shorter bike), as well as the distance between the rider’s hands and the front axle. For this reason, increasing the fork offset can feel a bit like a shortening the stem, in that the front wheel is further in front of the hands.
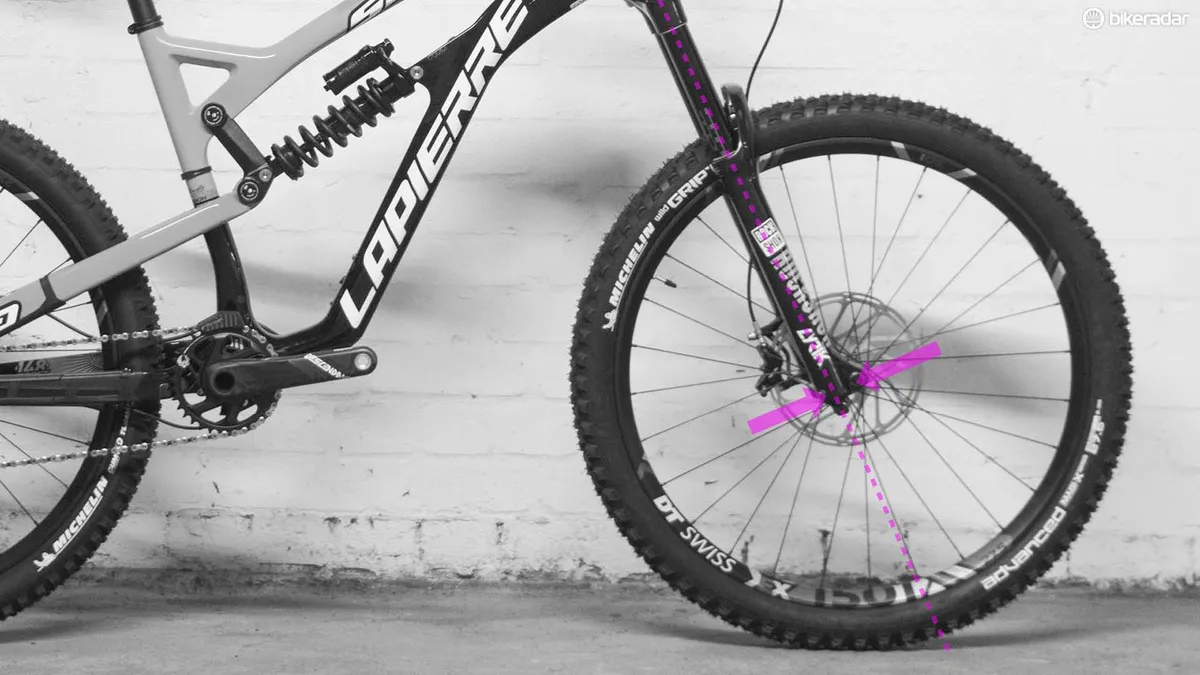
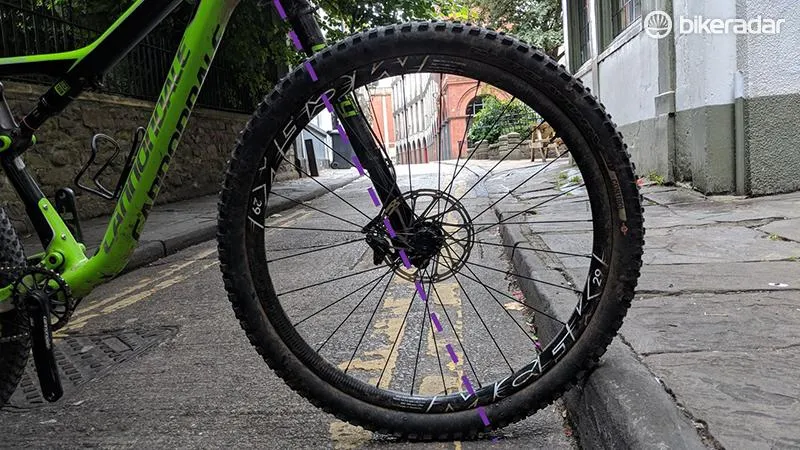
Ground trail
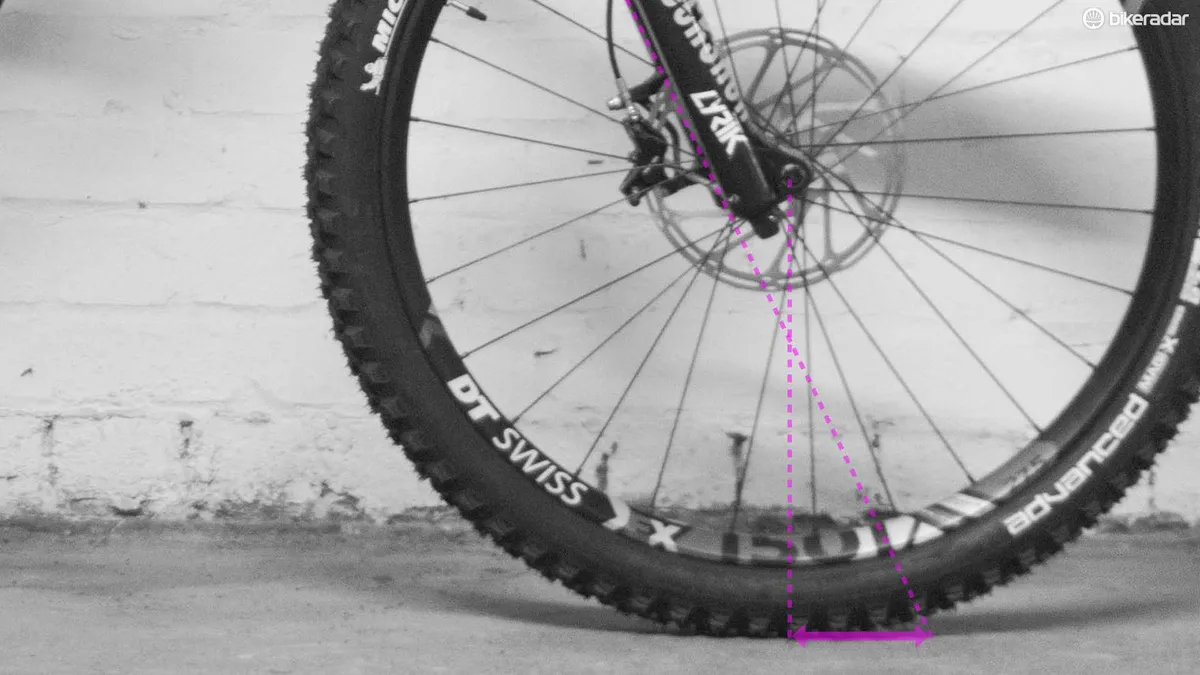
Definition: The horizontal distance between the front tyre’s contact patch and the point at which the steering axis meets the ground.
Ground trail gives an indication of how stable a bike’s steering will be. It’s technically less accurate than mechanical trail (see below), but it’s easier to visualise and it’s the measurement you’re most likely to find in a bike’s geometry chart, listed as 'trail'.
It’s affected by three factors: wheel size, head angle and fork offset. The slacker the head angle, the shorter the offset or the bigger the wheel size, the more trail.
Generally speaking, the more trail, the more stable the steering. This is because there is a restoring force when the steering is turned away from straight ahead, which acts to self-centre the steering to straight ahead. This force is related to the ground trail, but as I'll explain, mechanical trail is a better measure of this.
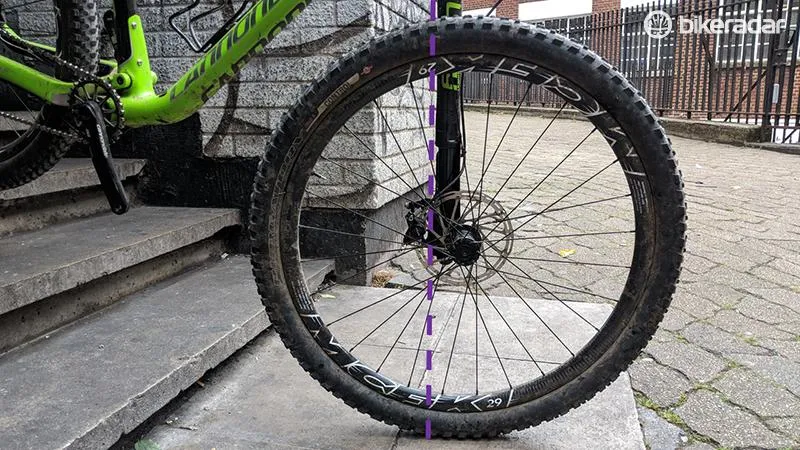
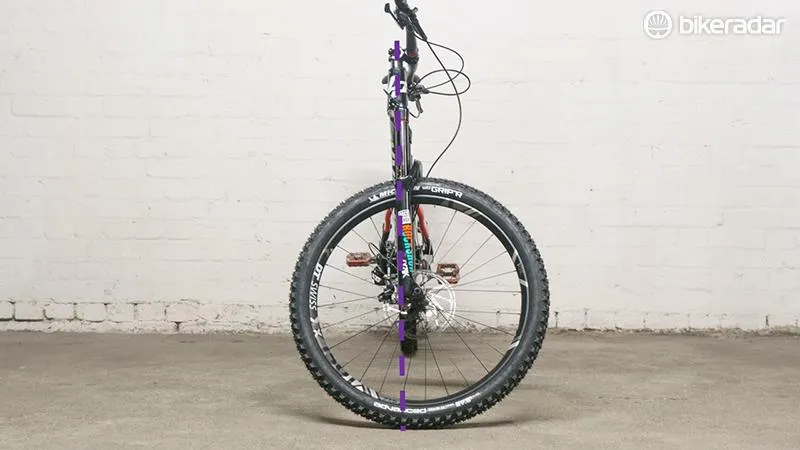
Mechanical trail
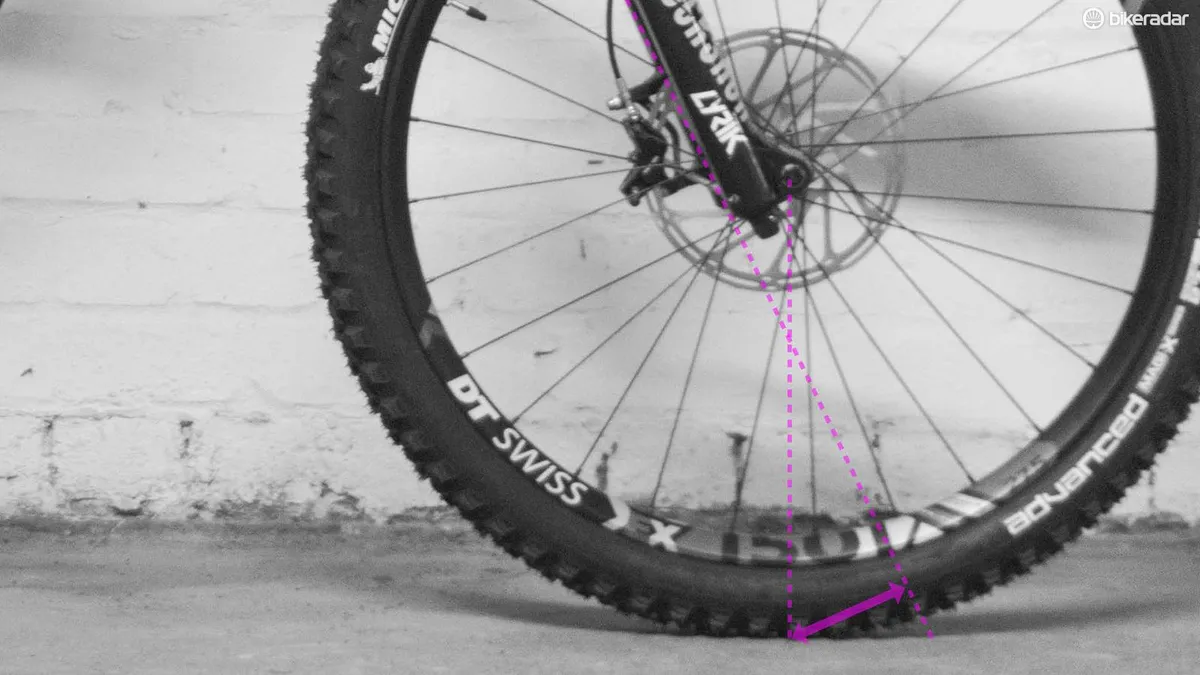
Definition: The distance between the front contact patch and the steering axis when measured at 90 degrees to the steering axis.
Also known as 'real trail', mechanical trail is closely tied to ground trail in that an increase in one will lead to an increase in the other.
Ground trail is a good analogue of mechanical trail, but mechanical trail is a more relevant measurement because it relates directly to the self-centring effect or caster effect.

The caster effect in a bike is like that in a caster wheel – as you would find on a shopping cart or office chair. The caster wheel is mounted on a link that swivels on a vertical axis relative to the cart, such that the contact patch trails behind the axis about which the link rotates. Because of this, the wheel self-aligns with the direction of travel.
If it steps out to the side, there is a restoring force on the contact patch that pushes it back into line behind the steering axis of the link. The greater the angle between the direction of travel and the wheel (known as the slip angle), the greater the restoring force that acts to reduce this angle. This self-steering effect applies to bicycle steering too.
A bicycle front wheel is similar in that the contact patch trails behind the steering axis. If the wheel is out of line, a restoring force acts to keep it in line with the direction of travel.
The mechanical trail is just like the link connected to the caster wheel. You can think of it as a 'virtual lever' that connects the contact patch to the steering axis. The longer this lever, the less the steering angle will be affected when the wheel is knocked off line by a given lateral distance (by a rock, for example).
Or, if the steering assembly is knocked off-line by a given angle, there will be a stronger restoring torque acting to straighten it out again, simply because the force at the contact patch acts through a longer lever.
For this reason, a higher mechanical trail figure implies the steering tends to stay straighter in rough terrain. But by the same token, more steering torque needs to be applied to the handlebar to initiate a turn because the contact patch needs to be moved relative to the frame via a longer (virtual) lever.
So, in other words, longer mechanical trail implies more stable but heavier steering.
The main reason for designing bikes with longer mechanical trail, however, is to reduce the chances of the trail becoming negative when hitting a bump, a change in gradient or a tight turn. Negative trail sends the caster effect into reverse, making the steering unstable and hard to handle. More on this later.
Mechanical trail is also one of the commonly cited prerequisites for a bicycle to be stable enough to ride no-handed. When a bike is leaned over to the right, the weight of the bike and rider acts downwards through the steering axis which is now tilted to one side; the steering axis being in front of the contact patch, this causes the steering assembly to turn to the right.
Alongside the gyroscopic force on the front wheel, this is one reason why a hands-free bike is able to steer into the direction of lean, thereby correcting the lean and remaining upright.
On the other hand, recent research has proven that it is possible to build a self-stable bike with negative trail, and with neutralised gyroscopic forces, but I wouldn’t recommend building a bike like that!
Wheel flop

Definition: The tendency for the steering assembly to automatically steer into a turn, because the head tube drops as the handlebar is turned away from straight ahead.
Flop is a little-discussed but important aspect of steering geometry. And, like the caster effect discussed earlier, flop is determined by the mechanical trail. But while the caster effect relates to the horizontal component of the mechanical trail, flop is to do with the vertical component.
When you turn the bars without the bike leaning over, the head tube will drop slightly. This is because the steering axis is on a slope (the head angle), so the bike tips downwards as the steering axis rotates about the stationary contact patch. The mechanical trail is the lever about which this arc takes place.
Imagine a head angle of zero degrees, such that the fork was horizontal. Now it's easier to picture that as you turn the handlebars, the head tube will move in a downwards arc as the steering angle is increased.
For normal head angles, the amount by which the head tube drops is proportional to the vertical component of the mechanical trail, which depends on the mechanical trail length and the head angle.*
Flop is the result of a torque on the handlebars acting to increase the steering angle (away from straight ahead), due to the weight of the bike and rider trying to achieve the lowest position.
This is aided by the fact that the bulk of the steering assembly – the handlebars, wheel and fork lowers – is placed in front of the steering axis, and so their weight creates a torque about the steering axis, which also acts to turn the assembly away from straight ahead. This contributes to flop but is a smaller factor than the weight of the rider.
Flop is a destabilising force (it acts to increase any steering angle, pulling the steering further away from straight ahead), while the caster force is stabilising (it acts to pull the steering towards straight ahead). Increasing the mechanical trail, whether by slackening the head angle or shortening fork offset, increases both of these effects.
When riding at speed, the caster effect dominates, but at slow speeds and high steering angles, the flop force becomes important.
This is why slack bikes take more effort to keep the steering from flopping to the side in slow, tight turns – but at higher speeds, especially in rough terrain, the steering assembly remains more stable and straighter with a slack head angle or short offset.
*Shorter fork offset combined with a steeper head angle will result in less flop and more stable steering than the same amount of mechanical trail achieved with a longer fork offset and a slacker head angle. This is because the vertical component of the mechanical trail is less pronounced in the former configuration than the latter.
Sagged geometry
Definition: The shape of the bike when settled into its suspension travel under stationary rider weight.
So far, I've talked about geometry measured when the bike is unloaded. This is known as static geometry, and it’s what you’ll usually see in bike geometry tables. But when the rider mounts the bike, their weight will settle the suspension into the sagged position. This changes most of the above measurements.
In the case of hardtails, the fork compression steepens the head and seat angles, lowers the stack height, shortens the front-centre and lowers the bottom-bracket height slightly.
With full suspension bikes, the rear suspension will generally settle further into its travel than the fork. Therefore, the angles will slacken slightly, and the bottom-bracket height will drop significantly.
Depending on the axle path of the rear suspension, the rear-centre may also become longer at the sag position, but in most designs, the rear-centre will shorten again further into the travel. The front-centre will always shorten at sag, especially with slack head angles.
The amount of travel and therefore the amount of sag determines how much the geometry will change.
Dynamic geometry
Definition: Dynamic geometry refers to the average position of the suspension as the bike is ridden over a given section of terrain.
Because compression damping is typically much lighter than rebound damping, mountain bikes tend to sit deeper into their travel when riding through rough terrain, so the dynamic ride height is typically deeper into the travel than the sagged position.
Dynamic geometry relates to this average suspension position. Clearly, this is not something that is practical to measure without suspension telemetry, and it’s affected by many factors including rider position and line-choice.
Dynamic geometry is most useful as a qualitative (rather than quantitative) concept, for comparing different setups. For example, increasing compression damping in the fork will raise its dynamic ride height in rough terrain and so raise and slacken the bike’s dynamic geometry.
Part 2: Why does trail matter in the real world?
As discussed above, the weight of the rider creates a force, known as flop, which acts to turn the steering assembly away from the straight-ahead position. But when riding at speed, this force is small compared to the caster effect which acts to self-centre the steering assembly towards straight ahead. That’s why your handlebars (usually) don’t veer off to one side when you let go of them.
As long as your bike has some mechanical trail, the steering will remain stable, at least on smooth ground.
However, there are a few real-world conditions in which the caster effect is diminished or even reversed, resulting in unstable steering, which acts to exaggerate the steering angle away from straight ahead. This is usually referred to as the front wheel "tucking under", and it's not much fun.
First, when the front wheel hits a large enough bump, the contact patch moves in front of the steering axis. This results in negative trail, which causes the caster effect to go into reverse.
Like trying to push a shopping cart wheel ahead of the shopping cart, the wheel will try to exaggerate any steering angle, away from straight ahead, until the bump has passed behind the steering axis. This is one reason why bikes with low trail figures can suffer from jerky steering in bumpy terrain.
Second, a change of gradient causes the trail to change. Imagine going from a steep downhill slope to a flatter one – a situation that occurs regularly when mountain biking.
Here, the head angle becomes steeper relative to the ground under the front wheel. This effective steepening of the head angle reduces the trail. If the change of gradient is sufficient (typically around 20 degrees), the trail will become negative. Fork suspension compression will steepen the head angle further.
Third, as the steering angle is increased towards 90 degrees, there comes a point where the caster effect goes into reverse even on flat ground.
At low steering angles, the contact patch trails behind the steering axis, on the opposite side to the direction of steering. So, as the handlebars are turned left, the contact patch trails on the right, thus acting to turn the handlebars towards the straight-ahead position.
But when the steering is turned very far, say to the left, the contact patch crosses over to the left of the steering axis, due to the fork offset, which moves the whole wheel to the left. (This is difficult to visualise unless you picture a steering angle of 90 degrees. Here, the contact patch is directly to the left of the steering axis by a distance equal to the fork offset.)
Beyond this point, the caster effect will be reversed, acting to push the wheel even further from straight ahead.
You’ve probably experienced this when turning very tightly. Beyond a certain point the wheel 'tries' to steer even tighter and "tuck under" on its own accord. The shorter the bike’s trail figure, and the longer the fork offset, the lower the steering angle at which this effect starts to occur.
When negotiating tight, steep turns, these factors combine. A change of gradient and compressed fork steepens the head angle relative to the ground under the front wheel, reducing trail and often making it negative. When the handlebars are turned, the caster effect goes into reverse at much smaller steering angles.
This acts to pull the front wheel into the turn further than intended. Often, the rider can overcome this simply by holding the bars steady (hence the popularity of wide handlebars), but in some situations the torque on the steering assembly can be enough to make this difficult especially for unskilled riders.
Longer trail, particularly when achieved with shorter fork offset, makes this reverse-caster effect less common. For a given amount of mechanical trail, a shorter offset/steeper head angle configuration will produce less flop, and require a greater steering angle before the caster effect starts to go into reverse.
It will also result in a shorter front-centre than a slacker/longer offset configuration with the same amount of trail. For these reasons, more brands are experimenting with shorter offset, rather than slacker head angles, to achieve more trail. But how effective is this?
How much difference does fork offset make in practice?
A few years ago, I tested multiple fork offsets on a Specialized Enduro 29. The difference was immediately noticeable – on the track in question, I preferred the increased trail provided by the shorter (37mm) fork offset because it resulted in calmer steering.
The bike’s head angle was 67.5 degrees and I swapped from 51mm offset to 37mm, taking the mechanical trail from 92mm to 106mm. That’s a difference of over 15 per cent.
More recently, I tested the 42mm and 51mm offset versions of the 2019 RockShox Lyrik on a Transition Sentinel. With 29in wheels and a 64-degree head angle, the Sentinel has around 113mm of mechanical trail with the 51mm offset, and 122mm with the 42mm offset. That’s around a 7.5 per cent difference.

After swapping from 42mm to 51mm and back again, performing multiple timed runs with each offset on three familiar test tracks, there was surprisingly little difference in the handling.
With the longer fork offset, I was aware of my hands being further behind the front wheel, as if using a shorter stem. This appeared to make it slightly harder to weight the front wheel in flat turns.
The steering with the shorter offset felt slightly weightier and smoother when cornering very hard, but this was only noticeable in rare situations, and was a very subtle difference. I’d say changing the bar-roll by a couple of degrees makes more of a difference.
From this I would suggest that changing offset makes more of a difference to bikes with steep head angles, where there is less mechanical trail to begin with.
With such slack bikes, like the Sentinel, the difference between the fork offsets offered by Fox and RockShox (around 9mm) is simply too small to notice in most riding situations. Perhaps the back-and-forth flex of the fork drowns out such a small difference in offset too.
It seems there is a law of diminishing returns. Going from 92mm to 106mm felt hugely beneficial, while going from 113mm to 122mm was barely noticeable. Clearly more investigation is needed!
Acknowledgements
While all the opinions expressed above are my own, much of the information and terminology presented here were learned from the books Motorcycle Handling and Chassis Design: The Art and Science by Tony Foale and Motorcycle Dynamics by Vittore Cossalter.