

So you have to get fitter to ride your mountain bike faster, right? Well, fitness certainly helps, as do good skills, but these aren’t the only ways to improve.
A better bike can help, but you shouldn’t expect to be able to buy instant trail master ability by shedding a load of cash on a superbike. You’ll be better off learning about how to extract more speed from your current bike, and the best way to do that is to boost your confidence by upgrading comfort.
Adding comfort to boost speed might seem counterintuitive, since extra comfort can mean additional weight too. But if your bike rides softer then you won’t get knocked about as much. This means you can focus on maintaining your momentum with a smooth, powerful pedalling style.
What you’re aiming for is to change your bike so you’re less affected by the bumps. With a little imagination, you can do a hell of a lot to make it more comfortable without having to spend too much in the process. Here’s how... (These tips are designed for hardtail riders, but many will apply to full-suspension bikes as well.)
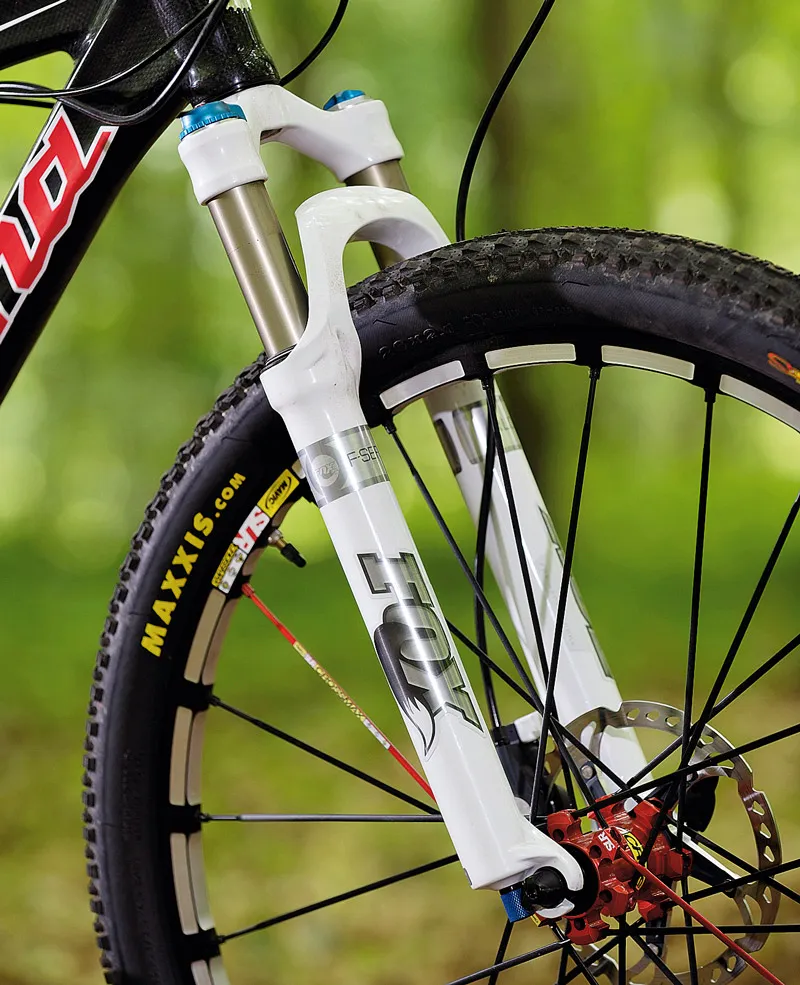
1. Forks: More comfort equals more control
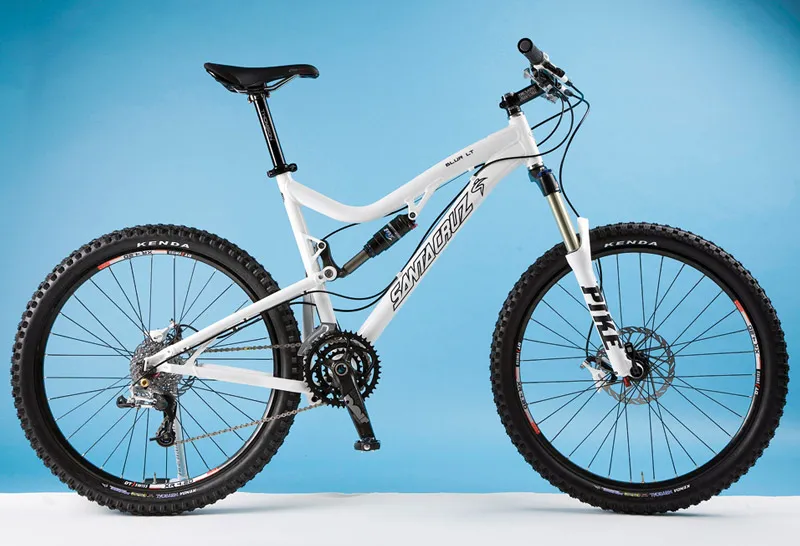
Let’s start by looking at the most costly comfort and control upgrade to a hardtail: a new fork. The average hardtail costing around £500 or so comes with a basic suspension fork, and these are typically limited by a slightly notchy compression feel, an overzealous rebound and a clunky top-out.
Your fork is only worth upgrading if the frame behind it is decent. If not, it’s best to save your cash until you can afford a better bike, since a plush fork with decent damping will cost you about half as much as the bike did in the first place.
If you do upgrade your fork, the biggest advantage it will offer you in terms of comfort and control is that it will encourage you to sit a bit further forward and let its plushness do more of the bump-taming work. It’ll also let you hover slightly over the saddle, so that the follow-through bumps at the back end don’t disrupt your momentum.
The options:
- Low-End: Cost: Free. Learn how to properly adjust your fork. Don’t be afraid to experiment with the rebound and compression dials – find out what each does by turning them to both ends of their range. Note the difference. Then fine-tune the settings to your liking (our step-by-step Guide to setting up mountain bike suspension should help here. Also learn how to service your fork.
- Mid-Range: Cost: £90 approx. Pay for a specialist to tune your fork. The fork that’s fitted to your bike as standard is set up to provide great performance for the average weight rider and average riding style. Tuners can modify the internal shim stacks and damper properties of the shock to better match you and your riding style. In the UK, TF Tuned tune all major suspension brands, while Mojo just deal with Fox units. Expect to pay around £90 for a basic tune, plus postage. If you ride a full-suspension bike, you can get your rear shock tuned too – check out our review of a PUSHed Fox RP.
- High-End: Cost: £250-1,000. Check out the sales deals on big name forks. With new suspension forks coming out every year, some older stock is nearly always left over. While most people will want the latest kit, you can grab yourself last year’s top fork at a lower price. At the time of writing it was possible to buy a RockShox Reba Race for £259 instead of £500. Hunt through the adverts in What Mountain Bike, Mountain Biking UK and on BikeRadar and you’re likely to bag a bargain. Just check that little things such as disc adapters and hub configurations match with your current bike, since getting these wrong can turn a bargain fork into a more expensive upgrade.
Recommended products:
- Manitou Drake (100mm travel), £250
- RockShox Reba Team Dual Air Maxle (120mm travel), £625
- RockShox Revelation Team Dual Air Maxle (150mm), £599
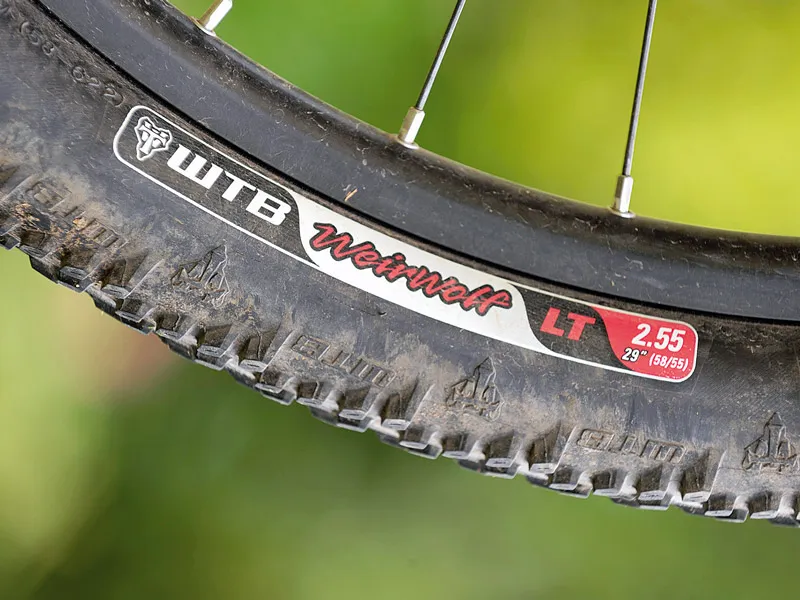
2. Tyres: Maximise your speed and grip
Good tyres aren’t cheap, but they can make a big difference to the way your bike rides over rough terrain. Riders looking for extra speed often assume that skinny profile tyres help – they might over smooth surfaces, but it’s surprising how fat you can run your tyres without slowing down.
Extra traction and comfort comes from larger volumes, so the key to maximum performance is to go for a big volume tyre with a fast-rolling tread pattern. The big air volume can be safely run at lower pressures than you will need on a skinnier tyre and it takes the edge off bumps and dips, leaving you to focus on carrying speed without the worry of losing tempo or confidence as the bumps knock you around.
Converting your tyres to tubeless is another way of increasing comfort and control, simply because taking inner tubes out of the equation means you can run your tyres a bit softer without pinch puncture risks. We know plenty of riders who have followed minimum cost DIY tubeless tips, but it’s more reliable to go for a commercially available conversion kit with rim tape from the likes of ‘Stan’s No Tubes’ or ‘Joe’s No Flats’ if you have the cash to spare.
You can use these systems on most conventional tyres and rims, but there are also tubeless-ready tyres available, which run on either tubeless or non-tubeless rims. A tubeless tyre setup provides more comfort and control than a tubed one does because it deforms more as it rolls on rough terrain, while traction is improved for the same reason.
The options:
- Low-End: Cost: Free-£18. Alter your tyre pressure. Lower pressures provide better grip, comfort and speed by helping the tyre casing and knobs conform to the terrain. If you’re an average weight, start at around 35psi. If you’re an aggressive rider and can feel the tyre squirm, or you’re heavier, add more air. Conversely, if you’re bouncing over roots then drop the pressure further. And if you’d rather venture down the tubeless route, you can do it on the cheap with the low-tech DIY conversion procedure. Warning: the process involves mess and you’ll need to know your way around wheels to make it work. You’ve been warned.
- Mid-Range: Cost: £40-50. Convert your current tyres and wheelset to a tubeless setup with a commercially available kit. They’ll roll better and you’ll puncture less. It can even cost less than a fresh set of posh new tread for your bike. We recommend you check out the Stan’sNoTubes (£50) and Joe’s No-Flats (£40) conversion kits.
- High-End: Cost: £20-50 approx. Invest in larger carcass, bigger volume tyres. If you increase the surface area of a tyre, you can run a lower pressure than a smaller volume tyre and maintain the overall force you apply to the trail, making for a plusher ride. The larger diameter carcass also provides more traction. But remember to check the maximum tyre size your frame can fit before buying. It’s also worth using a tape measure to size up the width and height of the tread and bead-to-bead size, as one brand’s 2.2in is another’s 2.5in. Going fully tubeless will also allow you to run lower pressures.
Recommended products:
- Bontrager Super Juice tyre sealant, £10
- Kenda Small Block Eight DTC tyre, £31
- Specialized Roval Traversee wheelset, £499
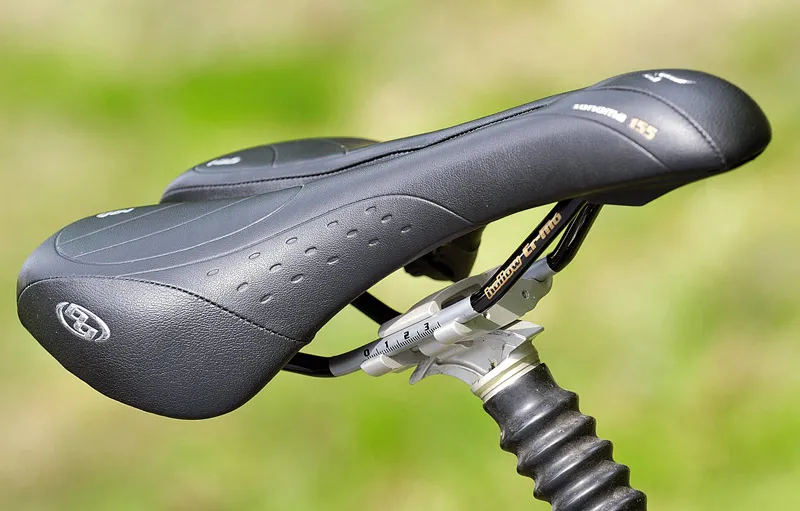
3. Saddles: Care for your derriere with a good perch
Finding a comfy saddle can make a big difference to the way you feel about and ride your bike, but it often takes a long process of trial and error to discover one you want to stick with. If you’re still looking, take every chance you get to try out the saddles on your friends’ bikes.
It’s worth remembering that large saddles with loads of padding are often fine on short rides, but become increasingly uncomfortable on long epics. In contrast, slimline saddles with simple padded support in exactly the right places often seem less comfy to begin with, but maintain comfort on long rides.
The best saddle for you will be the one that supports your sit bones properly, but doesn’t exert undue pressure or friction elsewhere. Every saddle maker will promote a whole host of different fit features, and some will offer a specialist fitting service through their dealer network. Try before you buy.
The options:
- Low-End: Cost: Free. Try adjusting the position of your saddle before buying a new one. This is because saddle positioning is vital for both your immediate and long-term comfort, and to maximise the power output of your leg muscles. The saddle should be level with the ground, so use a spirit level to get it right. Then, to sort your fore and aft positioning, sit on your steed with the cranks parallel to the ground. The front of your knee should be aligned with the middle of the pedal axle; use a plum bob/line to get the positioning closer.
- Mid-Range: Cost: £20 approx. There are plenty of saddles on the market that are simply cheaper versions of same-shape, more costly offerings from the big brands. Seek a few out, sit on them and invest in the one the suits you best.
- High-End: Cost: £90 approx. Top-of-the-range saddles can sacrifice comfort for low weight. While a low weight can be a bonus, don’t let the figures distract you from getting a comfy perch. Again, it’s essential you try before you splash your cash.
Recommended products:
- Gusset R-Series, £20
- Charge Spoon, £20
- Fizik Gobi XM, £95
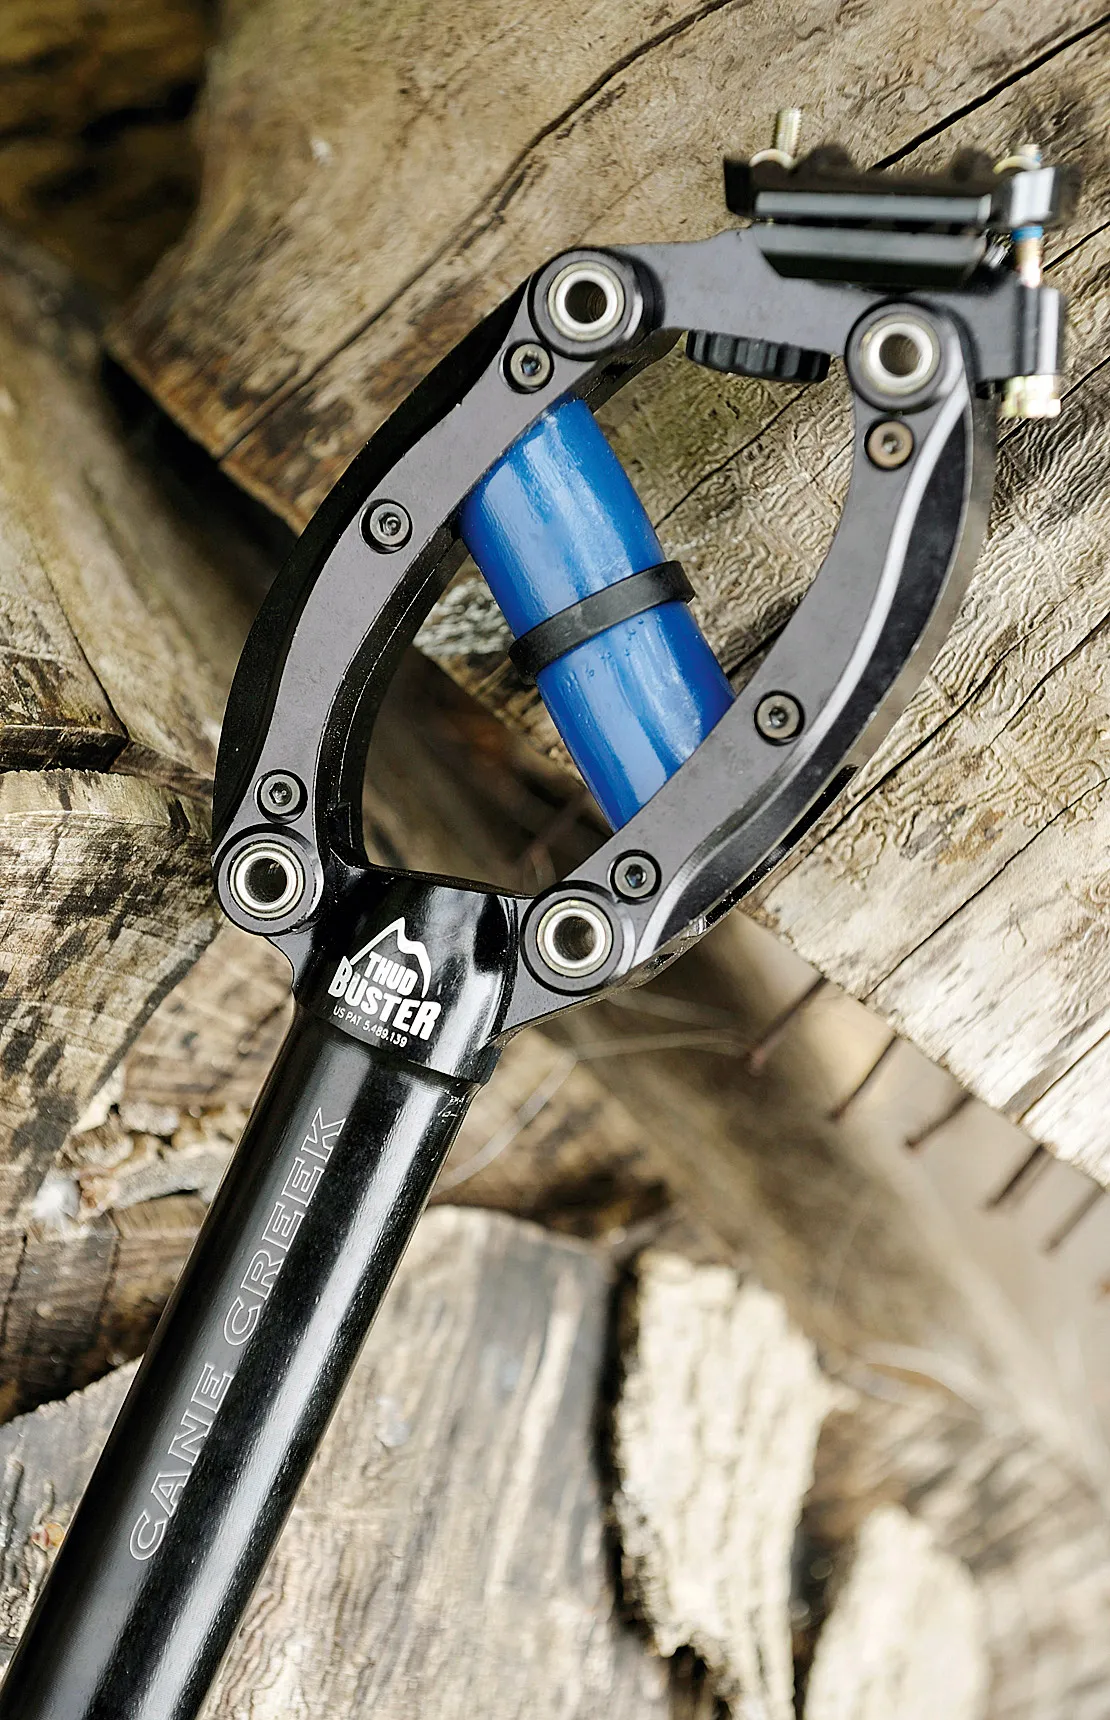
4. Seatposts: Take the sting out of the trail
You’ll see suspension seatposts on all sorts of bikes these days. Oddly, most of them are on hybrids rather than mountain bikes. Actually, there’s a sound reason for this – telescopic suspension seatposts need to be extremely well made if they’re going to carry on working on rough terrain over time.
Because they’re not compressing in the direction of wheel impacts, they’re constantly being subjected to out of line forces, exacerbated in durability terms by any ingress of dirt. The most efficient suspension posts are those based on a parallelogram linkage designed to compress in the direction of rear wheel bump forces.
The options:
- Low-End: There’s no free shortcut to suspension seatposts, but look out for bargains in your local bike shop, on the web and from the various mail order specialists.
- Mid-Range: Cost: £25-100. There are a number of telescopic seatposts available at a reasonable price.
- High-End: Cost: £100-140 approx. Cane Creek Thudbuster posts are expensive, but are a good investment if you really value comfort while riding.
Recommended products:
- Post Moderne Cushy SL, £25
- Cane Creek Thudbuster LT, £140
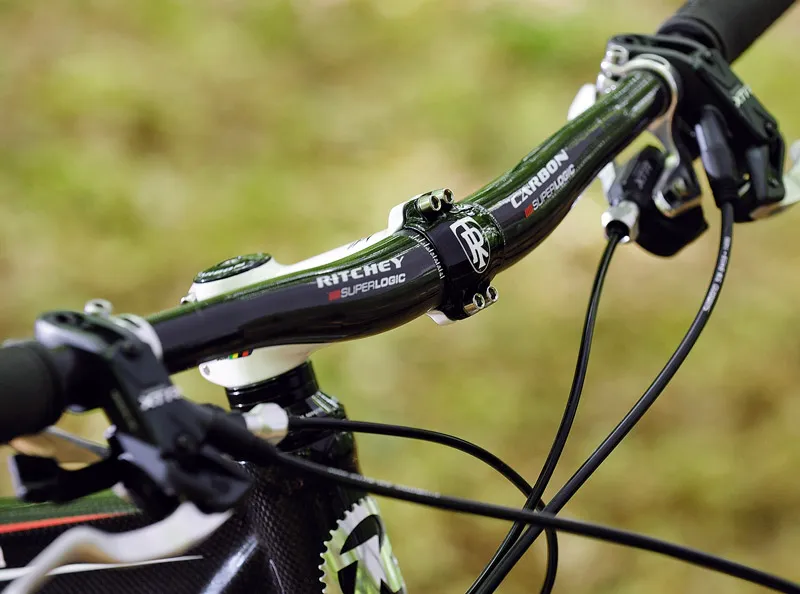
5. Handlebars: The right one can make all the difference
Bars often all look similar to the uninitiated, but there are loads of different shapes and sizes to choose from. It’s not just a case of choosing a width that suits you either, although that’s an important aspect of comfort and control. The shape of a bar can make an enormous difference to how you feel about your bike, and the backsweep and upsweep are as crucial as the width.
Ultimately, if your hands and wrists are tense, you won’t feel relaxed on the bike. A typical flat handlebar will offer as little as 3º of backsweep, while a typical riser bar will offer 8 or 9º. A few radically shaped bars (such as Ragley’s Carnegie) can offer as much as 25º. That means trying the different shapes and widths is certainly worthwhile if you get the chance.
The options:
- Low-End: Cost: Free. Try adjusting your handlebar before buying a new one. Most riders opt for a neutral position, rotating the bars so that the rise is near vertical. Your arms should have a slight bend, though, so roll your bar back slightly if they end up locked out. Likewise, it can pay to move your brake levers closer to the centre of the bars, so they’re in your line of sight and you’re using the last 30mm of the levers when you brake. This is more efficient than squeezing near the pivot. For more on cockpit setup, read our workshop guide.
- Mid-Range: Cost: £20-80. There are loads of relatively cheap riser handlebars in all sorts of shapes, sizes and prices. So search around for a good deal on a style you know you like.
- High-End: Cost: £100-120. The ultimate bar comfort upgrade is a carbon handlebar, since the build helps to absorb vibration too. But don’t commit cash until you know what rise and backsweep you like. Again, borrowing your mates’ bikes can come in handy for finding out which style suits you best.
Recommended products (non-riser):
- On-One Mary, £30
- Titec J-Bar, £65
- Syntace Duraflite Carbon, £119
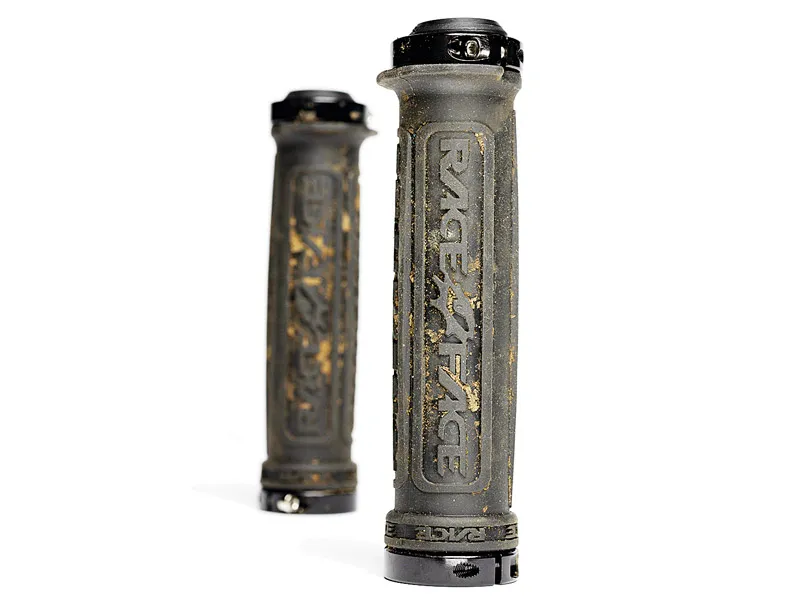
6. Micro suspension: All the small things add up
Don’t underestimate the value of small component parts in boosting your comfort and control by damping the hard edges of vibration. Dual density (softer on the outside) or silicone foam handlebar grips are a good starting point. As mentioned, carbon handlebars also seem to dull trail vibration more effectively than aluminium bars.
Inevitably, the feel qualities of different construction materials will have minor effects throughout the bike. Skinny tubed, flexible seatposts or carbon posts will absorb shocks a bit more effectively than fat-tubed aluminium posts. These are minor points compared to what sort of tyres you’re running and how much air are in them, but they all add up to more comfort.
The Options:
- Low-End: Cost: Free. Double check your contact points (shoe cleats, saddle or bars) and how you stretch across the bike since these all have a major bearing on your bike comfort.
- Mid-Range. Cost: £15-30. Dual compound or silicone foam grips are a good starting point. Since the feel of grips can be divisive, try some out before you buy.
- High-End: Cost: £90 . Seatposts and handlebars made from carbon can take the hard edge off general trail vibration, but they're certainly not cheap.
Recommended products:
- Lizard Skins Charger Lock-On grips, £19
- Ergon GP1 grips, £22 (there's a review of the more expensive GX1 here)
- Ritchey True Grip WCS Ergo, £18
7. Clothing: Dress to impress for riding success
Never underestimate the value of comfortable clothing made for riding. Okay, it might sound obvious, but it’s amazing how often we see riders out on trail with blatant pant lines under their shorts. You can be pretty sure they’ll be wearing a cotton T-shirt as a base layer too.
Believe us, you'll feel way more comfortable if you wear a base layer that wicks the sweat away from your body and Lycra shorts with a padded crotch underneath your baggies. Your choice of outer shorts can make a big difference too: proper cycling baggies have seams and pockets in the right places and a higher back that stays in place rather than slipping down and exposing your back flesh.
Proper riding shoes provide a real boost too. Even if you don’t use cleated shoes and pedals, flat shoes designed for riding are way more efficient than simple trainers. Good cycling-specific gloves will also help you ride better, but don’t go for too much palm padding: it’ll squirm around and make your grip less precise. For more comfort, get softer compound grips instead.
The options:
- Low-End: There’s not much going for free unless you can get some cast-offs.
- Mid-Range: Cost: £20-60. Proper riding gloves, Lycra short liners with a padded seat and a thermal vest are all good starting points here. Baggies with a good chamois are expensive, but grab a decent set of Lycra bib shorts and you can wear any old pair of shorts – or even some old swimming shorts – over the top and still have your bits covered. Which is better than the ill-fitting liners you get in most budget shorts.
- High-End: Cost: £60 . Any quality clothing made for cycling will boost your comfort and enjoyment out on the trail. Prioritise your contact points first, and go from there.
Recommended products:
- DHB Earnley bib shorts, £35
- Fox Altitude baggy shorts, £65
- Gore Bike Wear Power 3/4-length bib tights, £85
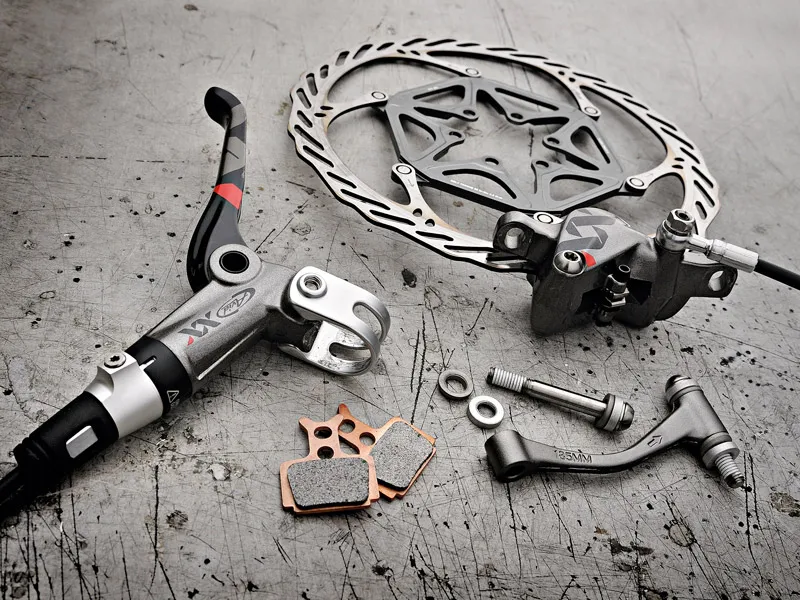
8. Brakes: Power is nothing without control
More obviously a control than a comfort advantage, don’t underestimate the value of decent, well-adjusted brakes. Having your brake levers in exactly the right position for effective application is a starting point, and that means giving some thought to factors such as lever reach and bite point. These are adjustable on most decent quality disc brakes. If you’re among the few who still use cable pull cantilever brakes, adjustment for powerful function is even more crucial.
Also remember that disc brakes need servicing occasionally: a full bleed and new pads can bring powerful new life to an old brake. Clean up your disc rotors at the same time as fitting new pads (use proper disc rotor cleanser). And from a pure comfort point of view, bear in mind that a powerful well modulated disc brake will save energy and contribute to a more pleasant riding experience.
The options:
- Low-End: Cost: Free. Most adjustments are free. Play around with lever position, lever reach and braking bite point to see what suits you best. Also see our online walkthrough for how to get quiet running disc brakes.
- Mid-Range: Cost: £15-20 per brake approx. A full bleed service and new pads cost relatively little and can make a big difference to brake feel/power. You can also do it yourself by following our workshop walkthroughs for brakes from Avid/Formula/Hayes, Hope and Shimano. We also have also a general guide to changing disc brake pads.
- High-End: Cost: £70-250 per brake approx. Upgrading to disc brakes from rim brakes is a costly affair, because it involves hubs too if your wheels aren’t already disc-ready. You need a frame and fork with disc brake tabs too. But you’ll never look back: good disc brakes simply make the riding experience easier. See our comprehensive disc brake test to find your perfect brake.
Recommended products:
- Gusset Chute, £70
- Shimano Deore M595, £105
- Formula R1, £247
Frame materials
The materials your frame is built from can have a strong bearing on how comfortable it is to ride. A frame needs to be stiff enough to deal with the external forces coming from your pedaling action, the way you shift your weight around on the bike, as well as all the bumps, turns and twisting forces coming from the terrain.
So stiff is good to a certain point. In fact, on a full-supension bike there are so many other factors getting involved in comfort and control that a stiffer chassis and fork will nearly always be better.
But, and this is a fairly big but, on a hardtail the in-line efficiency of the chassis stiffness needs to be countered against the fact that too much stiffness will beat you up and consequently slow you down. Well, unless you’re a race-hardened thoroughbred well accustomed to the rigours of full body abuse.
A stiff aluminium frame in particular, can often be very punishing at the back end unless you run bigger tyres and other comfort enhancing kit. Quality steel frames are slightly less punishing, because quality thin walled steel tubes are able to absorb a certain amount of small vibration.
This means they feel as if they have some ‘spring’ in them. Titanium frames have a similar feel, but even more so. The sprightly spring in their roll is even more obvious over bump-strewn terrain. Carbon frames are also very good at dulling down the hard edges of trail chatter.
