Make no mistake, trials riding is a thinking man’s sport. Its problem-solving nature requires riders to be astute in the art of anticipation – being able to judge distances on the fly and make instant decisions. This must also be combined with supreme balance and exact co-ordination.
There’s no room for bad form here, and it can’t be camouflaged with gear, like when you tackle rocks with suspension or a tough uphill with an ultralight bike. Trials riding is all about perfection, which is why it’s such an incredibly hard thing to learn – there’s no halfway house.
But the basis of all trials riding comes from a few key skills. And if you learn these, you can tackle anything that comes your way – however big, small or technical. Here, six-time British trials champion Chris Akrigg talks you through five essential trials moves, which form the very foundation of the most technical side of mountain biking.
1 The trackstand
Taking its name from the velodrome track rider technique of balancing the feet on the pedals for a faster start, the trackstand is essential in trials for pausing in between moves in tricky or dangerous places.
When you’re first learning the trackstand, lean the bike into a slight gradient – like velodrome riders would have done when the move was created. Turning the front wheel into the gradient enables you to hold the bike’s position using tension on the pedals.
1 Brake control: Once you’ve got the concept of the trackstand on banked areas, you need to practise on the flat and use the front brake to simulate the resistance the gradient would create. Here, Chris is squeezing his front brake and pushing on his leading pedal at the same time. Although not completely still, his front wheel won’t move more than a few millimetres using this technique.
2 Balanced weight: One of the keys to making the trackstand work well is to balance your weight evenly between the front and rear of the bike – your pedals and handlebars. Chris is constantly adjusting the pressure on his pedals and how much he pulls on either end of the handlebars – the trackstand is about small adjustments, rather than big moves.
3 Concentration: Staying focused is essential for trackstands. Maybe not in a car park before hopping up a kerb, but for a serious move like this, Chris is focusing entirely on being as still and calm as possible, and on the next move he has to make. Remember that trials riding is all about setting up for the next move, and that the trackstand is a setup skill that buys you time when manoeuvring from one obstacle to another isn’t possible.
Akrigg says: "This is an absolutely fundamental skill – it looks nothing, but it’s an essential. To master this, start on a slight incline with your handlebars at 45 degrees, and use a combination of chain tension and left-to-right movement to constantly correct your balance."
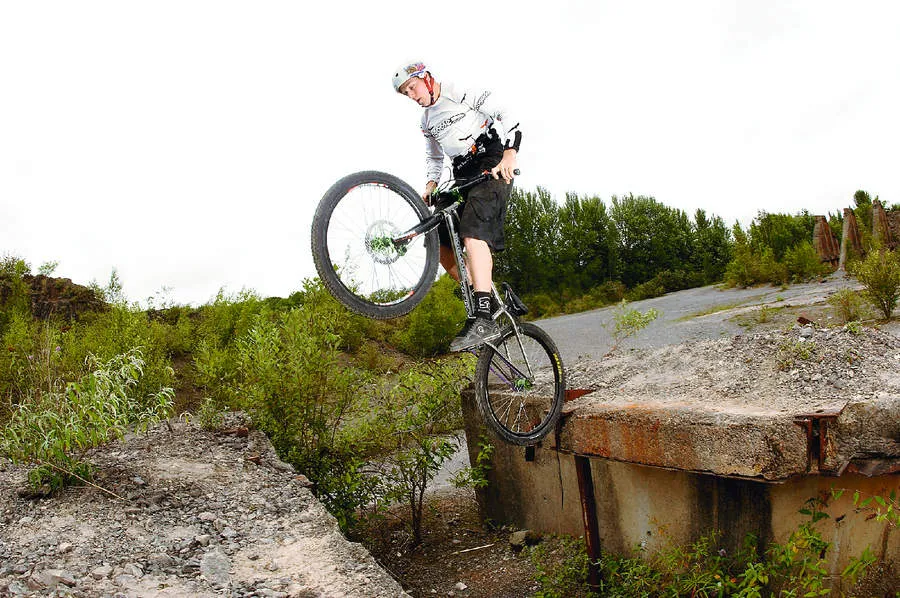
2 Pedal hop
Sometimes there won’t be a run-in for a gap, or a side hop won’t be the ideal method for the situation. So being able to lunge forwards from a stationary position is another pillar you’ll need to form the foundation of your trials skills.
This technique can be used to lunge across gaps, up obstacles or dismount off obstacles. The pedal hop, like the side hop, is easy to learn, but hard to progress to bigger features and perfect. Practice will make perfect though, so persevere.
1 Prepare: Being in the right position is crucial, especially if lunging across a gap, so take your time and get your front wheel as close to the edge as you possibly can.
2 Catch: You need to get your rear wheel in place of your front. Do this by kicking on the pedals at the same time as pulling up on the bars and then landing, weighting the rear wheel for balance.
3 Drop the nose: If you still need time, hop statically on the rear wheel to buy yourself a few seconds. Explosive power is needed to make the gap. To achieve this action, Chris lets the front wheel drop and, at the same time, pulls up hard on the bars, releasing the rear brake and kicking down hard on the pedals.
4 Kick forward: Now the lunge is in motion, Chris further pulls the bars towards him and pushes his feet out towards the landing zone. As the rear wheel meets the landing area, Chris pushes it to make contact while holding the rear brake on. The forward motion from the lunge allows his front end to drop down and land safely. From this position, he regains composure and prepares for his next move.
Akrigg says: "Crank the pedal as you release the brake to pop the bike forward. The right way to hop off something depends on the obstacle and the severity of the drop – there are so many variables with this technique. It’s all about composure, keeping control and spotting your landing.
"Hopping a gap is really more of a lunge. It’s all about weight transfer and timing. Instead of aiming to get up in the air, you’re getting across a gap using a combination of compression and release."
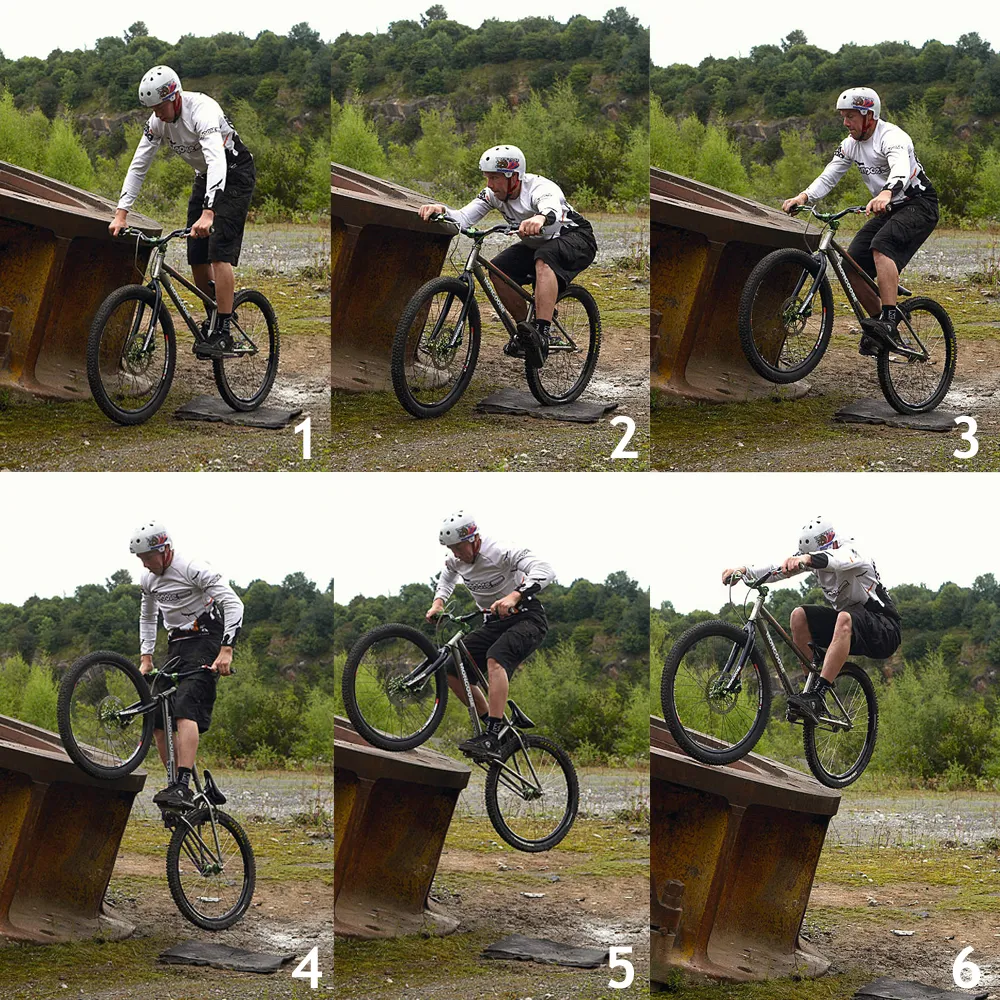
3 Side hop
In competition, the side hop will often be used for two things – mounting an obstacle or traversing a gap sideways. Both are used where there’s no space to gain sufficient forward momentum for techniques such as the front touch.
There are two ways of using the side hop – from the rear wheel, which is a matter of placing the front and lunging the rear to follow, or exploding both wheels from the ground up. The latter is the main way of learning to side hop.
1 Compose: As with all moves, there’s a quiet moment before the storm – explosive moves like this require full concentration since they’re all about mind over matter. Again, using the trackstand technique, Chris momentarily goes light on the pedals before compressing fully into the bike.
2 Compress: Similar to the action of a coiled spring, Chris compresses his whole body into the bike and fixes his eye on the landing patch.
3 Recoil: At the same time as he’s pulling up and back on the bike, Chris releases the rear brake and kicks forward on the pedals – this in turn initiates the bike’s upwards movement, leaping him and his steed into the air.
4 Lean to: As the bike rises up towards the higher level, Chris is still pulling, but he’s also leaning towards the obstacle and focusing on where his front wheel needs to be to successfully continue the motion.
5 Traject: With the bike on path, Chris makes a final move to push the front wheel forwards and onto the obstacle surface – this helps in that it coaxes the rear wheel up to the same level to mount the obstacle.
6 Touch down: As the rear wheel touches down, Chris crouches with the bike for balance, before regaining composure and moving on. Don’t be tempted to look to the side, or you’re likely to hop back off again.
Akrigg says: "Hopping up onto something with both wheels on the floor requires a static bunnyhop, so compression and release comes in again here. The trick is to add a kick of the front foot pedal for that extra va-va-voom. Hopping up onto something from the back wheel is similar, just from the back wheel instead.
"Hopping sideways over a gap while achieving greater height requires landing your front wheel first with the brake locked on, almost landing in an endo, then pulling the back wheel up onto the obstacle."
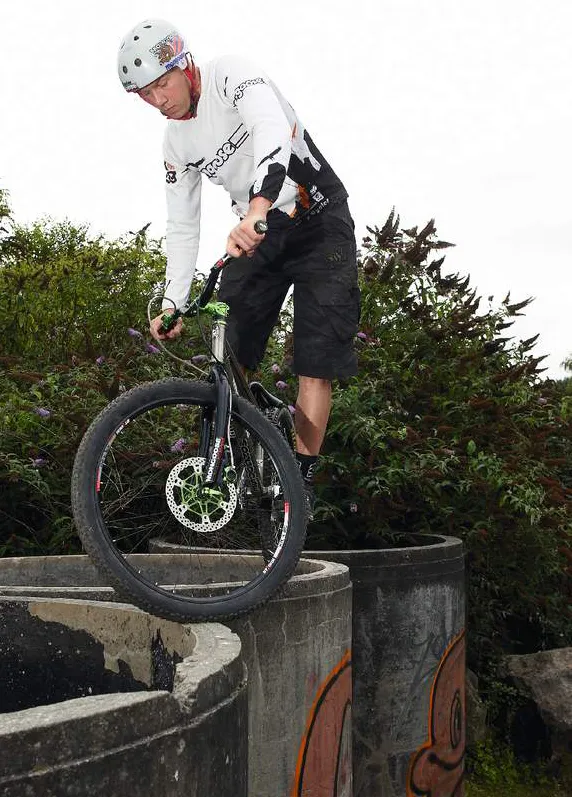
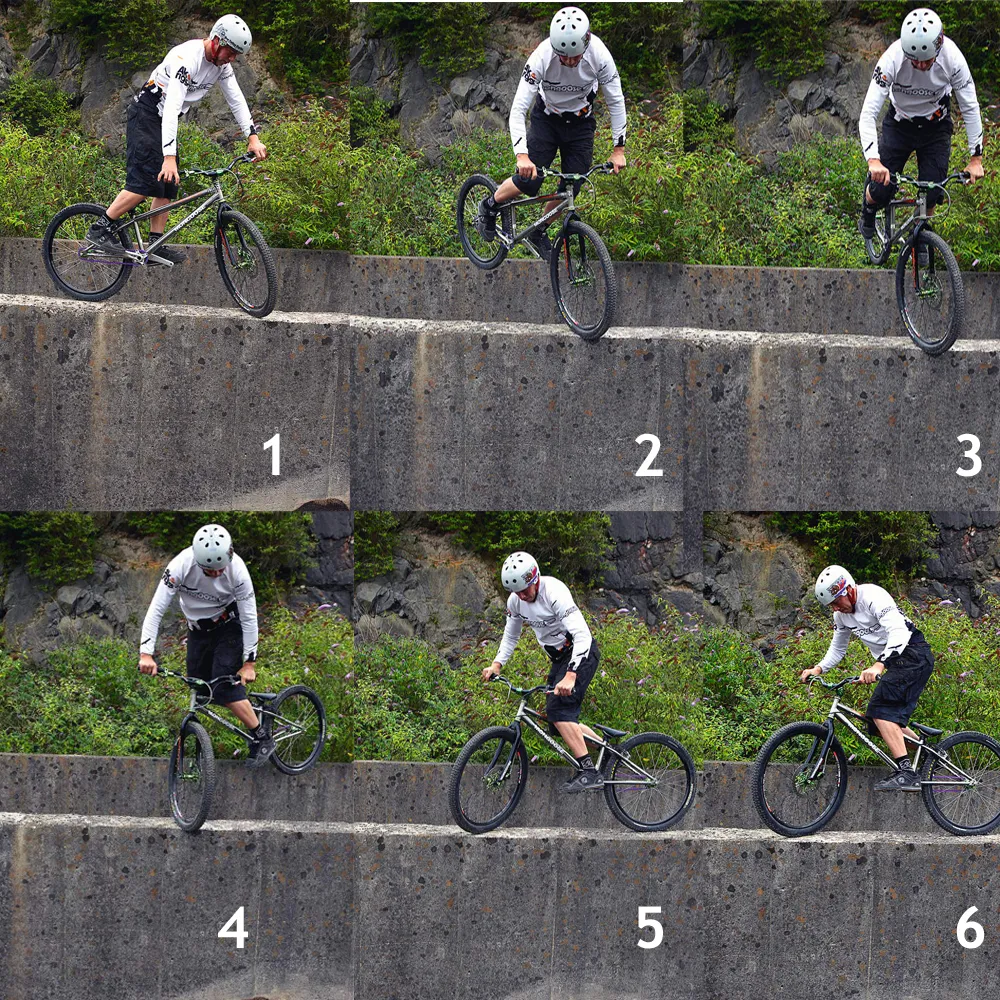
4 Front wheel pivot turn
Often referred to as the endo turn – after the trick where you balance on your front wheel without going over the bars (or ‘end over’) – the front wheel pivot turn is a simple-to-learn but tricky-to-master technique that’s used for changing direction and can be used in places where other moves just aren’t possible.
The move can be pulled off when rolling or when stationary, which makes it an ideal option for obstacles such as narrow walls, where there’s little room for error.
1 Setup: Using the trackstand to prepare, Chris turns his wheel into the direction of rotation – in this case, the same direction as his natural trackstand position. From here, he’s gauging where he needs his front wheel to be for the turn. Note how close his rear wheel is to the opposite side of the wall from the front – this is to minimise the amount he needs to pivot.
2 Initiate: With the front brake on and his full weight on the handlebars, Chris further leans forward, keeping his shoulders in line with the handlebars, and initiates the turn from his hips – swinging the rear end around with his feet.
3 Easy does it: In this case, it’s vital that Chris doesn’t rotate more than 180 degrees, in order to ensure the wheel is off the ground. Chris is fine-tuning his weight back and forth with minute movements. This, combined with tension in his legs, controls the speed of the rotation – there’s a fine balance between too fast and too slow.
4 Nearly home: After the halfway point, Chris’s balance is still perfect – and from here he’s able to spot the exact area to touch the back wheel down. Note how his eyes have gone from ensuring the front wheel is in the right spot, to watching the rear wheel as it comes in for touchdown.
5 Place it: As the rear wheel comes round to contact, Chris slows the movement right down so as not to throw himself off balance with the inertia that the rotation gives. He slows it so much that the last few inches are nearly still – and he places the rear wheel down with a firm-but-controlled touch.
6 Compose: It’s easy to give it away here – make sure you maintain focus. Check your wheel placements and recompose yourself into a safe trackstand before your next move. Remember that trials is all about a composed series of moves and gaining control is the name of the game.
Akrigg says: "To change direction while on an obstacle, the twist manoeuvre is performed. This relies on getting the turn going before you actually lift the back wheel. Once it’s lifted, move your weight forward over the front wheel. The extra weight over the front wheel, together with the extra twist at the beginning, means you’re able to carry the spin further than you’d think.
"Dismounting from an obstacle and changing direction at the same time is a skill in itself. For the 180 dismount, shift your body weight from front to rear mid-turn using a compression of the front tyre at the same time to flick the front wheel off the obstacle."
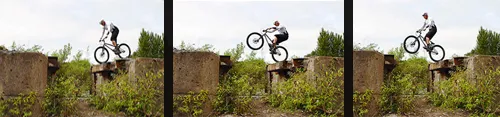
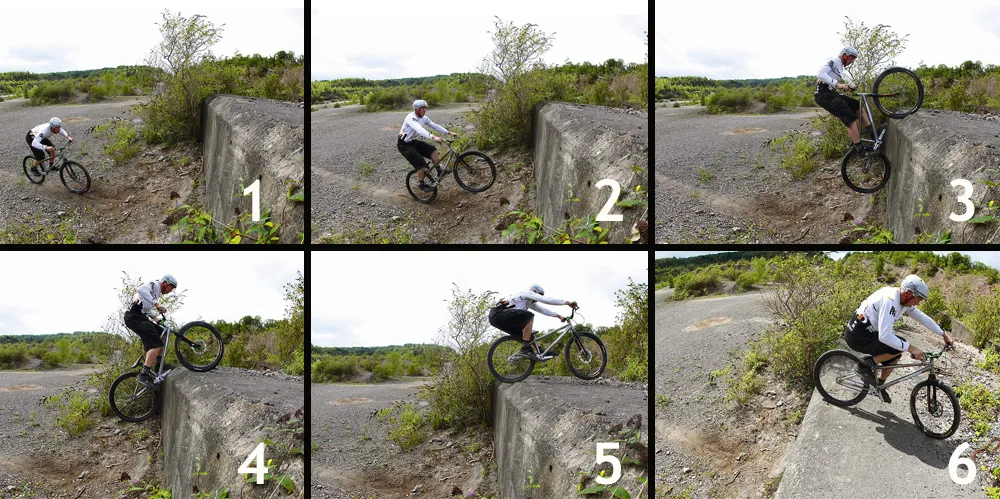
5 Hop up
The ability to ‘hop up’ onto obstacles is paramount in trials – it’s what it’s all about. Once you’ve mastered the basic bunnyhop and have put it to use hopping onto things such as concrete blocks or tyres, you’ll need to start adapting the technique for mounting higher walls.
The first thing you’ll learn is landing on your bashguard, recomposing and then lunging forward to get the rear wheel up. The front touch will follow, whereby you bump the front wheel off the top corner of the obstacle to help pop your rear wheel to the point your front bumped from.
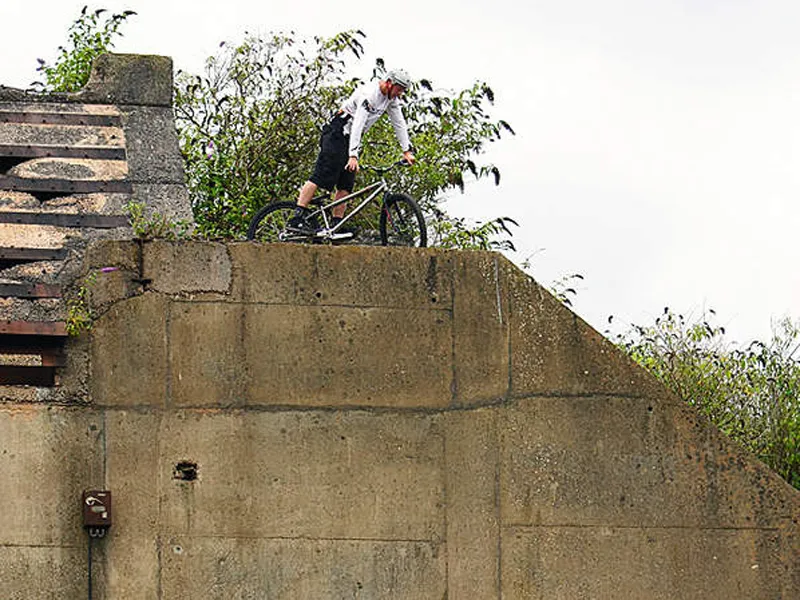
The hardest to learn, however, is the moto style. With this it’s possible, using a small kicker, to mount walls over head height – Chris is the master of this move.
1 Power down: Getting the horsepower down for momentum is essential for hopping onto a high wall. Chris powers it here and focuses on the take-off kicker.
2 Kick it: Here, Chris uses a flat-edged rock to initially pop the bike off. It doesn’t have to be much, but you’ll gain a surprising amount of lift from just a little kicker. The idea is to get the front wheel as high as possible at this stage.
3 Blam: As the front wheel makes contact, Chris’s weight is all up front and the speed he gained from the run-in is about to come in handy for the next step – the rear-wheel contact.
4 Moto: Just like moto trials bikes, the idea is to hit the wall with enough forward motion that you can bounce up it. The combination of speed, the front wheel on the top and Chris’s weight up front is key to success.
5 Extend: As the rear wheel bounces up, Chris extends his arms, throws the bike forward and gets ready to plant the back wheel directly on top of the obstacle.
6 Recover: As with all moves, recovery is extremely important if you want to be able to continue – be sure to regain your composure at the end of the move, and take a look around at what’s next before coolly riding away.
Akrigg says: "When using a front touch, timing is critical. The aim is to release the bunnyhop the instant your front wheel hits the obstacle. This combination of forward and upward movement gets you up and over. When mastered, this technique can yield impressive results. When using a bunnyhop, it’s all about the correct compressing and releasing, spring and snap movement.
"When it comes to using moto style, think of it as basically a wheelie bunnyhop. It relies on a manual into the base of an obstacle followed by popping into a hop on contact. It’s almost the reverse of a front touch, and if you’re going for style points, this is the one to try for."