The eTap shifters are about 10g lighter than mechanical Red shifters. Claimed weight is 130g - Ben Delaney / Immediate Media
We are testing the eTap group on a 2016 Specialized S-Works Tarmac - Ben Delaney / Immediate Media
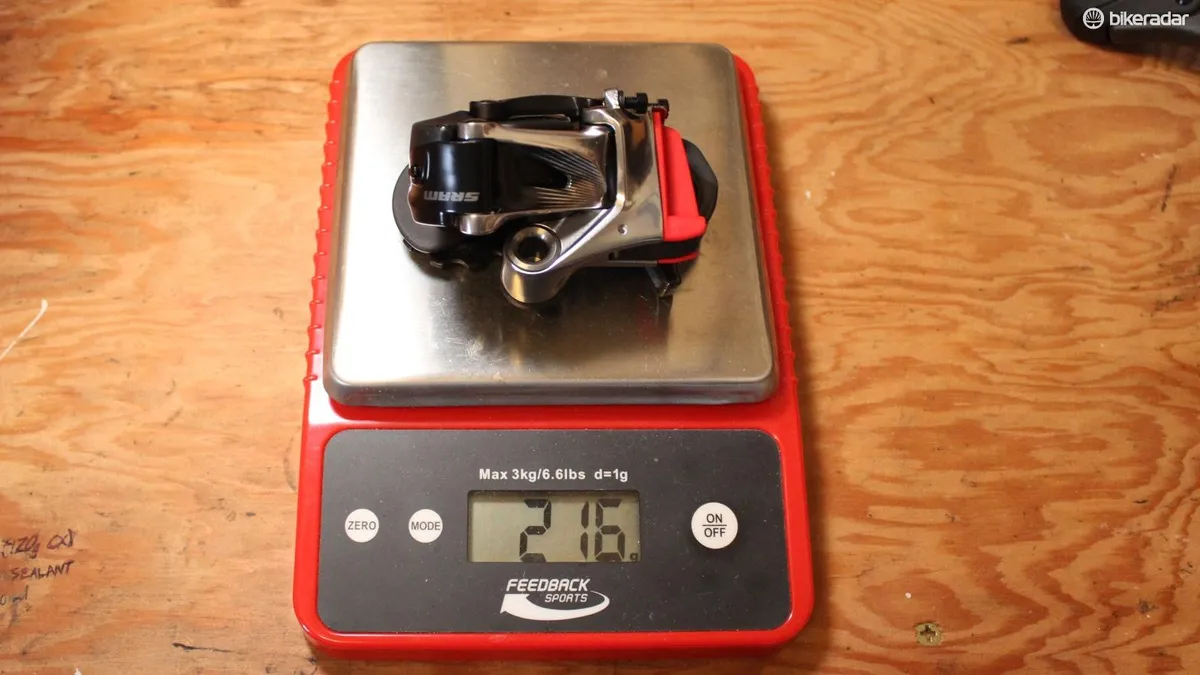
The eTap battery (not shown) weighs 24g, and the red plastic cover weighs 3g. So, total rear derailleur weight including battery is 237g, 2g less than the claimed weight - Ben Delaney / Immediate Media
Add 24g for the battery and subtract 3g for the protective red cover and you have 162g, well under the claimed weight of 187g - Ben Delaney / Immediate Media
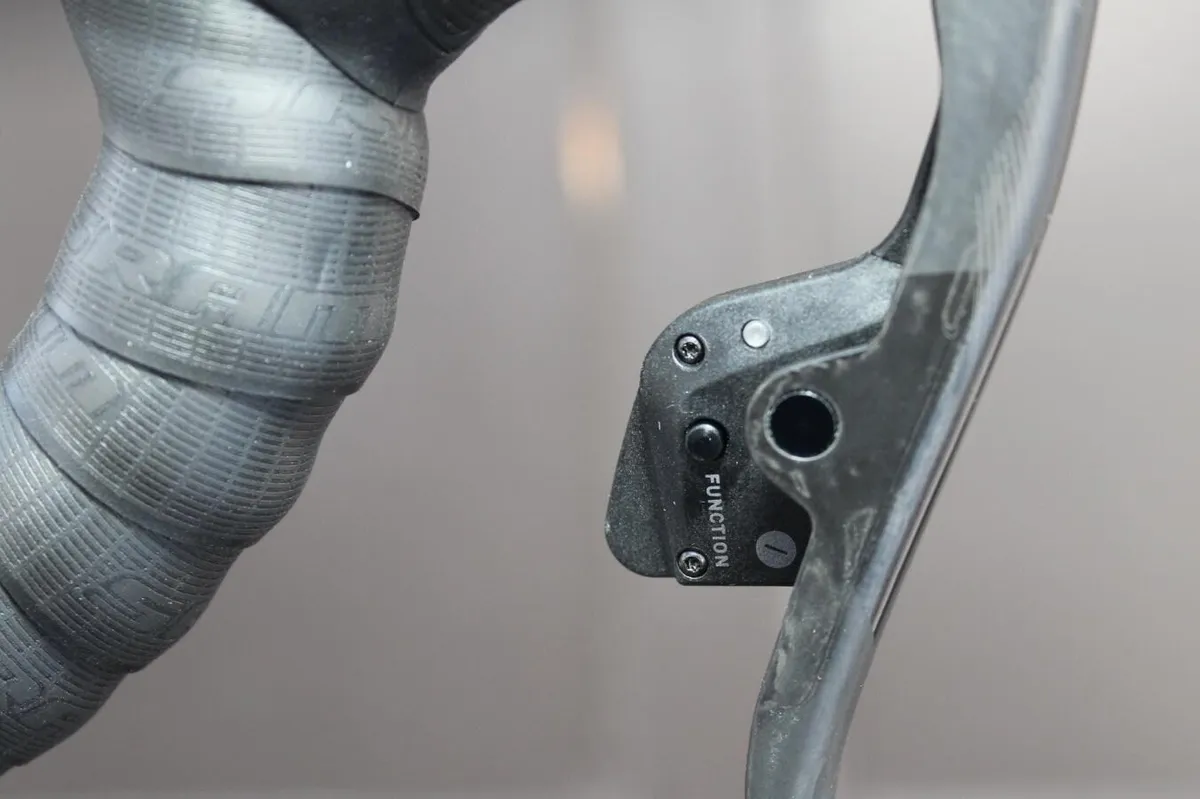
Each shifter has two ports shown here with red plugs. This is where the remote Blip shifters plug in - Ben Delaney / Immediate Media
The Blip shifters come in three wire lengths and can be put anywhere on the cockpit - Ben Delaney / Immediate Media
One feature we love is the indexed reach adjust, which offers four distinct lever positions - Ben Delaney / Immediate Media
We experimented with a Bilp in a similar position to where we run our Shimano Di2 sprint shifters, but it doesn't work well as you need to press the center of the button, not just nudge it like a Di2 sprint shifter - Ben Delaney / Immediate Media
Setting up the rear derailleur is done with a combination of electronic trimming and 'old fashioned' limit screw adjustment - Ben Delaney / Immediate Media
Each component has a function button and an LED light. Press and hold the rear derailleur button to pair this system. One press moves it outboard. Two quick presses moves in inboard - Ben Delaney / Immediate Media
The function button is left of the LED. On all components, the LED also indicates battery life. Green equals more than 25. Flashing red equals less than 5%. - Ben Delaney / Immediate Media
On the front derailleur, the function button moves the derailleur from one ring to the other. In initial setup, it also pairs the system - Ben Delaney / Immediate Media
When the lever is actuated, the colour of the light on the inside of the shifter paddle portrays the remaining battery life. - Ben Delaney / Immediate Media
Pressing and holding the function button while shifting is easy enough to do intentionally, but pretty darn impossible to do accidentally while riding - Ben Delaney / Immediate Media
In initial setup, the rear derailleur's limits should be set first with micro-adjust (at the far ends of the cassette, individually), then locked in with the limit screws - Ben Delaney / Immediate Media
The front derailleur is set up just like a mechanical Red derailleur - with limit screws. Note that the top screw is reverse threaded (the bottom is not) - Ben Delaney / Immediate Media
The lines on the derailleur cage must be aligned with the big ring teeth when viewed from above (we couldn't get the camera aligned perfectly to illustrate this - sorry) - Ben Delaney / Immediate Media
The rear line on the cage needs to be aligned with the big ring teeth when viewed from above (we couldn't get the camera aligned perfectly to illustrate this - sorry) - Ben Delaney / Immediate Media
Notably, the eTap group can be bought with an integrated Quarq power meter. This is the first such offering of its kind from any of the big component makers - Ben Delaney / Immediate Media
We appreciate how much room there is in the elbow of the lever, allowing for a comfortable fit of fingers wrapped around the hood - Ben Delaney / Immediate Media
Red eTap levers with the reach adjust on the closest setting - Ben Delaney / Immediate Media
The eTap group shares calipers, chain, cassette, and cranks with the mechanical Red group. The graphics are subdued compared to Red 22 - Ben Delaney / Immediate Media
The front derailleur comes with a small wedge that braces the unit against the seat tube - Ben Delaney / Immediate Media
As past SRAM front derailleurs were criticized by some as being flexy, SRAM engineers responded that sometimes a flexing braze-on mount was to blame. These wedge shims are intended to stabilize the unit - Ben Delaney / Immediate Media
SRAM recommends detaching the batteries for travel and replacing with these red covers. When accelerometers sense movement, the system is kept awake; this applies to car or plane rides, too - Ben Delaney / Immediate Media
Handlebar tape can be cut out or routed around the Blips, or just wrapped right over them - Ben Delaney / Immediate Media
From certain angles the Blips are hardly visible - Ben Delaney / Immediate Media
The hood shape should feel quite familiar to Red users - Ben Delaney / Immediate Media
While Red 22 has oversized logos, eTap goes for a more subtle design - Ben Delaney / Immediate Media
SRAM's hollow-pin chains are connected with a master link instead of press-in pin - Ben Delaney / Immediate Media
SRAM Red eTap, the world’s first fully wireless road shifting group, is now beginning to trickle out and BikeRadar has received a test set. We have already posted complete details on the group, and compiled the initial impressions of four testers. In this post, we’ll show you how claimed weights stack up against company claims, and highlight the critical steps for installing and adjusting the electronic group.
As we get more time on the group, we will update our 4.5-star review with more impressions and photos.
We are testing the etap group on a 2016 specialized s-works tarmac: we are testing the etap group on a 2016 specialized s-works tarmac
We are testing the group on a 2016 Specialized S-Works Tarmac
SRAM Red eTap actual weights
The SRAM Red eTap group shares some componentry with the mechanical Red 22 group, namely the cranks, chain and brake calipers. You can see those weights in our review of Red 22.
The eTap group as a whole is about 1,970g, roughly 60g heavier than mechanical Red but about 75g lighter than Shimano Dura-Ace Di2 9070 for comparably configured setups.
Claimed weight for a pair of eTap shifters is 130g and we weighed our test samples at 131g. For reference, mechanical Red shifters are 140g a piece.
The rear derailleur is claimed at 239g; we weighed ours at 237g including the 24g battery. (Note that the photos show the derailleurs without batteries but with the red plastic travel covers that weigh 3g.)
The etap battery (not shown) weighs 24g, and the red plastic cover weighs 3g. so, total rd weight including battery we weighed at 237g, 2g less than the claimed weight: the etap battery (not shown) weighs 24g, and the red plastic cover weighs 3g. so, total rd weight including battery we weighed at 237g, 2g less than the claimed weight
Derailleur shown without the battery
The front derailleur is claimed at 187g; we weighed ours at 162g including the battery.
The electronic derailleurs are heavier than their mechanical counterparts, but the group makes up some ground with the absence of cables and housing.
The shifters and derailleurs mount on the bike just like mechanical pieces. The difference comes in how they're connected to each other; instead of running cables, you need to pair the pieces electronically.
Setting the reach adjust for the eTap levers is easy. There are four indexed settings that you set with a 2.5mm Allen wrench on the outer side of each lever body underneath the hood cover.
One feature we love is the indexed reach adjust, which offers four distinct lever positions: one feature we love is the indexed reach adjust, which offers four distinct lever positions
eTap offers four indexed reach settings, which control the lever's distance to the bar
Each eTap component has a function button and a single LED light. This button serves initially to pair the group, then later to make micro adjustments or, on the derailleurs, to shift with the bike in a workstand.
You begin the pairing process by holding the function button on the rear derailleur until its LED flashes. Then, you hold the function button on the front derailleur until the LED on the rear flashes quickly. Now these two are paired.
Each component has a function button and an led light. press and hold the rear derailleur button to pair this system. one press moves it outboard. two quick presses moves in inboard: each component has a function button and an led light. press and hold the rear derailleur button to pair this system. one press moves it outboard. two quick presses moves in inboard
The function button on each eTap component serves a few purposes
The process is repeated for each of the shifters, holding their respective buttons until the rear flashes quickly. Now the system is paired.
To set the outer limits of the rear derailleur, you first use the electronics then the ‘old fashioned’ limit screws. Holding the function button while shifting with a lever makes a small adjustment to the rear derailleur. As with the shifting protocol, the left lever moves the derailleur inboard; the right lever moves it outboard. So, with the derailleur shifted all the way inboard (to the largest cog), you use the left lever to adjust the derailleur in until the pulley wheel is in line with that cog. You repeat this process with the derailleur under the smallest cog, micro adjusting it with the right lever.
Holding the functino button on the shifter and moving the lever micro-adjusts the rear derailleur. as with the shifting, the left lever micro-adjusts the derailleur inboard while the right lever moves it outboard: holding the functino button on the shifter and moving the lever micro-adjusts the rear derailleur. as with the shifting, the left lever micro-adjusts the derailleur inboard while the right lever moves it outboard
Holding the function button while shifting micro adjusts the rear derailleur. As with shifting, the left lever moves inboard and the right moves outboard
Then, you set the limit screws as you would a mechanical derailleur. SRAM master mechanic Nate Newton suggests setting the B knuckle adjustment between setting the inboard and outboard adjustments. He recommends using an Allen key between the pulley and the largest cog to easily measure the proper adjustment (between 6-8mm).
The front derailleur is a strictly mechanical affair for the limit screws. Note that the top 2.5mm screw is reverse threaded while the bottom screw is normal.
The front derailleur is set up just like a mechanical red derailleur - with limit screws. note that the top screw is reverse threaded (the bottom is not): the front derailleur is set up just like a mechanical red derailleur - with limit screws. note that the top screw is reverse threaded (the bottom is not)
Note the reverse threading on the top screw
The front derailleur has the same marks that current Red derailleurs do: a gray zone for height adjustment relative to the big ring is shown on the inner plate, and lines for alignment with the big ring are found on the top and rear of the cage.
One final add-on is a bracing wedge that can be affixed to the back of the front derailleur. Coming in three sizes, this plastic piece wedges in between the derailleur body and the seat tube. It is designed to prevent flex in the system and ensure clean shifting.
As past sram front derailleurs were criticized by some as being flexy, sram engineers responded that sometimes a flexing braze-on mount was to blame. these wedge shims are intended to stabilize the unit: as past sram front derailleurs were criticized by some as being flexy, sram engineers responded that sometimes a flexing braze-on mount was to blame. these wedge shims are intended to stabilize the unit
The triangular wedge bolted to the back of the derailleur is designed to reduce or eliminate flex in the front shifting system
At the risk of stating the obvious, it is worth noting that, unlike Shimano and Campagnolo’s electronic system, there are no wires connecting the shifters to the derailleurs and a battery. This speeds up the installation process tremendously and results in a cleaner build. The exception is the Blip remote shifters; those are plugged into ports on the shifters.
null
How to maintain and adjust SRAM eTap
As there are no cables to stretch or get contaminated, the system should not need adjustment over time.
Should you need to adjust the rear when swapping in another wheel — or if you crash — then you use the micro-adjust protocol of holding the function button on the shift levers to move inboard or outboard. This can be done while riding or with the bike in a workstand.
Pressing and holding the function button while shifting is easy enough to do intentionally, but pretty darn impossible to do accidentally while riding: pressing and holding the function button while shifting is easy enough to do intentionally, but pretty darn impossible to do accidentally while riding
Green means good battery life. Red means less than 25%. Flashing red means less than 5%
The interchangeable derailleur batteries do need charging. SRAM claims a 60-hour battery life, which could last between 1 and 6 months. The LED light shows green until battery life dips under 25%, at which point is shows red. The LED starts to flash red when battery life is below 5%.
After releasing a safety switch, the batteries slide out easily and into a charger.
The shifters use standard CR2032 coin batteries, with the same LED indicator system. SRAM claims these will last about two years.
When traveling, SRAM recommends removing the batteries and attaching plastic covers to the derailleurs and batteries. The system works on accelerometers; the system is put to sleep when immobile then woken when moved. So, if you transport your bike by car or plane without removing the batteries, then the system will be awake the whole time.
SRAM recommends detaching the batteries for travel and replacing with these red covers. when accelerometers sense movement, the system is kept awake; this applies to car or plane rides, too: sram recommends detaching the batteries for travel and replacing with these red covers. when accelerometers sense movement, the system is kept awake; this applies to car or plane rides, too
We will be putting the system through its paces in Colorado over the coming weeks, riding in the cold and wet (and hopefully some warmth), and reporting back with an updated review soon.
Ben Delaney is a journalist with more than two decades of experience writing for and editing some of the biggest publications in cycling. Having studied journalism at the University of New Mexico, Ben has worked for Bicycle Retailer & Industry News, VeloNews and BikeRadar. He has also previously worked as Global Brand Communications Manager for Specialized. Ben covers all things road and gravel, and can be found logging big miles in the Rocky Mountains that nestle alongside his home in Boulder, Colorado. He has covered the most important bike races in the sport, from the Tour de France and Tour of Flanders, to the Unbound gravel race, and specialises in tech content, showcasing what the pros are riding and putting everyday equipment through its paces.
This website is owned and published by Our Media Ltd. www.ourmedia.co.uk