Sealed systems, such as Gore’s Ride-On cables, have an uninterrupted PTFE middle liner, through which a PTFE-coated cable slips with no chance of contamination. This makes them ideal for winter riding.
Available for brake and derailleur systems for both road and mountain bikes, the Sealed Low Friction versions are the ones to get. They're a little pricey at £45.99, but are well worth it and very durable when correctly installed. Here's how to do it...
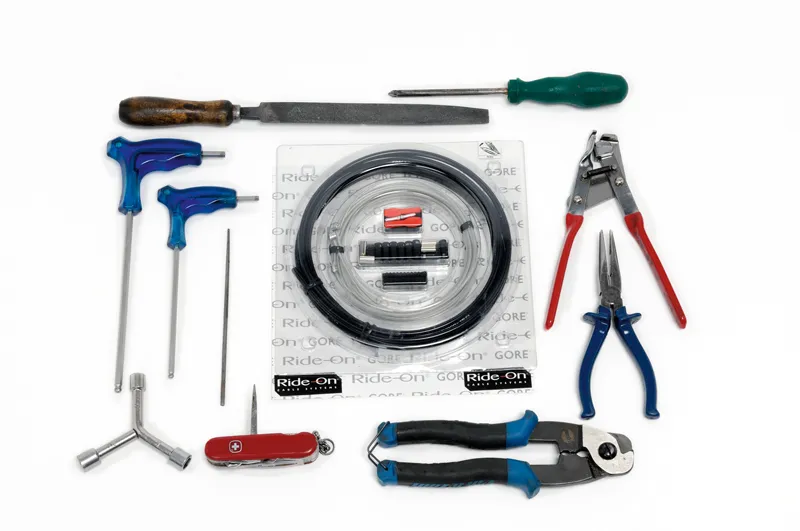
Tools
- Allen keys
- Scribe/awl
- Small screwdriver
- Files
- Pliers/wire cutters
- Gore Ride-On cable kit
1 Remove cables
Cut cables and caps, then loosen anchor bolts and release the cables. It might be advisable to cut the cables between the outers and anchor bolts to help pull them through without getting caught. Beware of frayed cable strands (as pictured) stabbing your fingertips. Make a note of the routing and which cables go through which cable guide stops. Give everything a clean with a shot of WD40 or similar, especially hard-to-reach places adjacent to the frame guides where dirt has a habit of accumulating. Remove the barrel adjusters by turning them anti-clockwise, making sure you catch the small tension spring. Clean the threads and grease or oil them to ensure they turn freely with full travel and don’t seize up in the future.
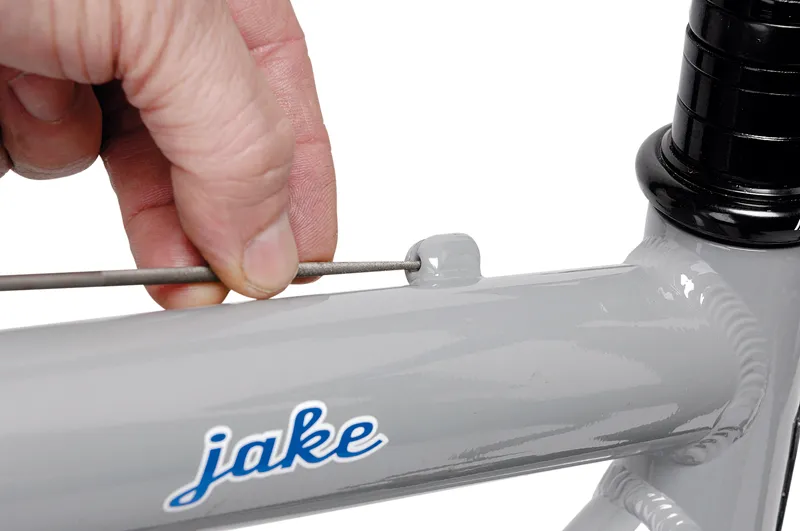
2 Prep frame, open guides
You might find that the liner doesn’t quite fit through the slot, so a bit of filing or drilling might be required, especially on older frames with smaller cable guide apertures. Where a drill might be difficult to use because of a lack of space, carefully position a round file as pictured. Open the cable slot just enough to allow easy passage of the liner without nicking or damaging it. If a drill can be positioned safely, use a 2mm bit. If you need to drill the barrel adjusters, make sure they’re safely held in a vice before putting the drill through to avoid sudden snagging by the bit. Take the opportunity to install some frame protection patches at areas of cable rub.
3 Cut outers to correct length
Sizing cable outers correctly is a crucial step in the installation process. An outer that’s too short can bind when the handlebar is turned, causing unwanted braking or ghost shifting at the worst possible moment. If your original outers were correctly sized, you can use them as a guide. But more often than not stock outers are too long, and could be helped by better routing. Choose the cable stops that give your outer the most gradual curve, with no sharp bends. If re-cabling under handlebar tape, fasten the outer firmly against the bar to prevent power-sapping movement. Problem areas like the cable stop headset spacer can sometimes be solved by looping the outer over the stem.
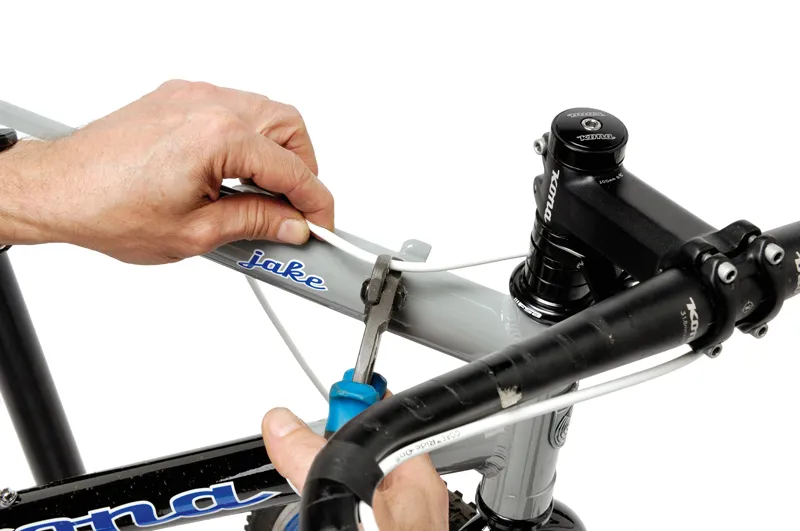
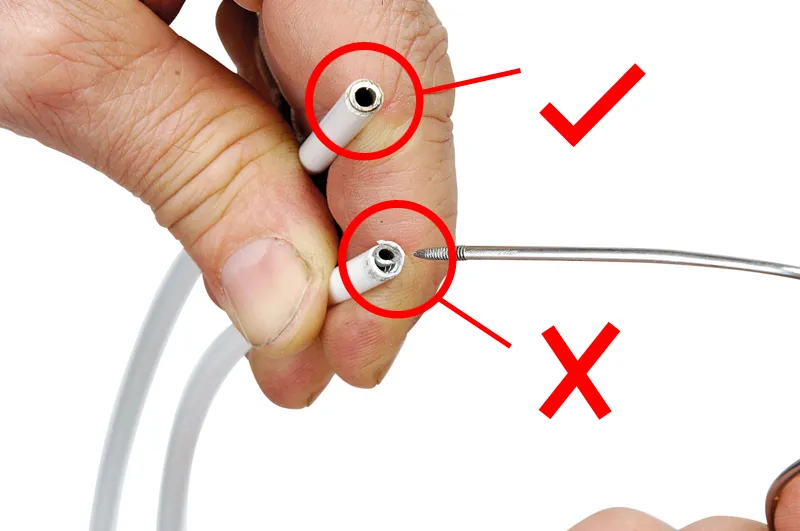
4 Square off cable outer ends
The outers need to be squarely and fully seated into their respective cable stops and guides without causing any cable interference. Note the right and the wrong way, as pictured. After cutting with a good set of wire cutters, squeeze the ends back into a circular shape if they’ve been ovalised. Now, holding an end firmly, dress it with a few strokes of a sharp file to square it off flat. Finish by inserting the point of an awl or sharpened spoke to smooth out any burrs, which could dig into the liner. Be careful not to slip and stab yourself! Repeat for all the ends of all cable-outer sections. If you have a bench grinder in your workshop, you could use it to speed things up.
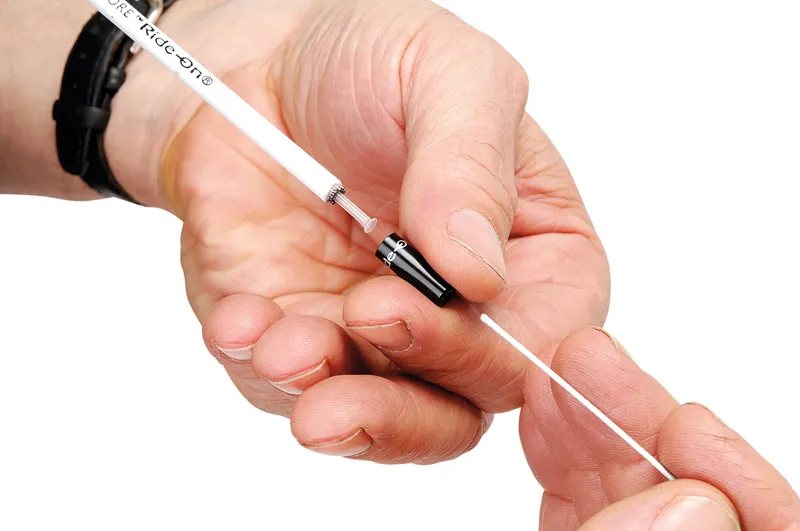
5 Thread through liners and cap off
Remove the new cables from the liner by cutting the anchor end that you won’t be using. For brakes, road ends are pear shaped and mountain bike ones are barrel shaped – keep the one you’ll need. For the derailleur cables, the smaller ends are for Campagnolo (4mm), while larger ones are for Shimano and SRAM (4.4mm). Thread the liner through the outer by inserting it into the end closest to the shifter or brake lever. Gently pull it all the way until the trumpet-shaped tip is seated, then cap with a ferrule, as pictured. Thread through and seat a ferrule on the other end, then position completed outers into the frame guides, while threading the liner in a continuous path along the frame.
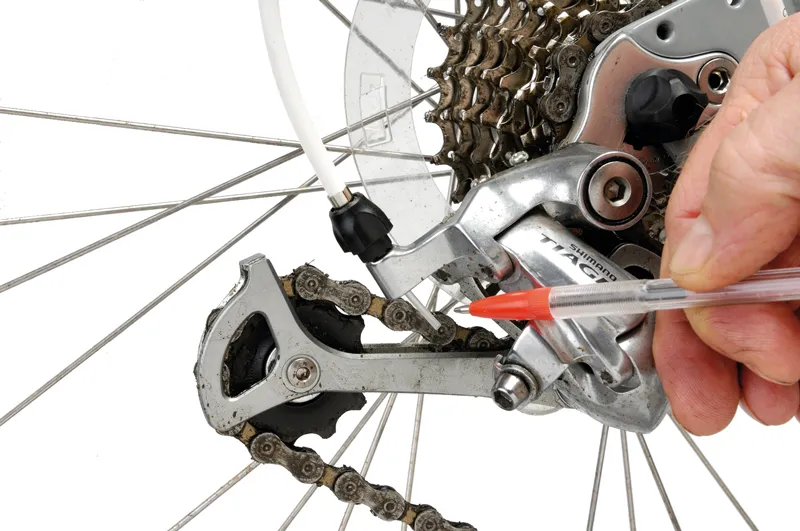
6 Trim liner to length
Trim the liner to length, allowing the correct amount to be exposed – don’t nick or kink it while cutting and manipulating. A specific amount of liner needs to protrude between the barrel adjuster end and the anchor bolt, depending on its location. First, ensure that all the outers and ferrules are in place. Pull the liner all the way through, making sure that it’s properly seated. Before threading through the cables, trim the liners at the following distances: on the front derailleur (in small ring) about 25mm from the anchor bolt. On rear mechs, in the small cog, trim the liner at 10mm from the cable exit before the anchor bolt. For brakes, trim at about 10mm from the exit of the last length of outer, checking that brake travel doesn’t interfere.
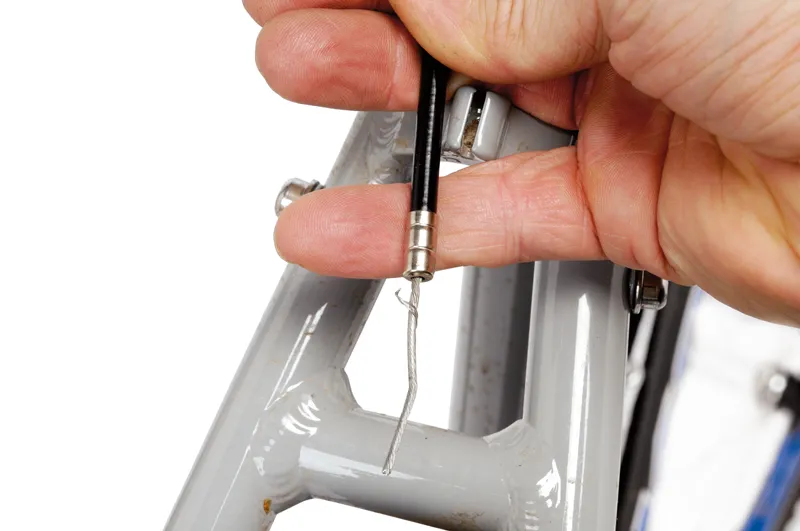
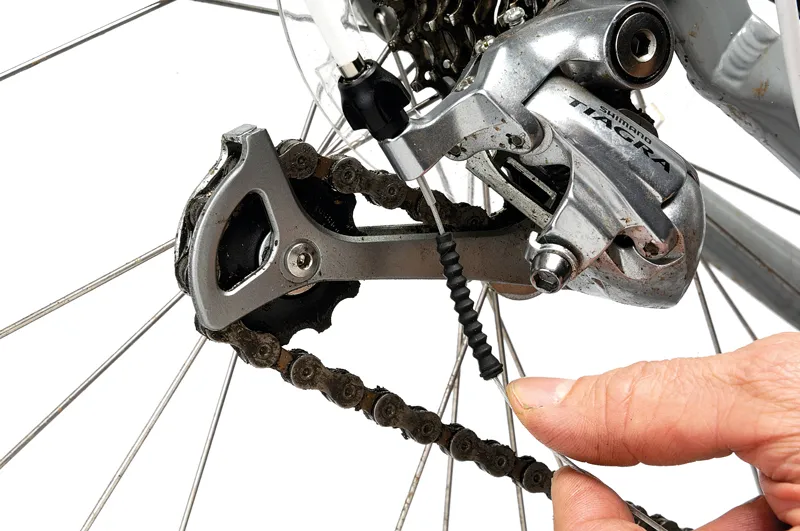
7 Installing grub seals
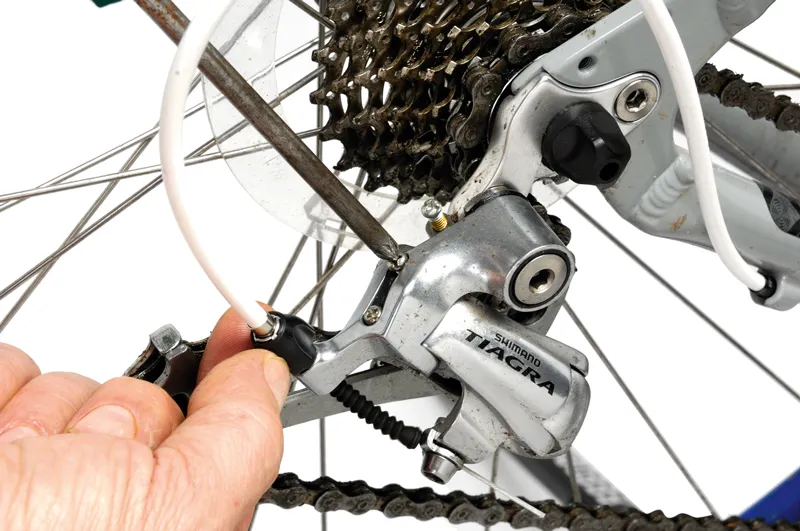
Carefully thread the cable through, making sure you don’t damage the coating on any sharp edges. The next step is an important one as the little bellows device, which Gore call a Grub Seal, prevents grit from entering through the one small vulnerable area in the system, and is the final line of defence against unwanted contamination of the system. Each time a shift or braking action is engaged, a small amount of cable gets pulled out or re-enters the liner, offering an entry point for grit to work its way in, as happens in a standard cable system. So finish by installing a Grub Seal pointy end first, as pictured, over the end of the cable. Cover about 10mm of the exposed liner, and with the remainder cover the cable.
8 Adjust gears
Now that you’ve got the cables correctly in place, you can set about adjusting the gears; but first bed in the new cables, outers and ferrules by stressing the system. You can do this by gently pulling a section of exposed cable by hand while turning the pedals until the derailleur shifts through the gears to its travel limits. Or, for the rear mech, simply activate it by pushing the parallelogram by hand. Go easy as you approach the spokes on the rear wheel. If the low limit screw isn’t correctly adjusted, the rear mech could tangle with the spokes, so ensure it’s in contact and preventing further movement. The same rule applies for the front derailleur. Use barrel adjusters to fine-tune the shifter stroke so that one click grabs exactly one gear.
9 Adjust brakes
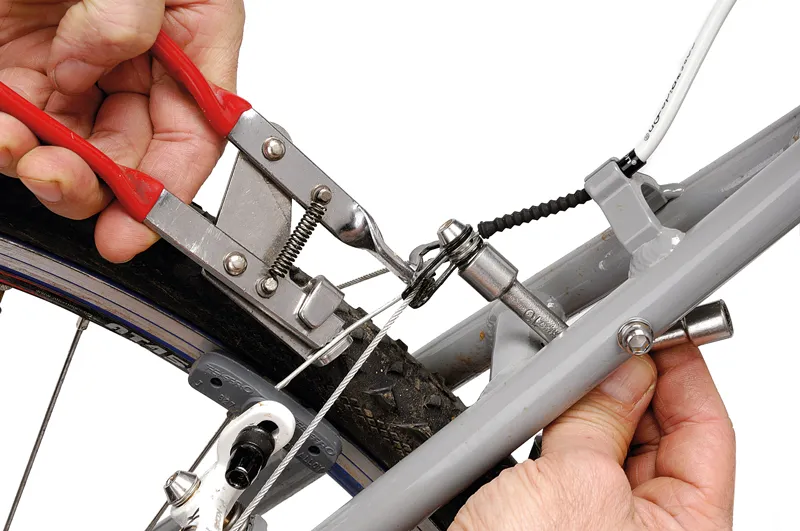
While adjusting a modern dual-pivot side-pull brake is fairly straightforward, stringing up a set of ‘heritage’-style cantilevers that use an old-fashioned straddle wire (as opposed to a preset Shimano-style link wire) can be more tricky. Use either a third hand tool or an old toe strap to hold the brakes against the rim, freeing up a hand to thread cable through the yoke and cable anchor. Better still is a fourth hand tool, pictured, which helps draw the cable through the anchor bolt, setting the brake position in the process. Immobilise the back of the anchor with a 10mm socket spanner and tighten firmly at the front with a suitable Allen key (usually 5mm).
10 Test and readjust
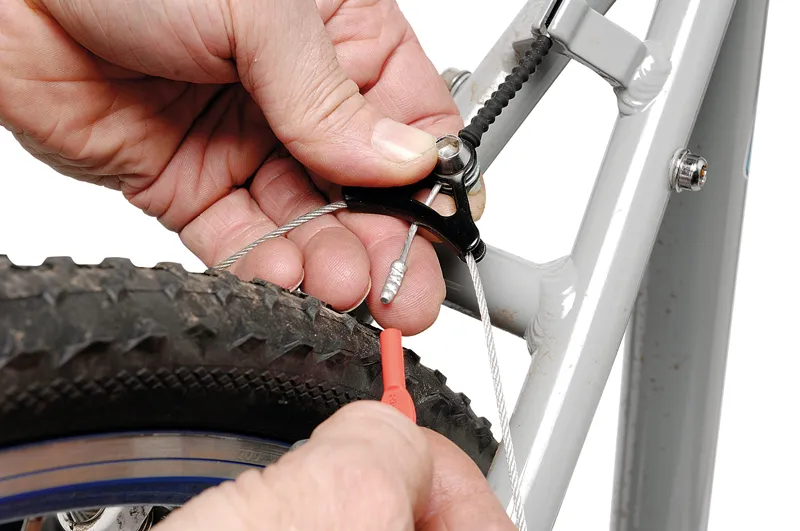
Now you need to get on your bike, hammer through the gears and slam on the brakes half a dozen times or so to make sure everything’s bedded down. Pay particular attention to the shift from the large to small ring while in the second-largest cog, and the other way around, from the small ring to the big while in the second-smallest outside cog; these are the gears most likely to cause the chain to overshift and come off. Readjust the brake cables at the anchor bolts if required, or simply use the barrel adjusters to tighten things up a bit. Now finish off by carefully crimping the metal end caps over the cable ends to prevent fraying and, for a touch of colour, install the red rubber ID crimps.