

Bicycles rely on smooth-turning, low-friction bearings to allow them to roll forward with as little human effort as possible. We can’t create frictionless bearings – even Shimano hasn’t cracked perpetual motion – but we can give ourselves every advantage by keeping the bearings we do have as clean, lubricated and well adjusted as possible.
Given the damp and dirty natural habitat of mountain bikes and the fact that – rubber seals notwithstanding – bearings are more or less open to the ravages of the elements, you’d expect them to need lots of care.
Well, just for a change, bearings are better now than they were in the ‘good old days’. The grizzled old-timers among us can remember spending at least two hours each week cleaning, regreasing and adjusting old cup and cone bottom brackets – it was a never-ending cycle of ride, strip, refit, adjust.
These days, water and dirt has a harder time finding its way into the dark, greasy confines of our bearings, meaning modern mountain bikers can ride more and wrench less. It’s all thanks to the advent of non-adjustable ‘cartridge’ bottom brackets, the wider use of cartridge bearings in headsets (and some hubs), together with more effective lip-and-labyrinth seals for headsets and hubs.
That said, we still need to take occasional care of our headset and hubs, so here’s how it’s done:
Need to know
Time: One hour (hubs and headset)
Skill rating: Medium
Cost: Approximately £10 for degreaser and grease, £10 for cone spanners if you don’t already have some
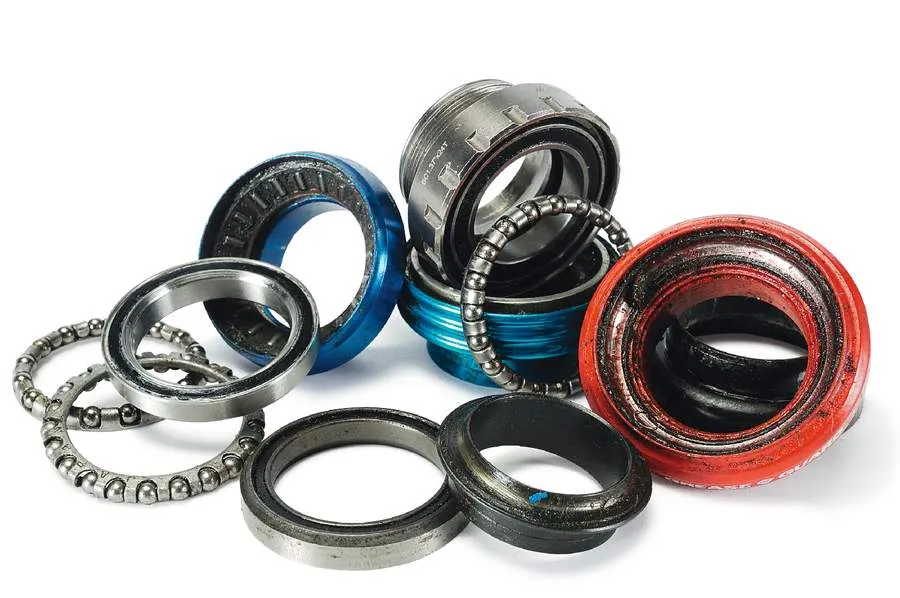
Roller bearings:
Some threadless headsets have an arrangement of long roller bearings (as opposed to balls) in a conical plastic retainer. Use the same rules for rollers as for ball bearings: shiny = good, dark/pitted/missing = bad.
Loose balls:
Entry-level threadless headsets still use loose ball bearings arranged in metal cages. These cages can be bent easily, rendering them useless. Also watch for balls dropping out.
Bearing Races:
Threadless headsets and hubs that use loose ball bearings require steel bearing seats. These tracks must remain smooth and free from pits or cracks for the balls to run smoothly.
Cartridge bearings:
Although cartridge bearings are designed to be disposable, you can service them with a little care. Make sure you get the seal out without bending it, otherwise its sealing qualities will be impaired.
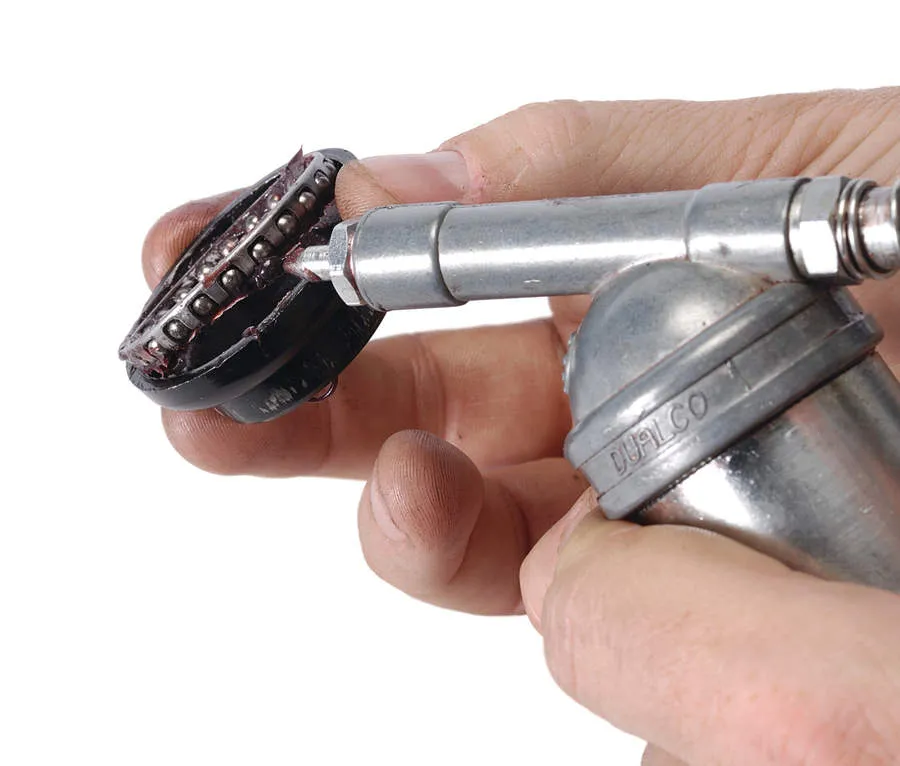
Fresh grease:
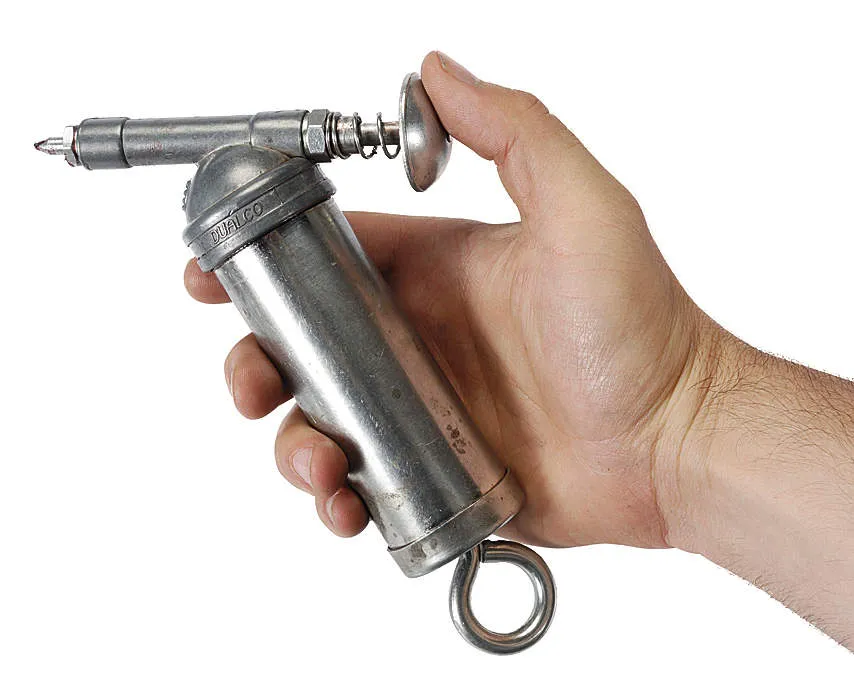
Servicing your bearings once in a while gives you the opportunity to remove built-up crud from the bearing, inspect the balls and races, and top up with fresh grease. A grease gun is the cleanest and most efficient way of applying grease to a bearing.
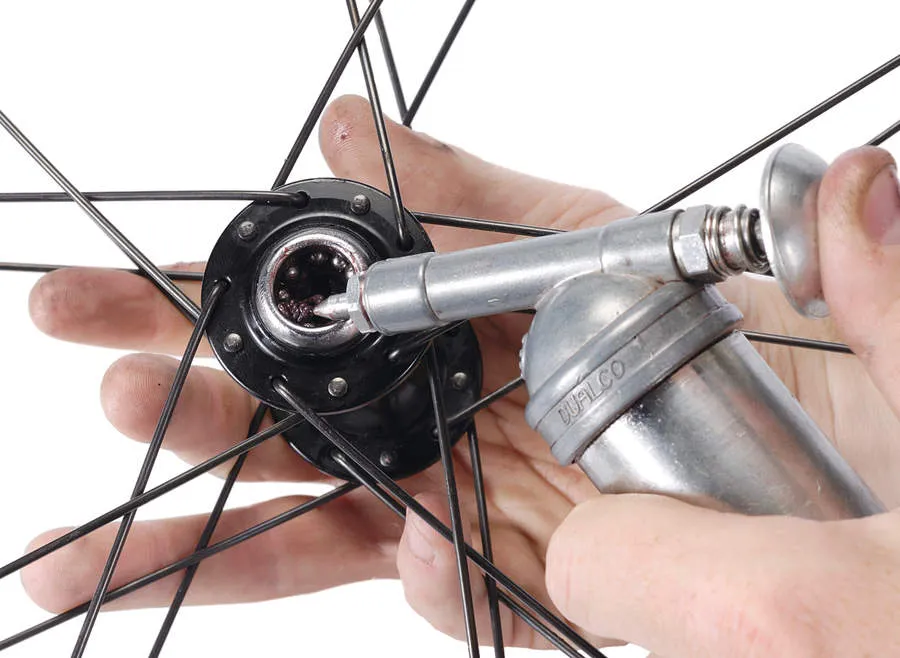
There are a few different models of grease gun. Some are simple trigger/barrels that screw on to threaded, plastic tubes of grease. Others, like the Dualco model pictured, have a metal container attached, which you fill up with your preferred brand of grease.
Servicing bearings
Here we’re servicing a cartridge headset bearing, a loose headset bearing and cup-and-cone bearing hubs.
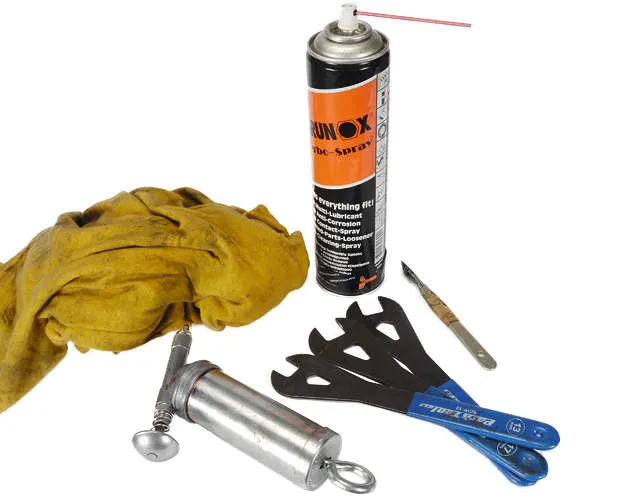
Tools you'll need:
- Lint-free rag
- Scalpel
- Grease (with gun)
- Cone spanners
- Degreaser (with straw nozzle)
Servicing a cartridge headset bearing
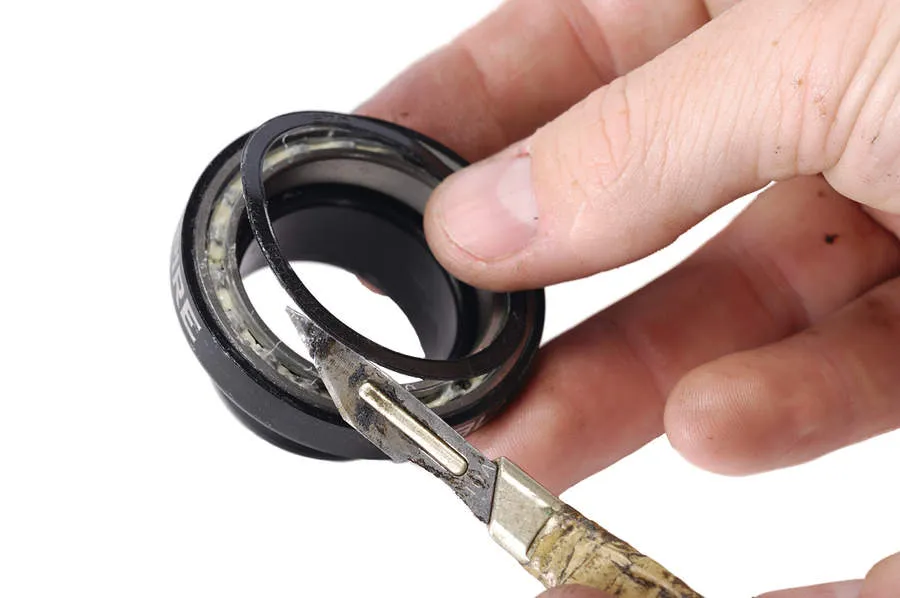
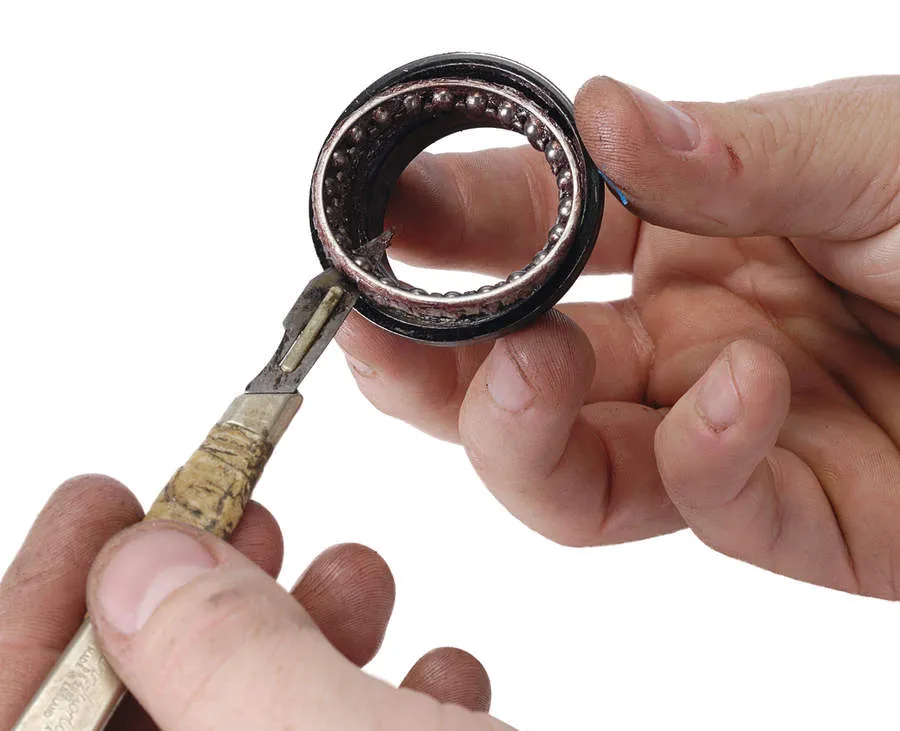
1] Remove the seal
Once you've removed the bearing from the headset, you need a steady hand to slide the tip of the scalpel blade between the outer steel case of the bearing and the outer edge of the black (sometimes orange) seal. With the tip under the seal, gently twist the blade towards the inside edge of the seal and it'll pop out. The seal is rubber coated but has a metal core, so don’t bend it!
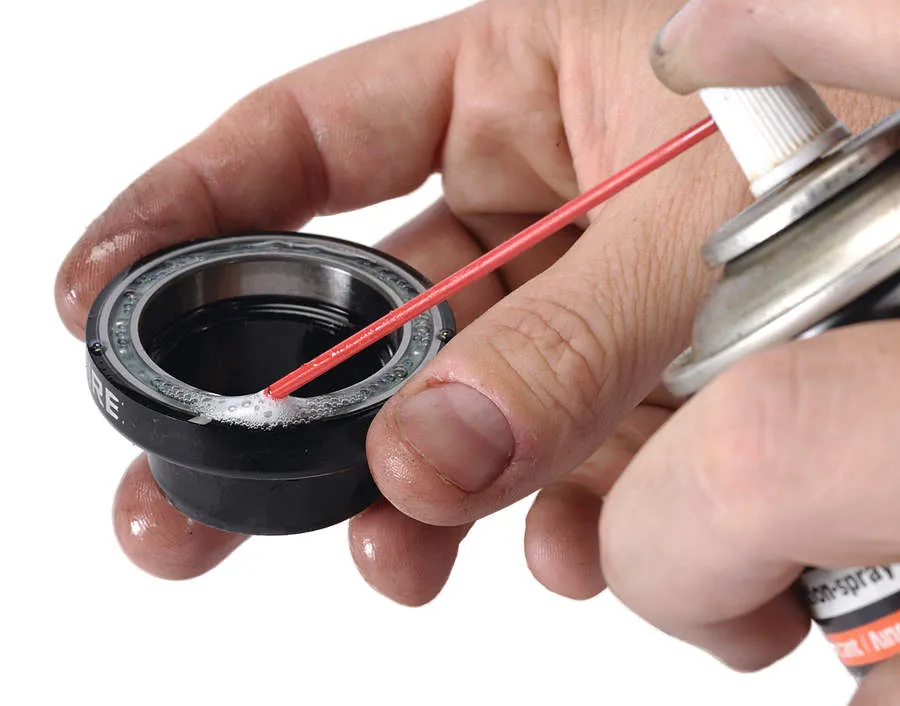
2] Clean the cartridge bearing
Use a can of spray degreaser with a fine straw applicator to direct a jet of degreaser into the bearing assembly. With the bearing full of degreaser, keep turning it to break the grease down and continue to flush with degreaser until it’s clean. This may take five minutes and a few applications of degreaser, but do get it all out.
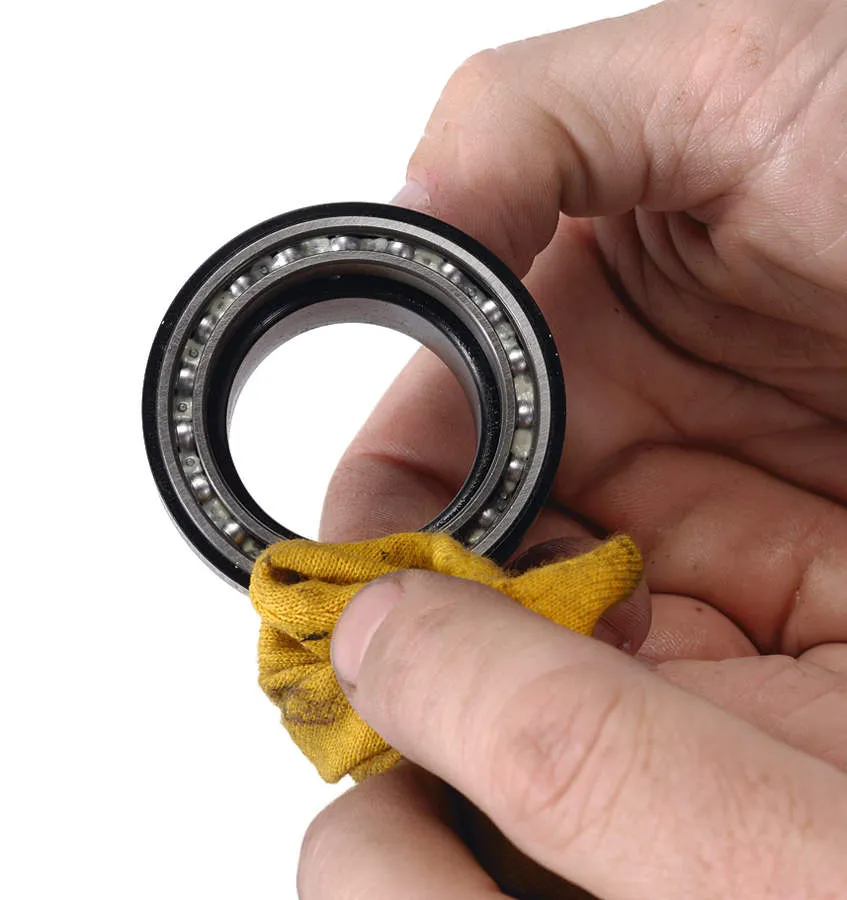
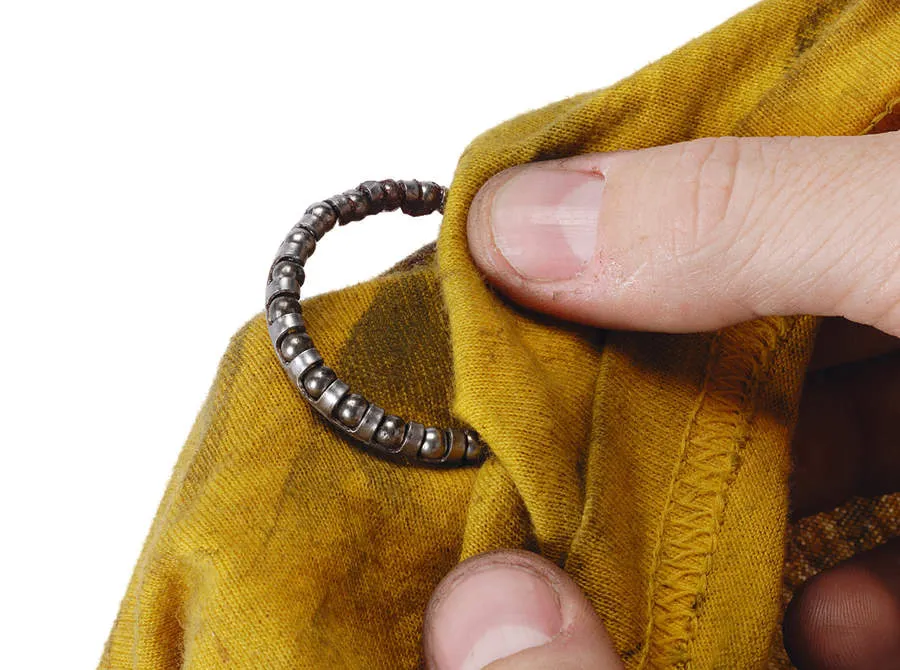
3] Dry the cartridge bearing
Use a lint-free rag to dry the bearing – you don’t want to fill it up with rag fluff. Only now can you get a real picture of the state of the bearing. If it is shiny or dull silver, that’s a good sign. If the bearing is black or dark grey but still feels acceptably smooth, eke out the last of its performance by giving it a service. If it’s notched, it's best to throw it in the bin.
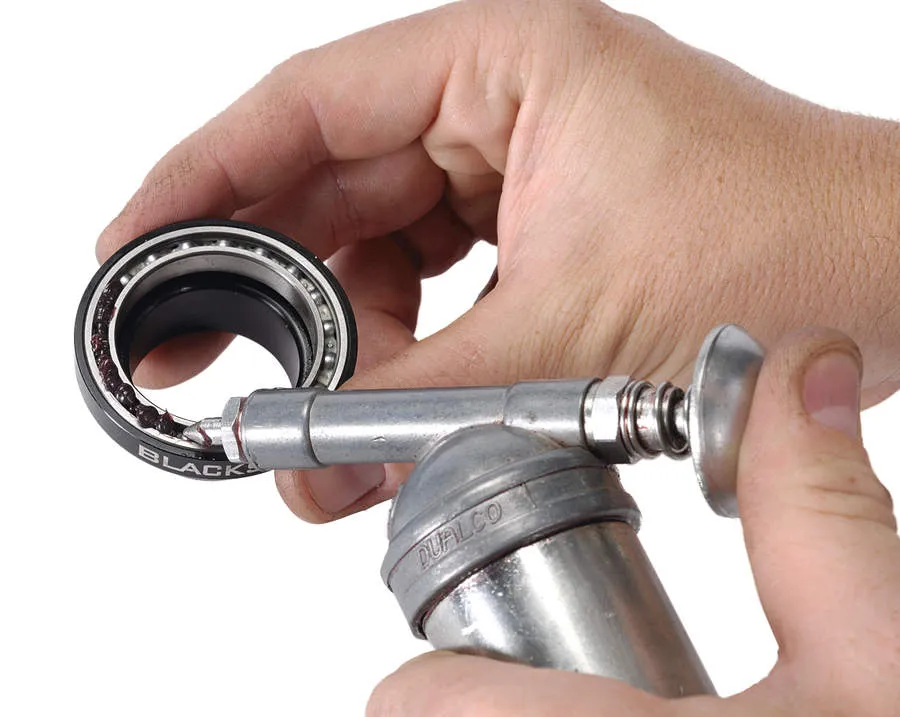
4] Add grease
It’s time for the grease to go in. Which brand you go for is less important than how much you use – don’t skimp. Because the balls are shielded somewhat by their cages, a quick smear of grease may not reach them. You’ll need to work the grease in there to ensure all the metal-to-metal surfaces are shielded from each other.
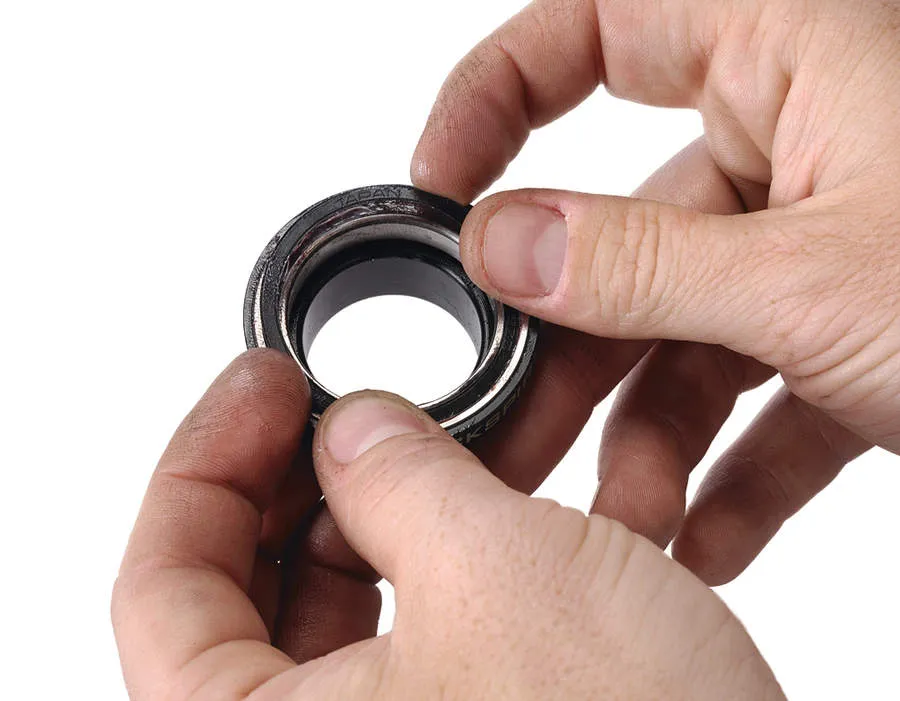
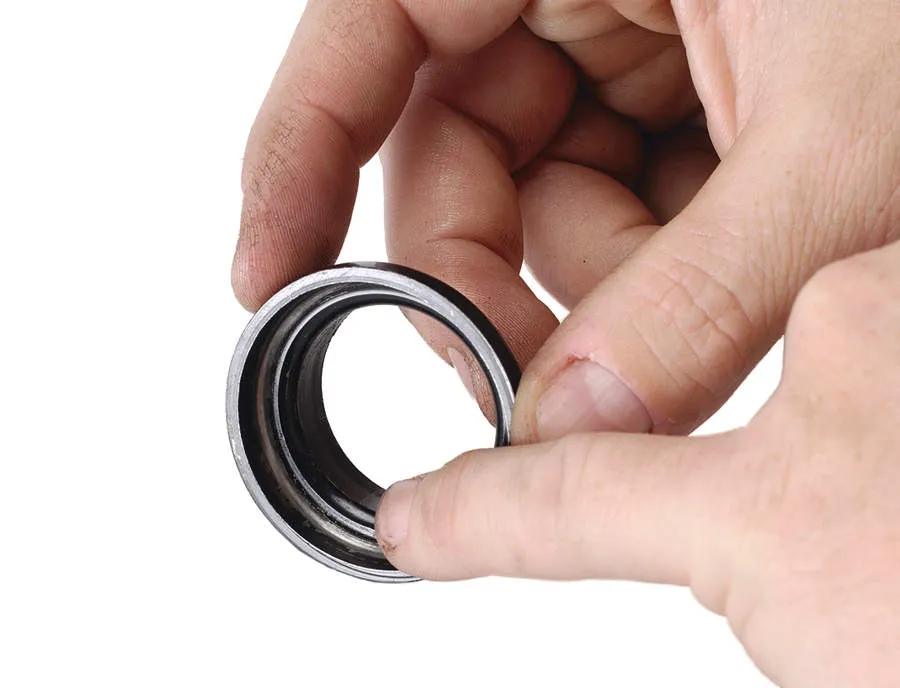
5] Refit the seal
When you’re happy that the cartridge bearing is full of fresh, clean grease, you can refit the seal. As we’ve mentioned, the seal has a metal core and once bent will not properly fit (or seal) the bearing. Gently place the rubber-coated seal on top of the open bearing and use your thumbs to ease the seal back into its grooved seat without adding undue pressure. You should feel it seat into place.
Top tip
Use some workshop rubber gloves to protect your hands when working with grease. They’re thin enough to let you can work on even tiny parts without loss of feeling and you’ll have less scrubbing to do afterwards.
Servicing a loose bearing headset
1] Remove the loose bearings
Threadless headsets with loose caged balls can be lifted out with a scalpel or similar tool. If there is grease on the balls they should stay in position. However, dry races may cause odd balls to drop out. Given their tiny size, they’re easily lost, and even when you find them again they’re not easily reintroduced into the cage. Go carefully.
2] Clean the loose bearings
Use a spray of degreaser to shift the worst of the grime, then get to work on the bearings with a lint-free rag. Be careful to avoid popping the individual ball bearings out of the cage — they’re difficult to replace, especially without damaging the cage. As with cartridge bearings, brighter is better with loose ball bearings. If they look tired, they probably ought to go.
3] Check the bearing seats
Wipe the bearing seats out. They’ll almost certainly need a dousing with degreaser (we’ve removed ours from the frame for clarity). You’ll see a silver line worn through the black paint (or a grey line on a silver seat) where the balls make contact with the seat. Ingress of dirt can cause corrosion, leading to pits and cracks in the surface – this results in poor performance.
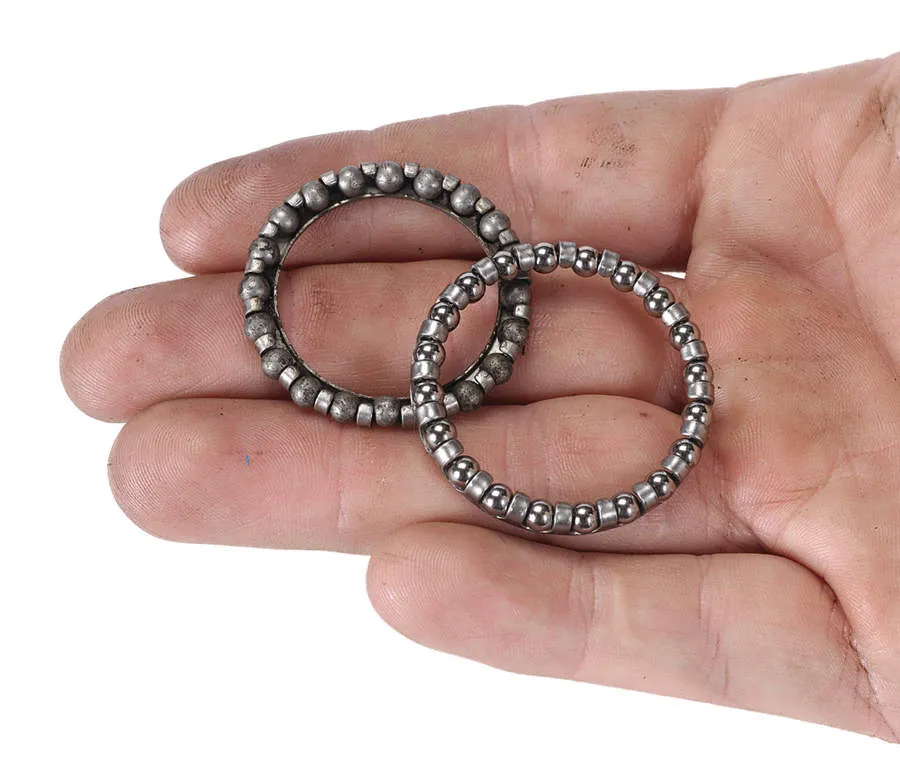
4] Appearances matter
Here are two cages of loose balls taken from two different threadless headsets. The left-hand one is from a bike with a year’s worth of use. Its balls are grey, although still uniform and without serious damage. They have a few months of use left, as long as they get a good greasing. The set on the right-hand side is nearly new and, if looked after properly, will look like this in a year’s time.
5] Replace the loose bearing cage
When you put the caged loose balls back into the cup (shown here out of the frame for clarity), ensure the cage is sitting on a bed of grease. It is unshielded metal-to-metal contact which causes the rapid wear to the bearing and to the bearing seat, while voids inside the bearing can be filled by water ingress causing faster breakdown of the grease. So fill it up.
6] Check the position carefully
It's vital that the caged loose balls are placed back into the headset cups the right way (balls towards the head tube). If the cages get replaced the wrong way around, they simply won’t spin. Trouble is, by the time you notice (usually when you do the headset up) you’ve knackered them.
Servicing cup-and-cone bearing hubs
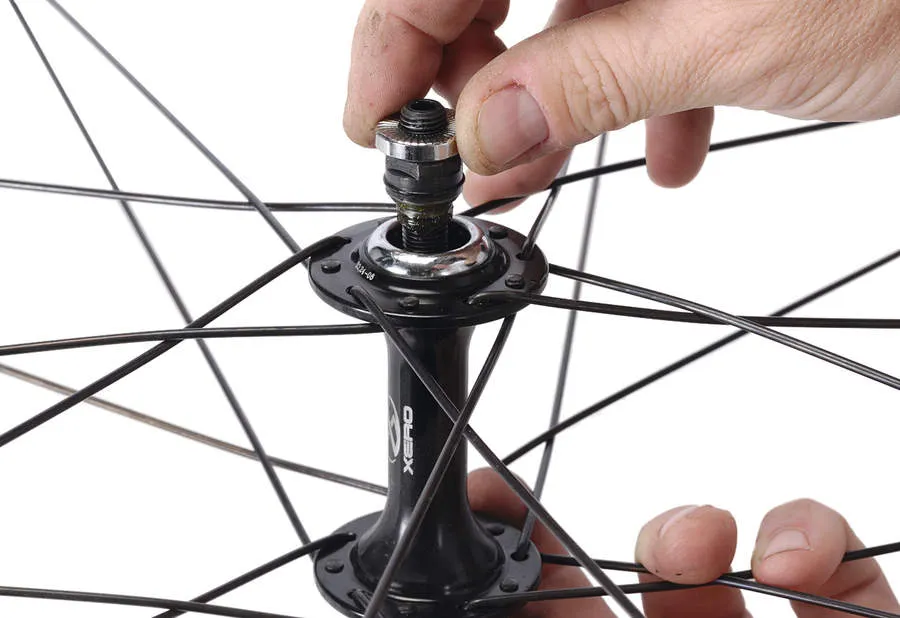
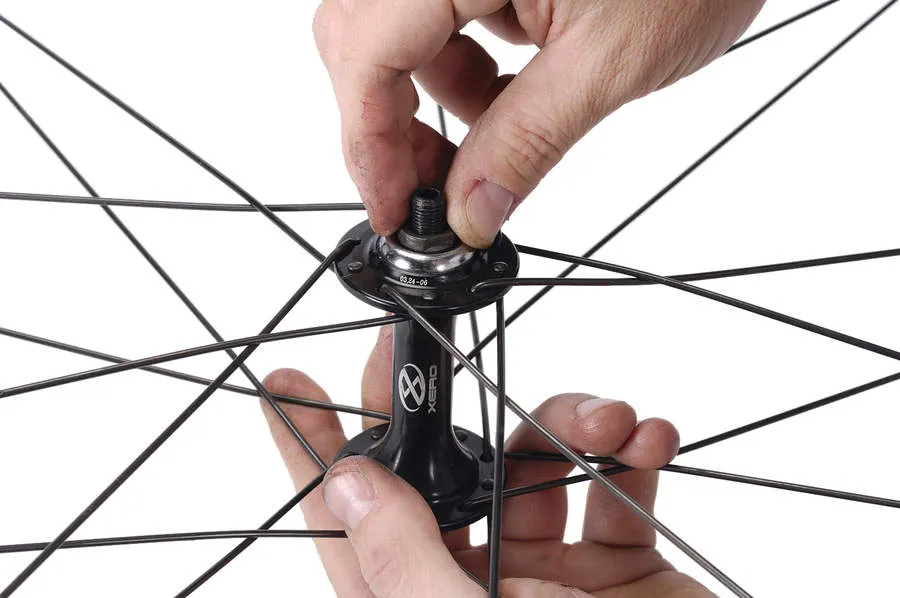
1] Undo the cup-and-cone hubs
Cup-and-cone hubs will require a pair of thin cone spanners to undo the axles and gain access to the bearings. Once undone, carefully lift the axle clear of the hub. Be careful not to disturb or dislodge any of the bearings, which should remain in their seats — sometimes they stick to the axle as you pull it out or drop out from the bottom end of the (now open) hub.
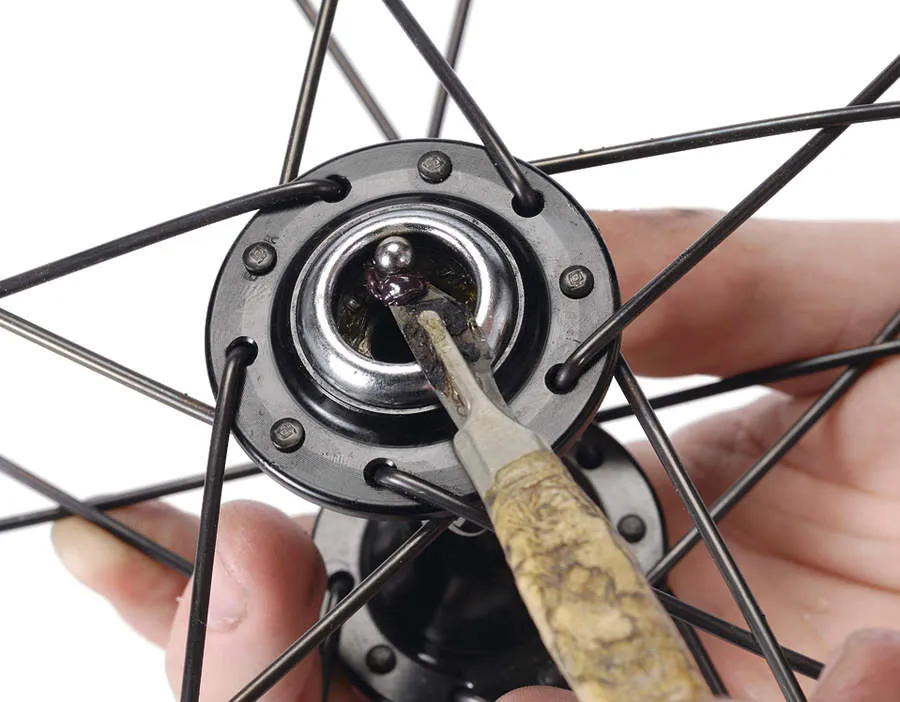
2] Remove the hub bearings
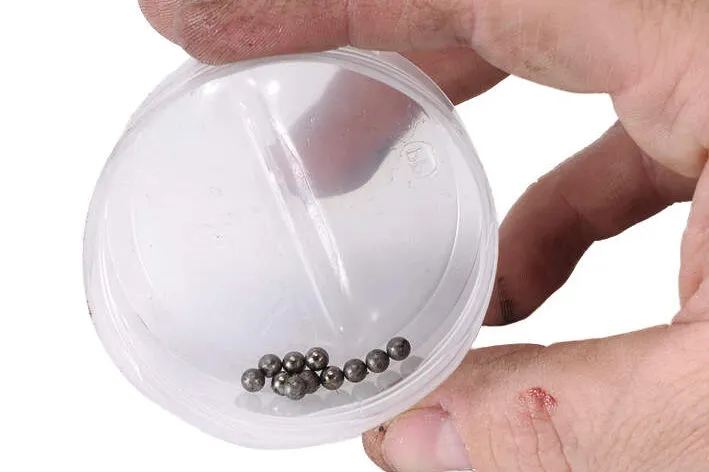
Use a scalpel blade to carefully remove the loose balls from each side of the hub. There should be 10 ball bearings per side. To help lift them out, you may find it easier to add a little grease to the scalpel blade. This helps the individual loose balls stick to the blade. Place each ball into a small container to prevent losing them on the floor.
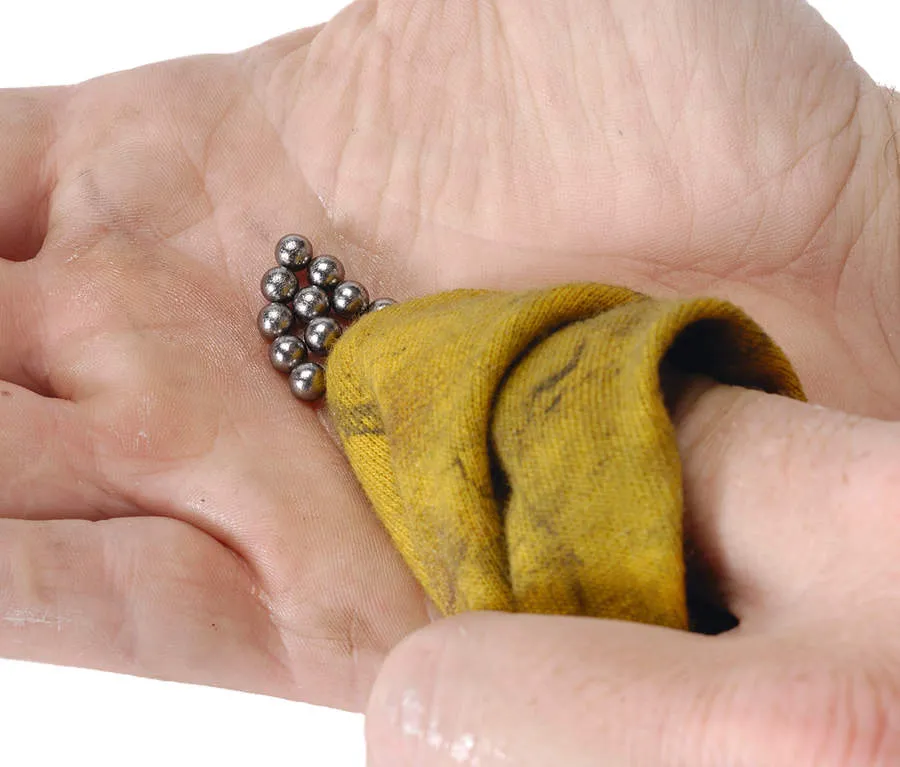
3] Degrease the balls
Add a spray of degreaser to the balls and rub over with a rag. The balls should be bright, shiny and uniform in appearance. If there are any dents, misshapen balls or dark discoloration, it’s worth replacing them with new ones. This is even more important with hubs than headsets. Headsets are cheap to replace, but changing your hubs will require a costly wheel rebuild.
4] Clean the hub bearing seat
Clear out the hub’s bearing seat with some degreaser and a cotton bud, and inspect it. It’s important that the bearings are refitted into a bed of fresh grease. Don’t be stingy with the grease – any excess will work its way out. Also, be careful when replacing the axle in the hub, because the movement of the axle can cause the balls to catch it and become dislodged.
5] Tighten the cone and lock washer
With the axle back in position, you need to retighten the cone and lock washer correctly. This requires a little practice to get right. You want to leave the bearing adjusted so that it turns smoothly with no catching, but with no perceptible play. If there’s any play in the hubs, it'll make the wheels sound awful when ridden and ultimately cause extra wear and tear on the bearings.
Top tips
- Keep a container next to you and put your loose ball bearings straight into it as you’re removing them from your hubs. They’re easy to lose and seem to like nothing better than rolling into hard-to-reach places, particularly under the fridge.
- Get a magnetised screwdriver blade to make life easier for yourself when removing loose ball bearings from a hub – the balls will stick to the magnetic tip without the need for more sticky grease. Either buy one or magnetise your own screwdriver by dragging its blade over a fridge magnet several times in the same direction.
