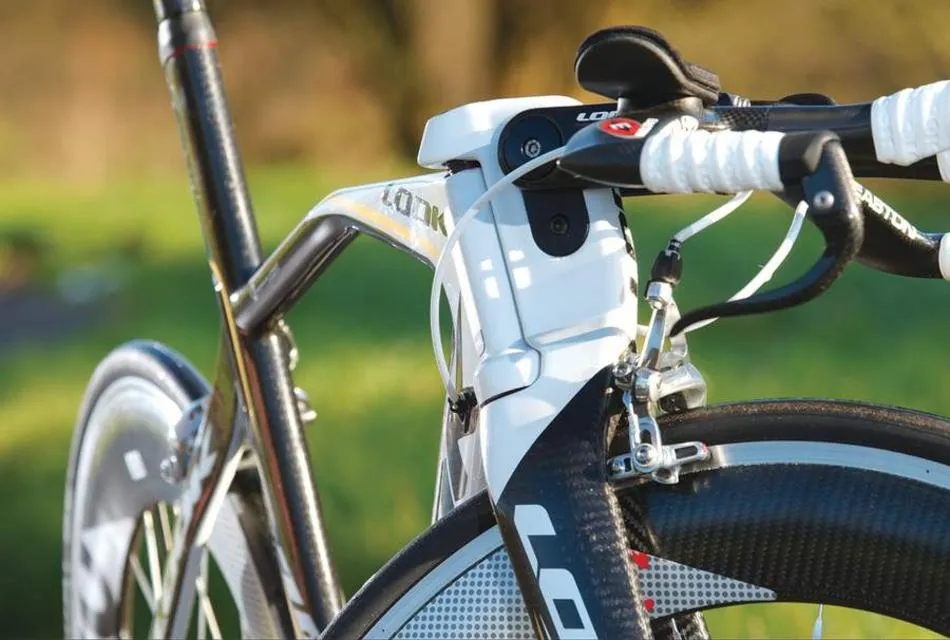


Unlike in years past, well designed time trial and triathlon bikes with lots of integrated aero features are now readily available at a variety of price points. Here’s a selection of tips on how to deal with some of the unusual features typical to these machines, along with some standard maintenance pointers.
Remember, if you’re unsure about any of these steps, head over to your local bike shop and consult a professional mechanic.
Tools needed
- Small adjustable spanner
- Multi-tool/screwdriver
- Slotted spoke tool
- Small torque wrench
- Superglue
- Chain cleaner/chain lube
- Carbon assembly paste
1 Sitting pretty
When setting your seat angle or position, you’ll have to contend with different types of clamp designs, which often allow a forward or rearward option by reversing the clamp orientation. Use an indelible marker to mark your initial and final position. Ensure clamp bolt threads are greased and tightened to their correct torques – don’t overdo it. Most torque values tend to be between 5 and 10Nm, which is quite low. Prevent shiny carbon seatposts from slipping with an application of assembly paste; this will also stop you having to use excessive torque on seatpost clamps. It’s quite easy to split carbon or strip fragile titanium bolts if you’re ham-fisted, so get a small torque wrench. If your seatpost is round, make sure it isn’t askew.
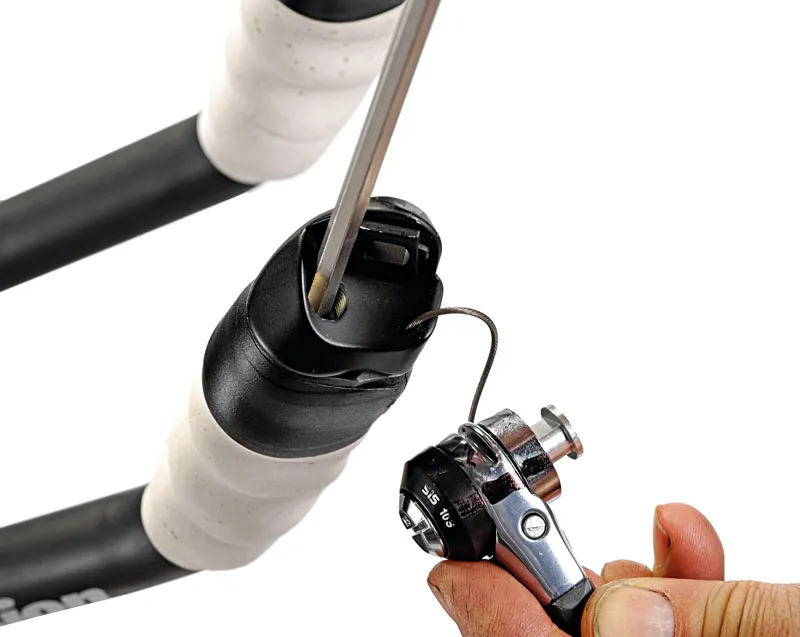
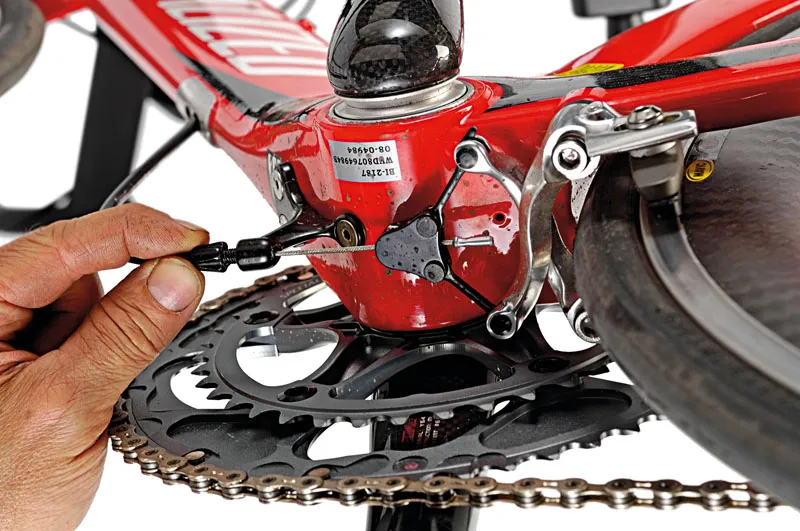
2 Bar end shifting
Over time, your bar end shifters will almost certainly need tightening. Drop the rear derailleur into high gear, then mark the shifter assembly’s position to aid reassembly. Release the cable from the anchor bolt and withdraw slightly to disconnect the shift lever from the bar end body; this will give you access to the wedge bolt. With Shimano, tightening is done anti-clockwise. On SRAM, remove the shifter barrel with a 4mm Allen key after disconnecting the cable. With a 5mm Allen key, tighten the wedge by turning the bolt in a normal thread direction: lefty-loosey, righty-tighty. The same thread direction applies to Campagnolo bar end shifters; remove the wing nut to disengage the shifter and gain access to the wedge bolt.
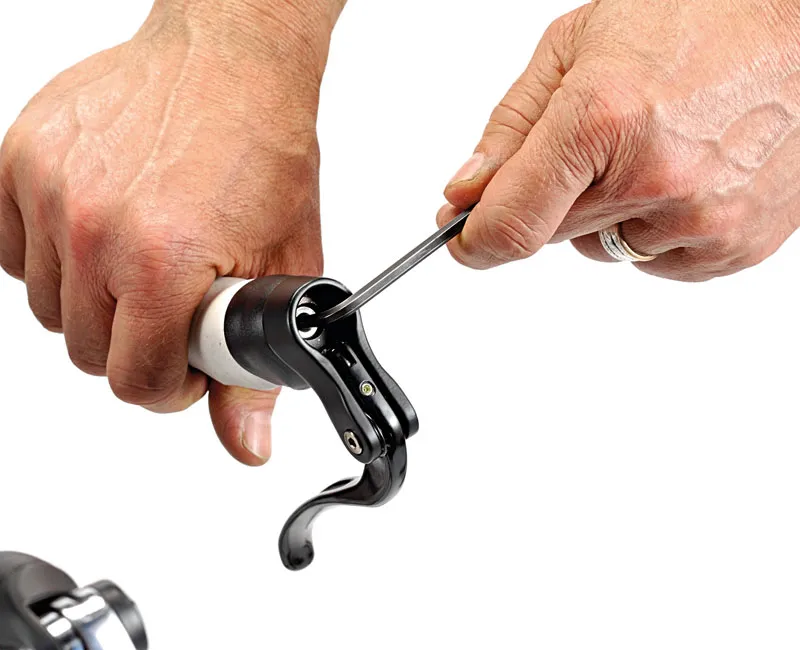
3 Bar end braking
Like the shifters, bar end brake levers can work their way loose over time. To set up your brake levers correctly, remove the rubber plug to gain access to the fixing bolt. The model pictured uses a conventional wedge with a standard threaded bolt (Dia-Compe/Cane Creek). Other brands use a simple external clamp with a small bolt needing very little torque. Position as required, and tighten sufficiently so the lever can only be dislodged by a substantial blow. Take great care when tightening wedge type designs into carbon bars – they can split open. Make sure the cable outer has been cut with enough of it protruding so as to bottom out and seat correctly into the lever cable guide and prevent squashiness.
4 Correct compounds
Thin aero brake levers can be uncomfortable, and braking power, when coupled with internal routing, can be pretty poor in wet weather. Brake pads need to be the correct compound for the rim surfaces and conditions. If you’re installing a set of carbon tubular wheels, be sure to swap the old pads for a carbon compound. If you’re expecting foul weather, on alloy rims consider using a special wet weather compound such as Kool Stop Salmon block inserts, which will allow you to brake later and harder. Centre-pull brake designs feature small grub screw spring adjusters on both sides which will allow you to centre the brakes, and increase spring tension for snappier lever return. Turn clockwise to increase, anti-clockwise to decrease spring tension.
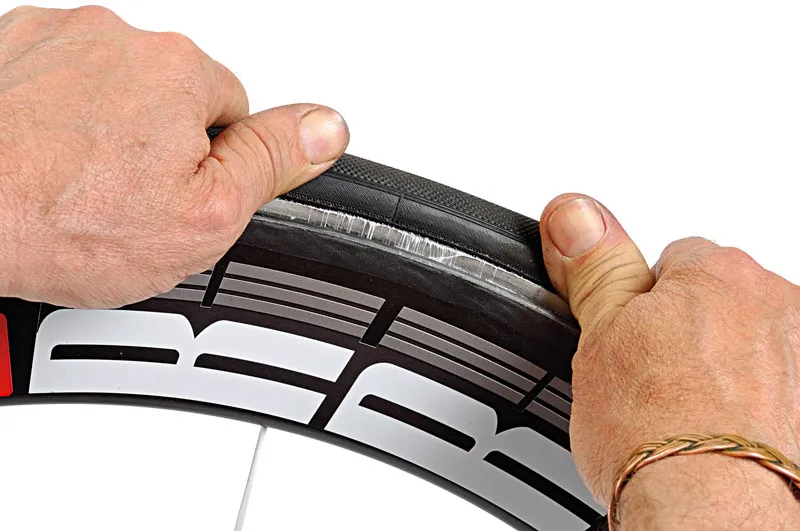
5 Rubber checking
Make sure tubular tyres are glued on correctly. Grab the tub and try to pry it off as pictured, with steady even thumb pressure at 12, 3, 6 and 9 o’clock. It should stay put and not lift away under sustained pressure. Notice the tub tape lifting away in the photo; while tape can sometimes make for a quicker tyre change, glue is less likely to result in a tub rolling off in a tight corner or at the turnaround. On both clinchers and tubs, small cuts in the tread can allow debris and stone chips to get picked up and wedged back in, eventually working their way through and causing punctures or slow leaks. Locate and mark the cuts, release the air, and superglue them back together. Re-inflate once they're dry.
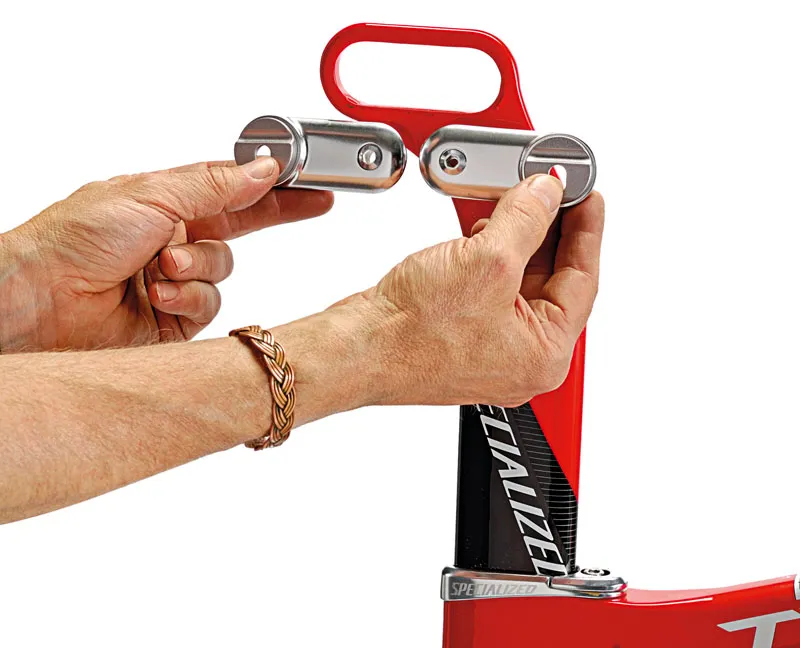
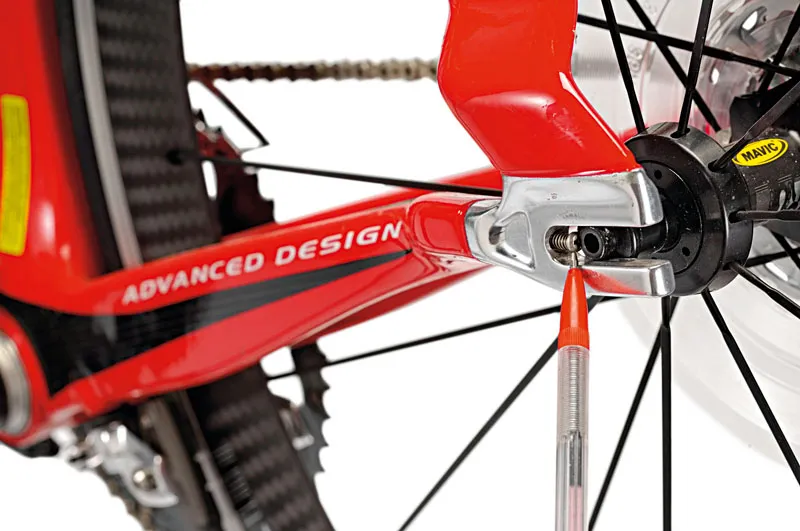
6 Wheel right
You don’t want any wheel rub under hard effort, especially at the rear. Fine tune wheel and tyre clearances in the frame using the threaded dropout adjusters as pictured. Fitting a different tyre can lead to rubbing, as can out-of-true wheels. Pressure should be measured with a gauge, as relying on just a thumb squeeze could leave you with under-inflated tyres. Consider a fresh set if yours are showing signs of wear: look for a flattened, squared-off tread section with numerous cuts and/ or exposed casing threads. If you often find yourself on ‘heavy’ or rough road surfaces, consider moving up a size if you originally had 18mm or 20mm tyres; 23mm tyres inflated to about 120psi will roll better on the rough, offering a smoother and more controlled ride.
7 Better braking
While dual-pivot and side-pull callipers usually incorporate a quick release, a new generation of centre-pull designs lacking this feature are finding their way onto many bikes. One way to avoid any wheel rub, while speeding up wheel removal, is to carefully adjust brake cable length to allow for the extensive use of the barrel adjuster as a substitute for the lack of a quick-release. Set the brake cable length with the adjuster positioned about halfway through its travel; this will allow it to be turned clockwise (inwards), releasing the cable and opening the brake arms, thus allowing the tyre to clear the blocks. Slacken the cable if wheel and frame flex cause brake rub under hard acceleration, or tighten it up (anti-clockwise) to reduce lever travel and quicken braking response.
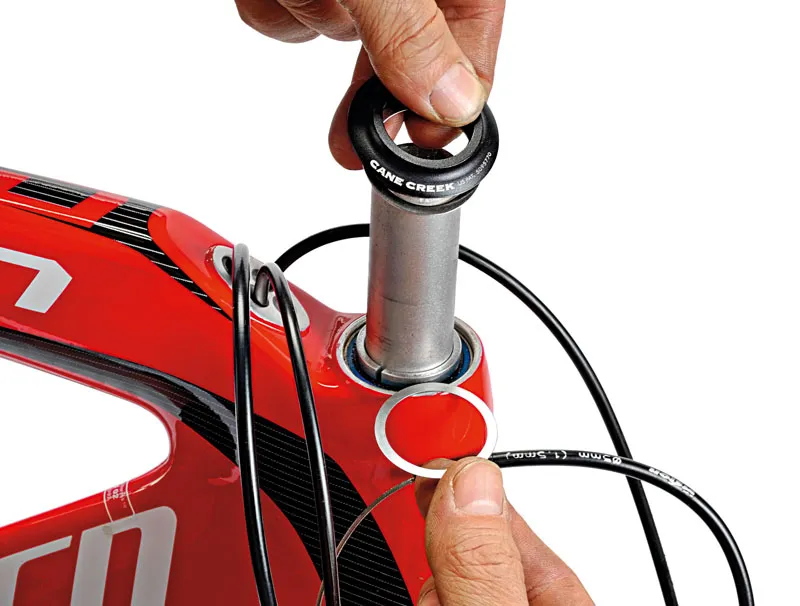
8 Headset overhaul
Improperly adjusted headsets can be distracting while riding. Rattling noises when going over small sharp bumps are a sign that they’re loose, while diffi culty holding a straight line within about a 2in strip can mean the headset is over-tightened or binding. If you’ve been experiencing problems with headset adjustment, try the following: for loose aheadsets with carbon steerers, ensure the expander wedge is set about 5mm below the edge of the steerer tube to prevent interference with the top cap, and tighten fi rmly to prevent slippage. Star-fangled wedges can be tapped down a touch further to obtain the same result. If your headset is overtight or binding, and you’re having trouble fine tuning it, try a thin shim or two between the upper bearing wedge and top cover, as pictured.
9 Perfect pitch
Inspecting your wheels before an event could mean the difference between a good time, or having to wait by the roadside for the broom wagon. Check for loose spokes or signs of the wheel being out of true. All spokes should be adequately tensioned, producing a medium pitched ‘ping’ with a bit of sustain when plucked. A really loose spoke won’t produce a sound, and will feel unmistakably loose. Only attempt to true a wheel if you’re experienced, especially aero wheels with high tensioned bladed spokes. What you can do, though, is ensure the leading edge of the blades are pointing in the right direction for maximum aero advantage. Use a straightening tool or a small adjustable spanner to orientate them correctly. This step shouldn’t affect trueness in any significant way.
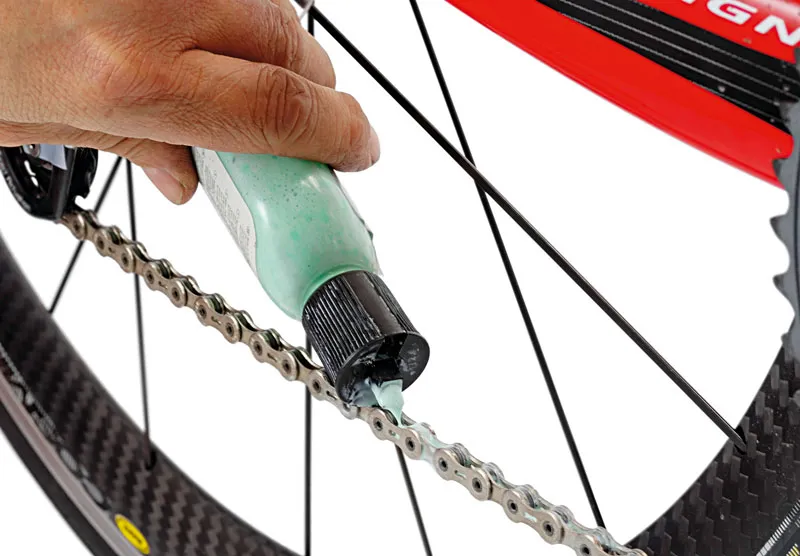
10 Clean quiet = fast
A clean and silent drivetrain brings speed and efficiency, while the lack of noise distraction will help your concentration during intense effort. Begin cleaning the exterior of the chain by applying a shot of WD-40 or GT85 to a rag and then wiping a short section at a time. Run the rag along the rollers until they are completely clean. Now work on the chainrings and the cogs, and remove gritty and greasy deposits with the same cloth and spray method. Clean between the cogs by running the rag, stretched between two hands, through the cassette. Apply a generous amount of thick wet or wax lube such as Finish Line Cross Country or Weldtite Dry Wax and work it into the chain while turning. Wipe away any excess, or allow to dry. Nirvana!