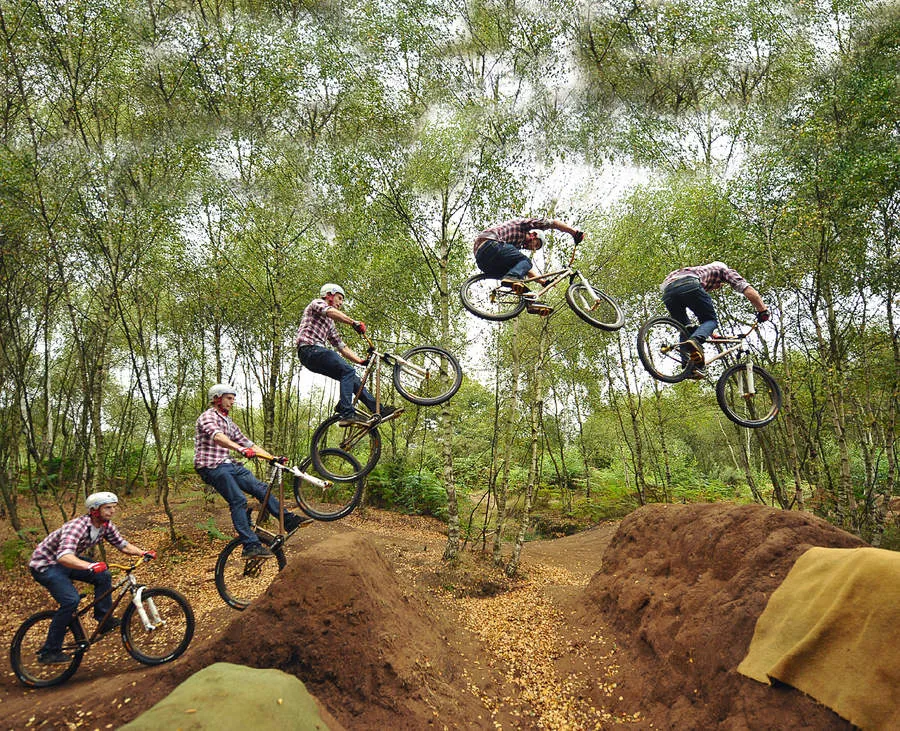
With their huge manicured take-off ramps sculpted like tombstones, and steep landing ramps, dirt jumps look like works of art. And they can be very intimidating to ride, especially when you see top riders gliding through them as though they’re on rails.
At just 23, Mike Smith may be youthful, but he’s a veteran of the UK dirt jumping scene and regularly competes in overseas competitions. His calm, calculated and methodical approach and clean, smooth riding style makes jumping look effortless. Here he explains the key skills you'll need to make it through even the most technical trails.
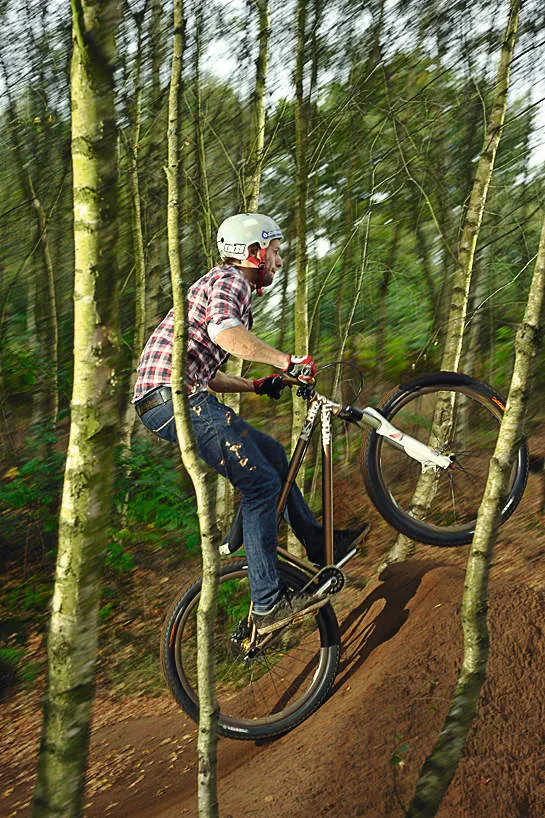
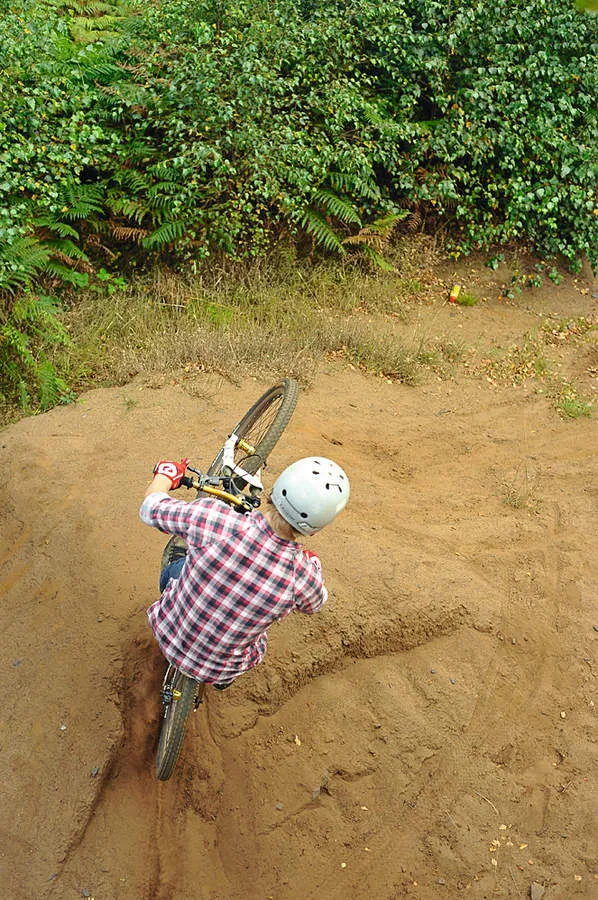
1 The manual
A manual can often be confused with a wheelie or coaster wheelie. A wheelie is a seated trick with the front wheel in the air that uses a combination of pedalling, rear brake feathering and weight shifting to keep the bike at balance point. The coaster wheelie is the same, but you stop pedalling once you’re at the balance point. The manual is where you’re out of the seat and have to keep the bike at balance point manually, by moving your weight back and forth.
The manual is often seen in street riding where riders do it along ledges and rails, but it originates from BMX. It's a useful technique when you want to roll a double jump rather than boost off it – staying on the ground is faster than being airborne, but doubles are hard to roll fast because they're designed to kick you in the air. The manual can be used to force the rear wheel into the dip between the jumps, pumping it for speed. Once learned, you can apply it to any kind of mountain biking to increase your speed and control.
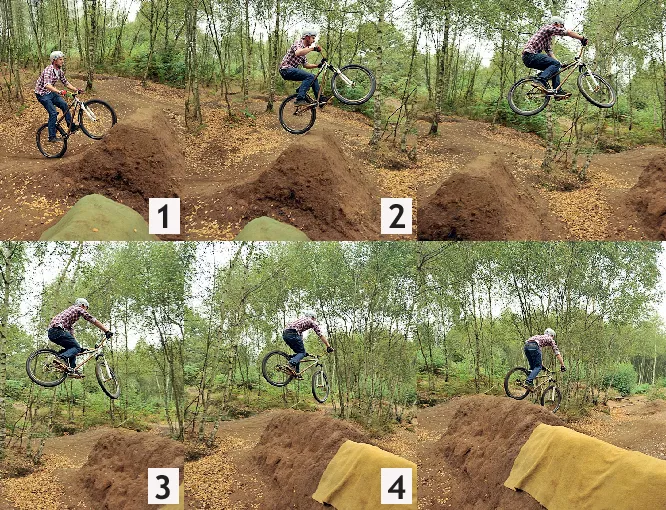
Approach: As you approach the first mound, have your preferred foot forwards, keep your knees and elbows bent, and stay relaxed – don’t stiffen up or your bike won’t be able to move underneath you.
Absorb the lip: Stay flexible and you’ll naturally absorb the take-off – if you tense up, your body will push the bike into the transition and you’ll get bucked off the ground. As you hit the first mound, let the front end come to you by bending your knees – make sure you keep your body position the same.
Weight back: As your bike continues to move forwards, move your weight backwards, so that the front wheel stays at the height of the top of the first mound.
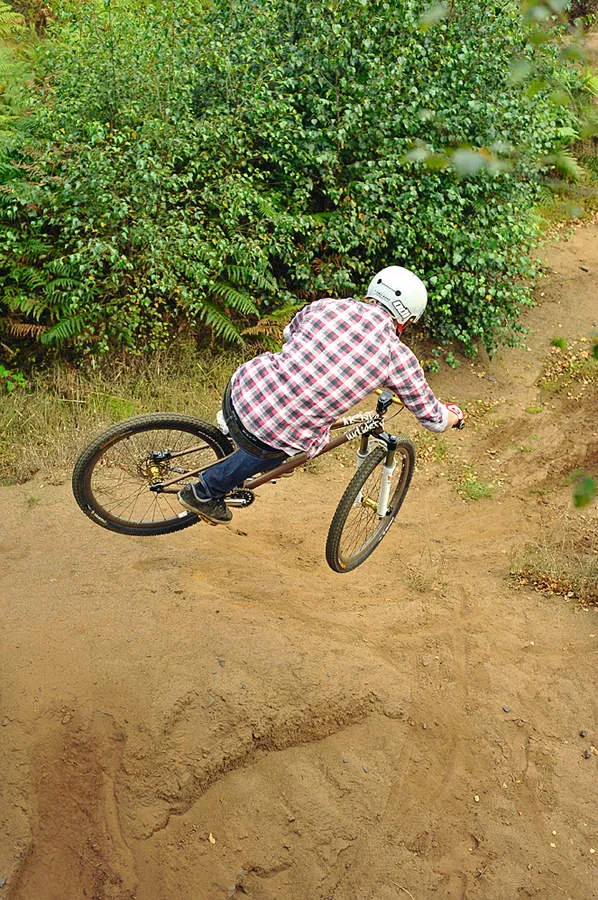
Extend legs: As the rear wheel leaves the top of the first mound, push down with your feet and extend your legs. Many people think you need to pull up here, but don’t – the motion of pushing your feet down will make it feel like the front rises, but it’s really the combination of the rear dipping and you standing upright that makes it feel like that.
Extend arms: Push down the rear end to help pump the backside of the first mound for speed and help you reach the second mound – as you do this, let the front of the bike drop slightly by extending your arms.
Pump the backside: Allow the rear wheel to come up between your legs while you’re extending your arms and, as the front wheel makes contact with the ground, use your feet to push the whole bike into the backside to get every last bit of pump that you can.
Mike Smith says: Approach the rollers with good speed – too many people try to learn half-heartedly. When you push your rear wheel into the backside, make sure you don’t pull up too much or you’ll loop out. Really push in with your feet to help you pump for speed.
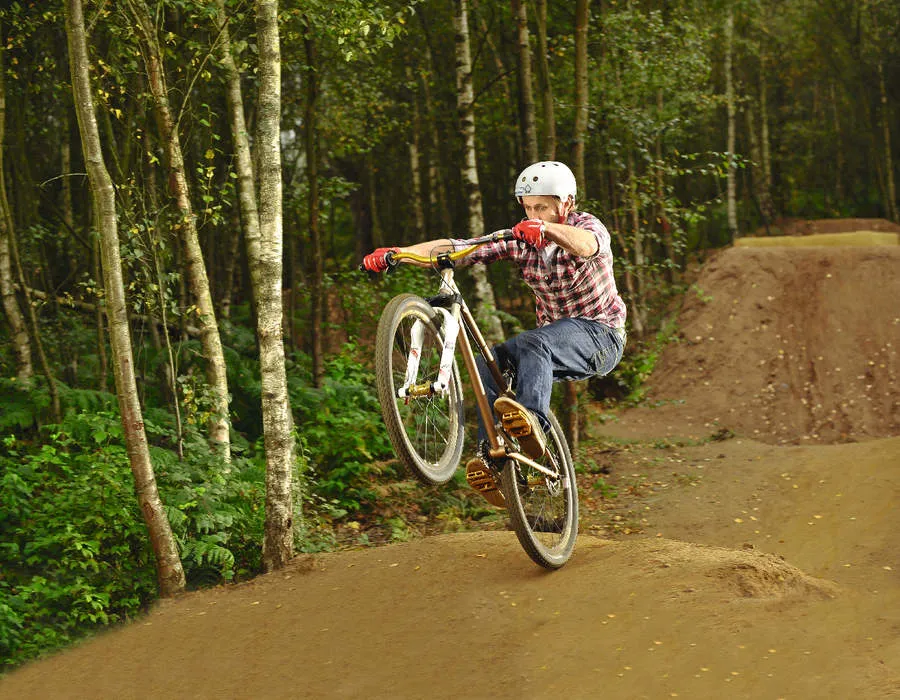
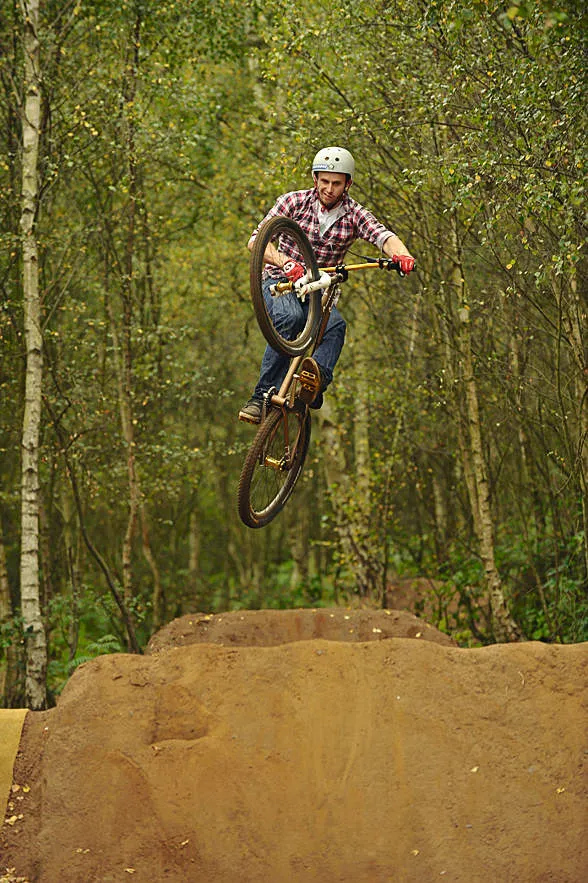
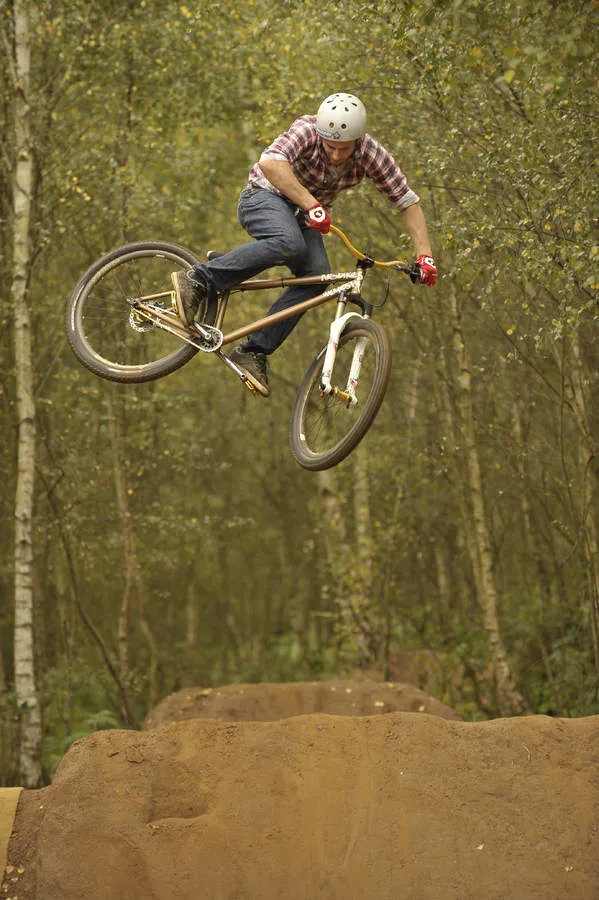
2 Boosting a lip
Being able to boost a jump is an essential skill. You often get several sets of trails in a pack, so it’s important to know how to flow through them seamlessly, sucking up extra speed or boosting off them if you don’t have enough speed.
Once you know how to judge depth, you can work out the speed you need to approach a jump with and how much you need to pull up to clear a jump. Every now and then, you will come across a jump that’s a bit too big, so being able to fire off the lip to safety is very important.
Being able to boost off a lip is also handy for hip jumping and transferring to other landing areas, and can be used in regular trail riding for avoiding hazards and jumping your way to safety. Here, Mike demonstrates boosting a jump to the maximum you possibly can. Mike will often do this in competitions for extra style points.
Stand tall: You want to keep as much forward motion as possible, so before you reach the transition, stand up so your arms and legs are fully extended, then compress into the take-off.
Push into the transition: As your reach the start of the transition, use your arms and legs to push the bike into the ground.
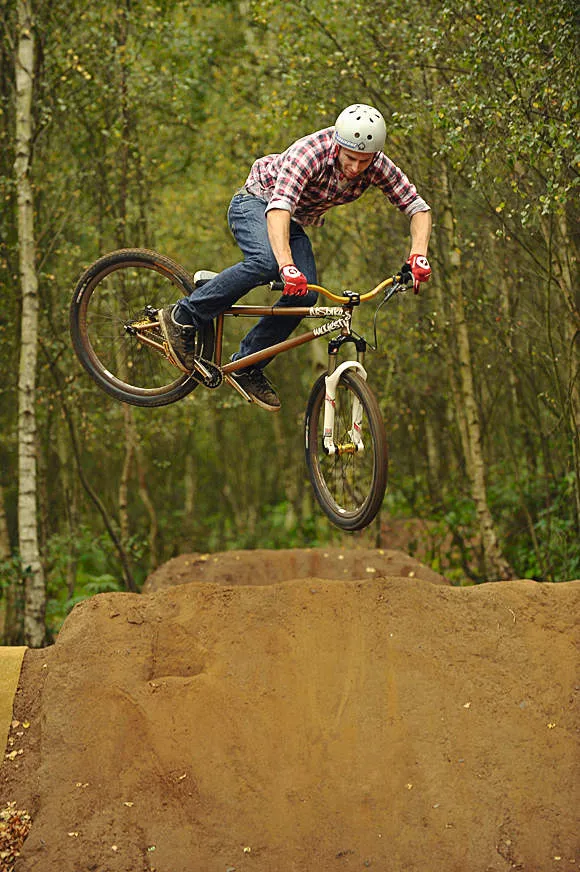
Explode off the lip: By the time you’re fully compressed, the bike will be reaching the peak of the lip. As you come off the lip, pull up and release your weight in one movement, allowing the lip to kick you up into the air.
Tuck the bike up: You could let your pop from the lip keep you high, but Mike goes further, pulling the bike right under him, as if doing a giant bunnyhop.
Dive bomb: While the bike is climbing, you can’t really alter your riding position – you’re along for the ride. Mike keeps his weight towards the rear of the bike as it naturally nosedives in to land. Stay on course and you’ll guide the bike into a smooth landing.
Mike says: As you are towards the top of the lip, shift your body weight upwards towards the front of the bike, extending your legs and arms as if you're trying to get your body in the air before your bike. Spy your landing and hope you haven't gone too far. If you have, learn your lesson and approach slower.
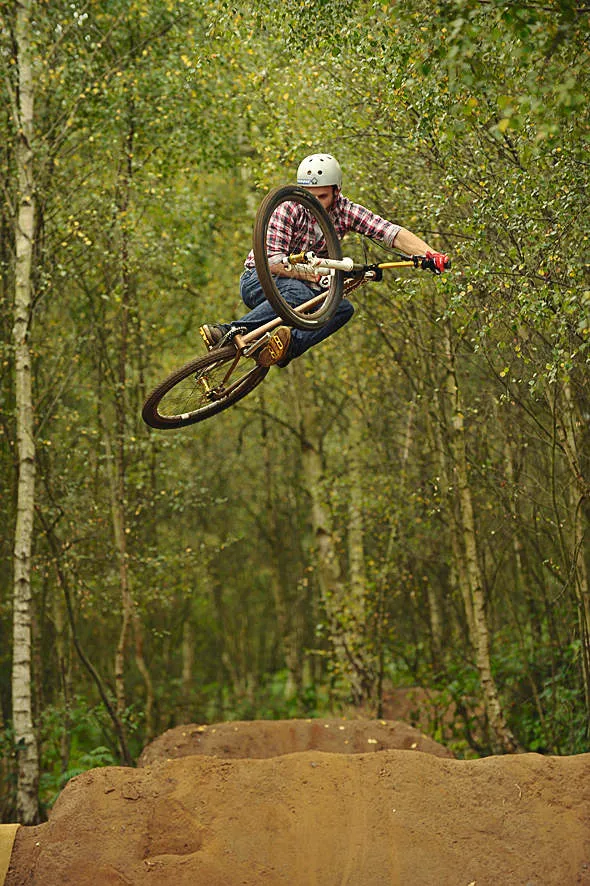
3 Squash
Just as there are times when you need to gain extra height to clear a jump, there are times when you need to maintain your speed, or suck up the kick on a jump to avoid over-jumping the landing transition.
Squashing is a technique that you’ll use when you’re familiar with different sizes of jumps and the speed needed to clear them. Many riders approaching a big jump for the first time will go a little too fast and have to suck it up, so squashing is a great way to ensure you clear a jump and learn the speed.
In racing, you’ll often see riders squashing the lips of jumps in different ways. Usually this will be a simple squash, but the scrub is coming across from motocross now. The scrub is a more aggressive and effective way of achieving the same thing but involves laying the bike right over as you hit the take-off ramp. It’s harder to learn and takes longer to master, but really does look rad once you have it nailed.
Relax your limbs (1): Unlike when you’re boosting a lip, your knees and elbows should be relaxed and ready to counter the kick of the jump. Note how Mike looks relaxed here, compared to how he was when boosting the jump.
Absorb the lip (2): As the front wheel comes off the lip, let the front end come up to you instead of both you and the bike moving up and away from the jump. Keep your knees flexible, and let the rear end of the bike do the same.
Stay poised (3): Once the bike has finished coming up against you, push against it slightly to raise yourself off the bike slightly. This puts you in position while you’re in the air so you’re ready to push down on the bike for landing.
Extend arms (4): Now the bike will naturally start to arc towards the landings. You can either let it cruise in, or extend your arms to speed up the nose dive, and as your rear wheel meets the ground, push the bike into the landing for as much pump as possible – depending on whether you were squashing to avoid being kicked, or squashing for speed.
Mike says: Rather than pulling up the lip you need to compress down onto it with your arms and legs. Be cautious of speed when learning because you’ll have a lot more than you’ll be used to doing
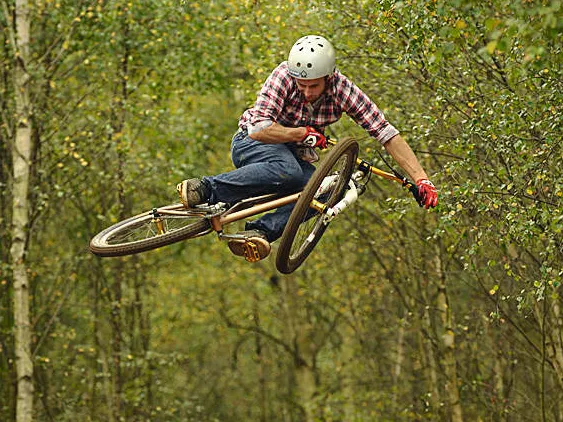
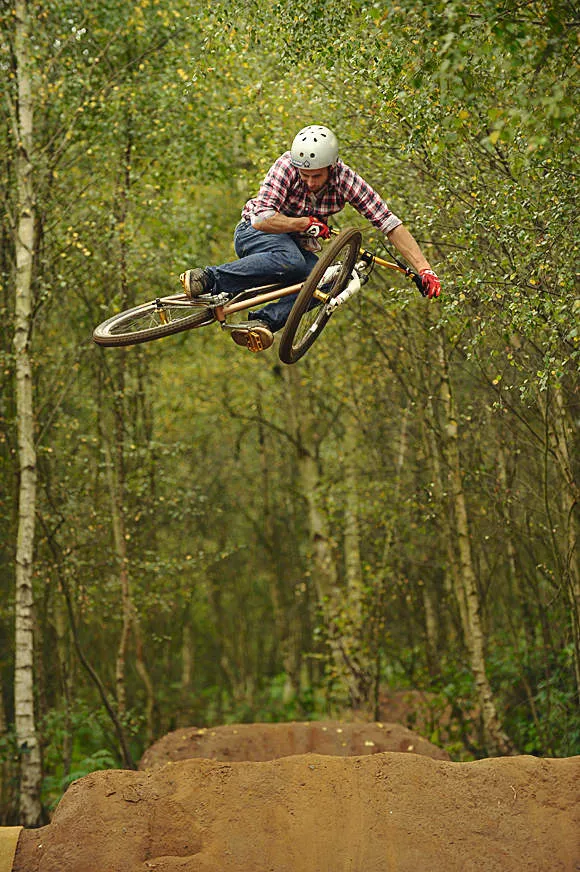
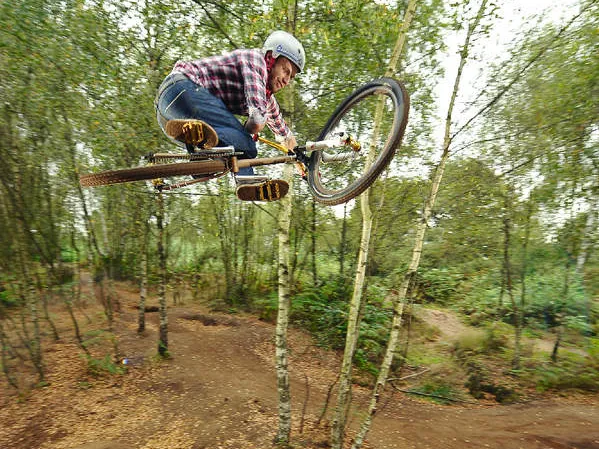
4 Tabletop
The tabletop is one of the oldest tricks in the book, but it remains one of the most stylish. Its name comes from the way that your bike is flat like a tabletop while you’re in the air. In the picture below, Mike demonstrates the classic version of the tabletop, but the modern version is commonly called a table, or invert, and involves getting the handlebars lower than the wheels.
The classic tabletop is usually pulled towards the left if you ride right foot forwards, and vice versa. This is because your forward knee will be in a more convenient place, and your rear foot will able to scoop up the rear end at the same time as using your arms. Mike can tabletop either way, and has chosen to go against the grain here and ride his the ‘wrong’ way. He’s thrown in a bit of a whip at the same time – looking pretty damn stylish too.
Pop: For a good flat tabletop, you need to get a good pop off the lip. So, using the same technique as you’d use to boost a jump, pull up hard on take-off.
Lay it over: As the bike comes off the lip, start laying the bike over, turning the bars in the opposite direction to the way you’re laying the bike over and use your inside arm to help pull the bike inwards.
Scoop: As the bike starts peaking on the jump, pull the bike in as much as you can and scoop the rear end up with your legs. If you want to go even further, try dipping your upper knee under the down tube and allow your upper foot to twist from the pedal onto the crank.
Peak: Once your bike is flat, you need to start releasing the tabletop and extending your legs to help the bike straighten up. Mike chooses to whip the back end out here for style points but you can cruise straight forward here.
Dive bomb: As you come out of the tabletop, get your front wheel nose diving into the landing ramp – even if you don’t get the bike back fully straight in line, it will follow the front wheel, which will already be back on terra firma.
Mike says: Hit the jump in the same way as you would for a boost. In most cases you would lean the bike to the side of your leading foot, but I go opposite. Try to keep your knees into the top tube and try to bend from the knees and hips. Try tweaking the bars up for extra style.
5 Hip jump
For a typical hip jump, the direction of take-off is different to the direction of landing – it gets its name from the fact that hip jumps often resemble the human hip bone. A hip jump can look aggressive, because of the way riders carve into the take-off transition and arch through the air, landing in a different direction from the one they took off in. But despite how it looks, most of the direction change is done on the take-off, you only need to make small adjustments and shift your weight once you’re airborne.
The ?rst thing you’ll discover about hip jumping is that it requires more commitment than jumping a straight jump. Once you’ve learned basics of a hip jump you can start adding in some style. For example, the natural arch of the turn means that adding tabletops into hip jumps comes naturally. They’re also great for practising motowhips on, because you don’t have to worry about pulling the back end in for landing.
Approach: Riding with a slight carve, hit the take-off hard, as if you’re about to boost high, and push into the take-off ramp.
Pull up: As the front wheel leaves the lip, start leaning into the turn with your upper body – this really adds to the initiation of the turn.
Lean in: As the bike comes off the take-off, it will still be heading in the original direction. Lean your upper body away from the bike. This is where you really start to lay the bike over.
Follow with feet: As with a tabletop, pull your feet up, but let the back end continue to ?oat round to meet the landing ramp.
Nose down: By now you’ll be just over the landing, so you need to start straightening up – extend your arms and push you feet down towards the ground and get ready to absorb the landing.
Mike says: Look before you leap – be aware of where the landing is going to be, how hipped it is and how wide it is. Tabling or whipping the bike can aid turning in a more natural arc.