

Trail centres are the ideal place to pick up skills for proper off-road mountain biking, but some can assume a little too much knowledge from riders who might never have tackled a jump or other freeride obstacle before.
We've already looked at North Shore ladders and drops, and berms and wallrides, so this time we're checking out tabletop jumps and box jumps.
When taking these techniques out onto the trail, remember that practice makes perfect – so if you’re lucky enough to have a purpose-built trail network near you, get out there and ride it as much as possible. Your skills will soon improve and you’ll be the one leading your friend down a gnarly trail or getting air like a pro.
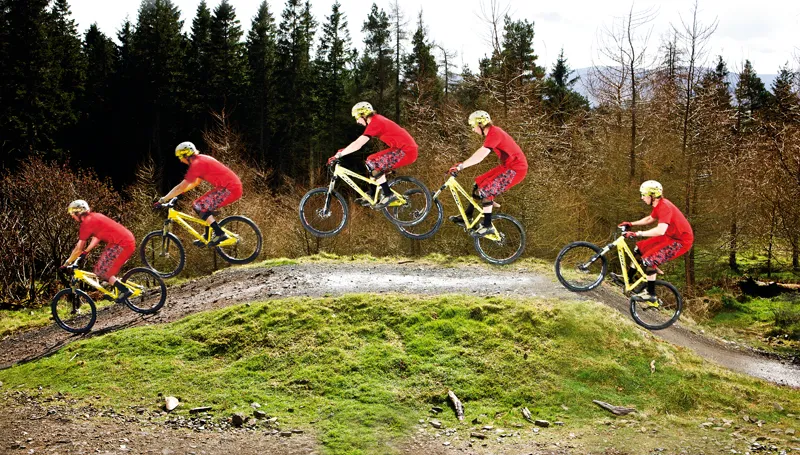
Tabletop jumps
A tabletop is the ideal jump to learn on because it has a smooth transition on both sides and a flat top to roll across. Because there is no gap to jump, the risks are low so you can gradually build up to getting some decent airtime.
The tabletop jumps at most trail centres are suitable for any kind of mountain bike, but we do recommend lowering your saddle to allow you to move around on your bike.
To start with, just roll over the tabletop so you can feel the kick of the take-off transition. Add more speed each time and you’ll start to feel where the bike naturally wants to become airborne, until you get to the point where you’re clearing the jump.
Once you’ve mastered clearing the jump, you need to work on your technique so you’ll be able to hit the jump at slower speeds and still clear it, and at higher speeds without over-jumping it.
1 The approach: On approach, you need to be able to judge the speed you require to clear a jump. This will take some practice, but soon you’ll be able to estimate how fast you need to go and be able to land within a few inches of where you intended. When you’re at what you feel is the correct speed, start your preparations for take-off.
2 Get into position: The transition is designed to help push the bike into the air, so all you need to do is get your position right here. Have your preferred foot forwards and your weight over the centre of the bike. As you feel the bike pull into the take-off, push in with your feet.
3 Take-off: Rather than pulling up with your arms, concentrate on unweighting the bike as you come off the lip of the jump. This will plot a flight path that’ll curve into the landing. In time, you’ll be able to go slower and pull up to meet the landing, or use more speed and actually push down on the take-off to do the same.
4 Correct flight path: Once you’re airborne, make sure the bike is on the right path by moving your weight back and forward and side to side. Both wind and the lip of the take-off can send you off course a little, so it’s now that you need to adjust, moving weight fore and aft and side to side.
5 Nose down: Ideally, both wheels should meet the ground at the same time to keep the impact to the bike minimal, and to help you regain control as soon as possible. Once you’re comfortable with this, nosediving is the best way of returning the front wheel to terra firma, because it allows you to regain braking and steering control more quickly.
6 Landing: A landing transition takes most of the impact from the bike, but use your arms and legs to minimise the impact further. Keep your head up, though, so you’re ready for the next section of trail.
Top tips:
- Experiment with speed: Once you’ve cleared the jump, try going slower and pulling up more to get an idea of the distances you can make with extra pop.
- Avoid over-jumping: Over-jumping due to too much speed can be dangerous – so learn to squash a jump. Instead of pulling up when you hit the take-off, push into it, forcing the bike down.
- Stay relaxed and loose: As soon as you tense up you’ll be cruising for some bruising.
- Avoid jumping in heavy crosswinds: Crosswinds make you prone to being thrown sideways mid-air.
- Saddle up! Keep the saddle down while you’re learning, but being able to jump with your saddle up is a huge benefit out on the trail – so work on that once you’ve mastered the basics.
- Have fun! Once you’ve mastered clearing the jump, try whipping the bike around and adding a bit of style into proceedings.
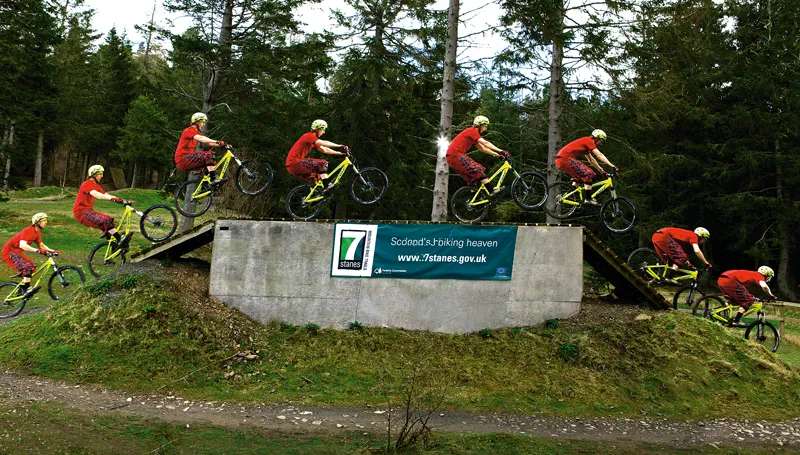
Box jumps
Whistler Bike Park in Canada was the first mountain bike spot to have a huge box feature – it was possible to jump on it, jump off it, wallride either side of it, or even clear the whole thing as one giant jump. So you may have gathered that you can ride box jumps in a variety of ways – it’s all down to how you interpret it.
To start with, though, you need to get to grips with the basics – jumping onto the box, keeping control and getting off again safely. Some box jumps – such as the one at Glentress in Scotland, for example – can be rolled onto and off of, so they’re the perfect starting point for a relative novice.
In time, you’ll gain confidence and will be able to jump up onto it and eventually off it as well. Once you’ve mastered it, you’ll be able to look at adding some style, maybe by jumping straight into a manual across the box and jumping off the end.
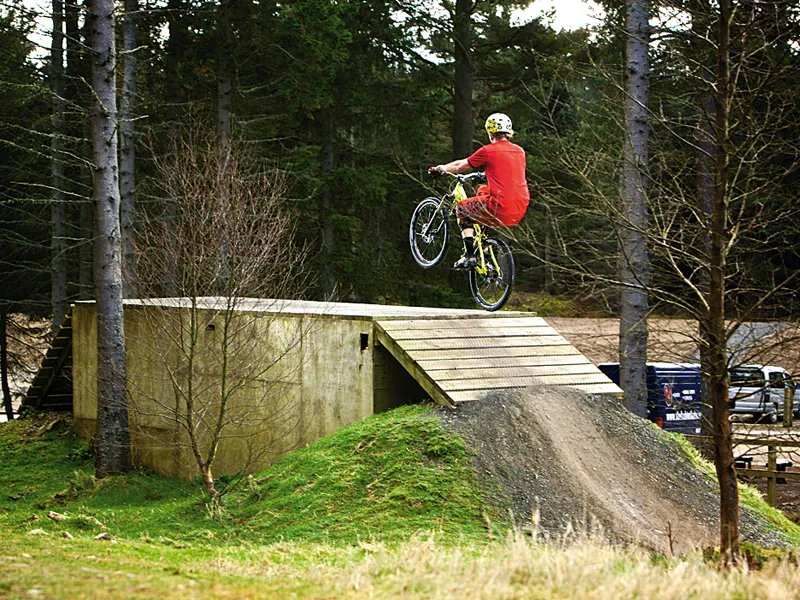
1 Approach: You don’t want to carry too much speed onto the box because you need to stay controlled for when you try to get off it again. Keep your speed fairly low to start with, until the point when you can comfortably jump up onto the box.
2 Push in: Instead of pulling up, get your lift by pushing the bike into the transition and then unweight the bike to pop upwards. Most box jumps have a transition designed to neatly pop you up onto the deck.
3 Top deck: As soon as you land, make sure you’re straight and are going at a comfortable speed – too fast and you’ll be off the end before you’ve prepared, and too slow risks making you twitchy. This is the point where you must commit to jumping or riding off the end – any later and you’ll find yourself at the end of the box and out of control.
4 Roll off: Rolling off the box is the same as tackling a steep bank or rolling drop – stay committed, focused and control your speed before you go over the edge. Lean back, keep your weight behind the balance point of the bike and let rip.
5 Jump off: Once you’re comfortable with rolling off the box jump, you can progress to jumping off – much in the way that you would tackle a drop. Bear in mind that you need a touch more speed, so it’s best to commit before you jump up onto the box. No hesitation makes for a clean effort.
Top tips:
- Walk the box first: Test it with your feet to see how grippy it is, and note how much room you have for error.
- Compare notes: Watch the speed that other riders tackle the box at and study their techniques. In 10 riders you’ll see a couple of very good ones, a bunch of comfortable riders and a couple of disasters waiting to happen.
- Bail out in side winds: It can be windy on top of the boxes and it’s a long way to fall if the wind takes you badly.
- Look before you leap: Make sure there are no riders or people near the landing area – you won’t see them until it’s painfully too late!
- Commit to riding off the box: Commit before you jump onto it – they’re often slippy on the top, which loses you speed and crashes can happen if you lock wheels and lose control at the pivotal moment up there.