


To feel in control of your bike, you need your body to be in the right place as you flow smoothly along the trail. If you ride on simple terrain like backroads and fireroads, you can get away with simple body movements. As soon as you start to ride over faster, steeper or rougher terrain, though, you really need to get your body moving correctly.
Even before you start working on body position, try thinking about how far you move around your bike, and watch your friends and other riders, too. It’s important to understand exactly what you do when you try to shift your weight back – for example, to go over a drop.
Many riders have programmed themselves to believe that a weight shift of just a few centimetres is as far back as they can possibly go, and that’s the limit of their movement, however steep the terrain. So during your next ride, or when you have a few minutes to play in the park, see how far you can stretch your limits.
Try rolling along the trail with your body so far back that your chest is on the saddle, or so far forward your sternum is on the front of the stem. Practise riding figure of eights with the bike practically lying down beneath you as you stand on the pedals, with your outside foot down, and attempt to stay upright in the turns.
The next step is to get used to making these shifts quickly and naturally. For example, you need to be able to go from your relaxed descending position to back over the saddle in an instant when you suddenly come upon a big drop or roll-off, so practise the moves and get the feel for them.
Once you get used to the idea of moving smoothly and quickly to the front, back and sides of your bike, you can really start to work on body position on all parts of the trail.
The following descriptions contain set positions for set moves, but in reality the trail isn’t like that. You need to flex, adapt and be constantly ready for change.
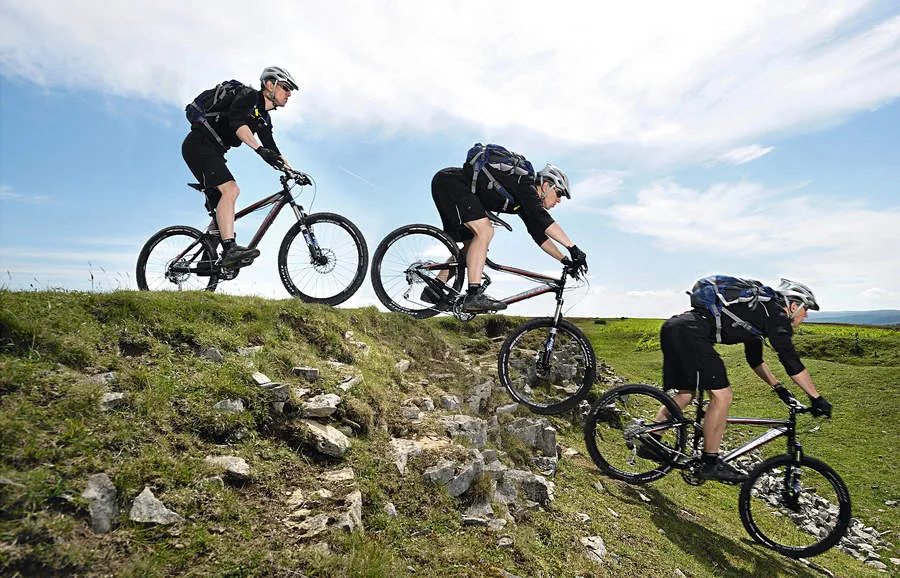
How to position yourself for descending
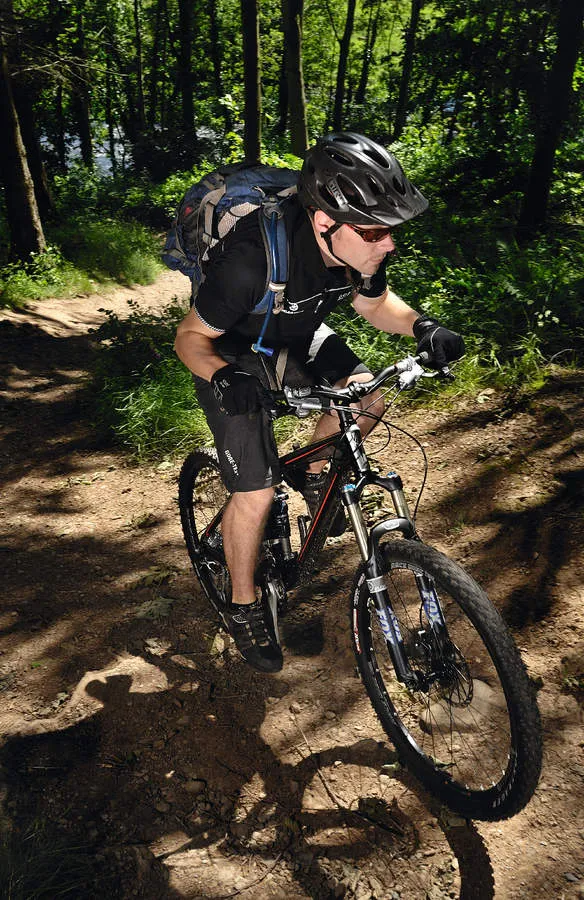
Most people can recite the basic drill for going downhill: stand up out of the saddle, cranks level, weight back, look ahead. That’s okay on easy terrain, but as the trail gets more demanding you need to develop this further.
1. First remember your footwork fundamentals. You need to descend with your heels down so you can absorb any braking or impact forces through your lower body.
2. You now want to move your body back. The idea is to shift your hips up slightly off the saddle then backwards – how far depends on how steep and how twisty the trail is (see steering, below). The temptation now is to leave it there, and many riders do. But like this you’re higher up than you were when seated and probably have fairly straight arms.
3. So with your hips back, the next step is to drop your torso low. Pretend you’re in that exaggerated boy-racer position – chest low, hips back, chin up and looking forward. This lowers your centre of gravity, and also allows a much greater range of bike movement through your flexed limbs.
4. With torso low, you now need to get your arms right. That means getting your elbows down so your forearms are almost flat to the trail, with wrists down.
5. To make this work you may need to raise your brake levers. This is a major change for some riders, but after a few weeks of trying it you’ll never go back. It lets you roll your shoulders back, lifts your vision and allows for quicker, smoother pumped manuals to get over drops or clear obstacles, with no temptation to tug the bars up in that old-school, inefficient way.
- Stay poised: Keep your knees flexed and your body weight centred over the bike — not too far back.
- Heels down: Dropping your heels allows you to ride fast and still soak up shocks through the feet.
- Arms primed for action: Flexed arms with low forearms are ready to pump the front of the bike over rocks or drops.
- Balance: With your weight centred and good footwork, you can brake hard without upsetting your balance.
Top tip: Strap up tight
If your CamelBak is bouncing about on descents or drops, it can seriously affect your balance and body positioning. Pull the chest and waist straps tight before you descend — it’s quick to do but makes a huge difference.
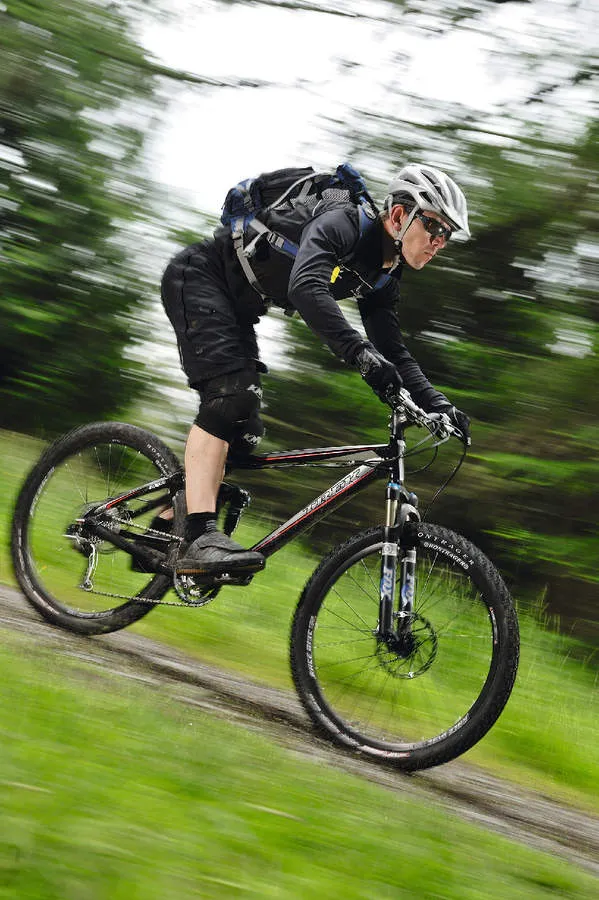
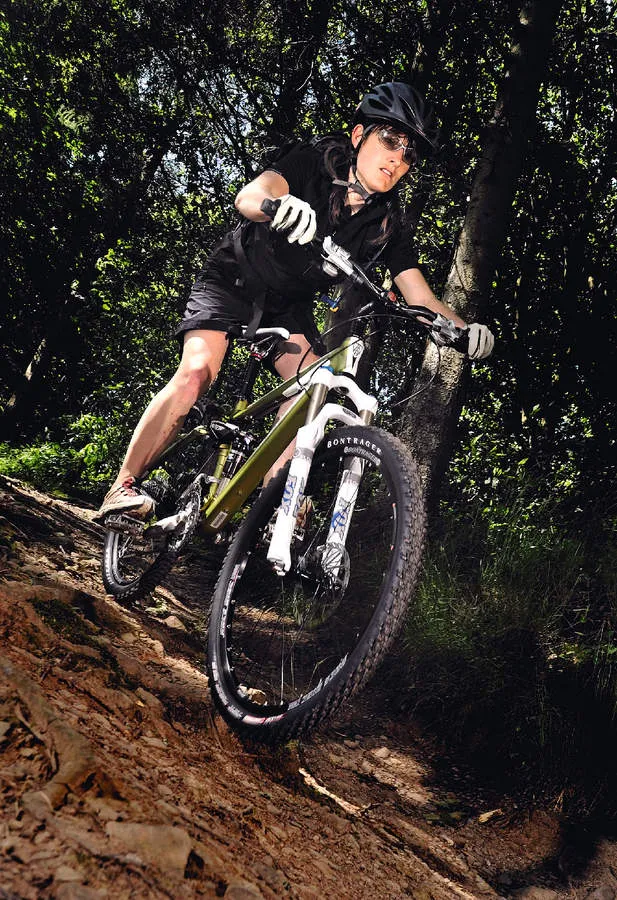
How to position yourself for roll-offs and drop-offs
Rolling over a sudden, steep section of trail requires a smooth and rapid weight shift towards the back of the bike. This is a simple extension of the descending position, pushing your hips back and dropping your chest low so you can retain some flex in the arms.
For drop-offs, the angle of descent may be the same as a roll-off, but you’ll also have to contend with the sudden impact as the front wheel drops down.
This force coming through the bike needs to be absorbed by the legs as much as possible, so having dropped heels are vital. If your arms lock out, any impact on the front of the bike will go straight through your arms to your torso, seriously affecting your balance, so keep your chest low and arms flexed on the drops.
- Flex your knees: Knees are flexed and ready for the sudden shift of your hips towards the back of the bike.
- Watch your feet: Keeping your ankles flexed and your heels down helps to keep your body position right as you go over the edge.
- Elbows ready: Arms are relaxed and ready for the flex in the elbows as your chest drops towards the saddle.
- Get your body low: One swift movement pushes your hips back and your chest down low, so the elbows stay flexed.
- Adjust your brake levers: With slightly raised brake levers, you can still cover the brakes even when hanging off the back of the bike.
- Drop your heels: Once over the steepest section, the body immediately starts to come back up. Dropped heels absorb the impact force and prevent your upper body being thrown forwards.
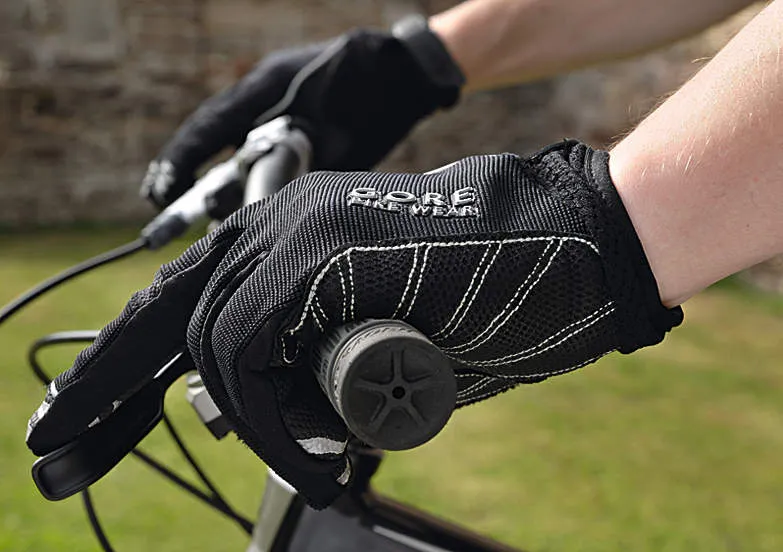
Top tip: Brake levers
To get riders descending more quickly and smoothly, we change brake lever position first — raising them to 15-20 degrees from horizontal. This starts a chain of changes that improves every part of your ride.
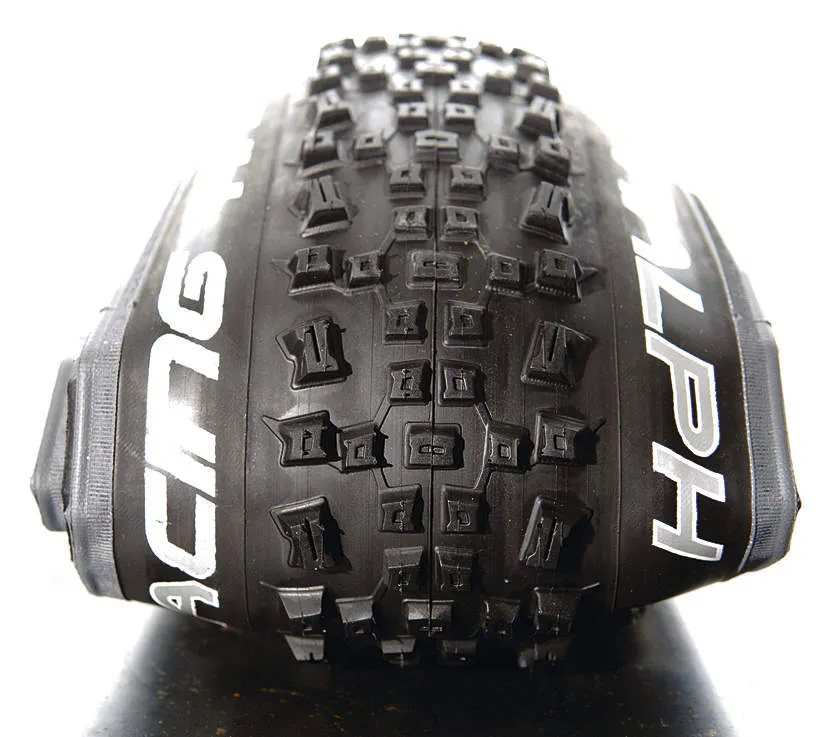
Top tip: Tyre experiments
A bit of imagination when selecting tyres can result in big improvements to the way your bike rides. In wet, muddy conditions with lots of slippery roots, try a mud tyre like the Bontrager Mud X 2.0in on the back, but run a 2.35in Bontrager Jones ACX or similar on the front, at low pressure (30psi for a 75kg rider).
The tread is similar so it sheds mud well, but the high-volume allows low pressures with little risk of pinch punctures. Big volume at low pressure means a huge amount of grip as you hit roots, rocks and slippery corners, giving a big boost to control, confidence and therefore speed.
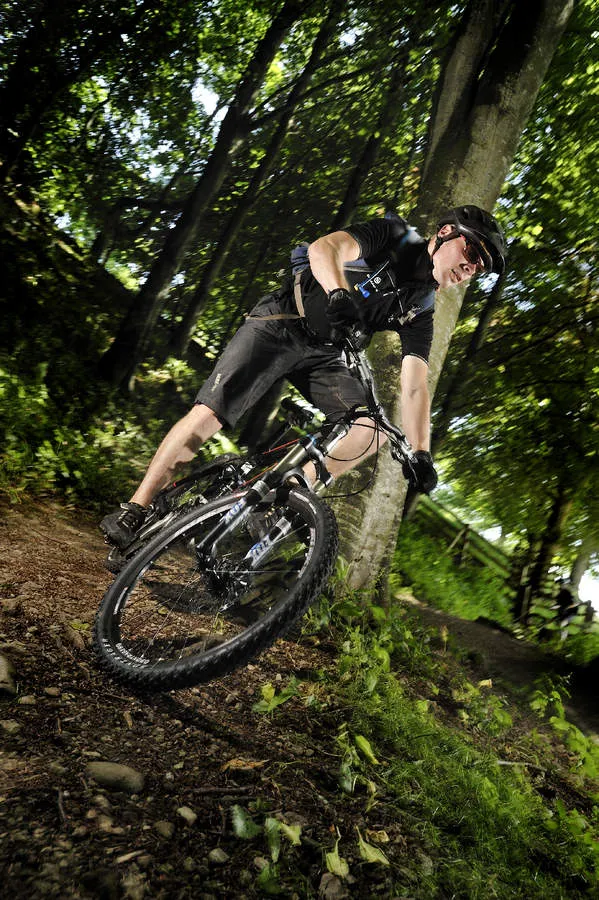
How to position yourself for cornering
To corner effectively, you must have enough body weight on the front wheel to keep it down, keep it biting and drive it smoothly through the turn.
For many riders this is the greatest challenge – you descend at speed with weight back and enter the corner with your body well behind the saddle. The front wheel then feels loose and flappy and it’s hard to control the bike through the corner, so you have to slow down more than you’d like to.
So find a corner – one that’s fairly smooth, one where you trust you can get round with no tricky rocks or roots to throw you off – and experiment with different body positions.
1. First try dropping your chest low – really low, but over the centre of the bike rather than the back. This pushes weight down onto the front wheel, but at the same time lets you flex your arms enough to throw the bike over on its side to create a smoother turn.
2. Leaning the bike while keeping your body fairly upright is very important. When a cycle is leant over it turns smoothly and the front tyre doesn’t dig in, as it can do when you simply turn the handlebars. On motorbikes the speeds are so high that body and bike need to lean together, but not on mountain bikes.
You need to stand on the pedals, legs slightly bowed, chest low, and let the bike drop to one side beneath you.
In the park have a go at weaving around sticks, cones or trees, and get used to leaning the bike under you as you remain flexed, low and centred over the bottom bracket.
- Weight forward: Keep enough weight on the front of the bike to maintain front tyre grip. Flexed arms and a low chest keep you stable.
- Drop your foot: Focus your weight through a dropped outside foot as the bike leans through the corner.
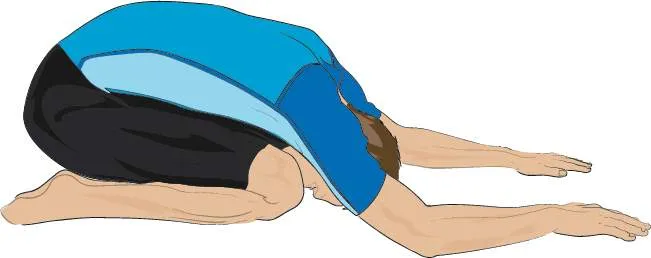
Top tip: Stretching
Flexible spine: Your back needs to be strong and flexible if you want to stay healthy and be able to move all round the bike with ease. Check out good back stretches, sports massages and maybe a session of Pilates every week or two, just to keep it in good shape.
Lower back stretch: Kneel down, sit back on your heels then curl forwards to bring your forehead onto the floor. Hold for 30-60 seconds.
Back rotation: Lying on your back, keep one leg straight and bend the other across. Keep your shoulders on the floor. Turn your head in the opposite direction to the rotation.
How to position yourself for climbing
The weight shifts when you climb have to be felt as much as studied. First you need to feel comfortable with your body scrunched right down over the nose of the bike, with the saddle nose pressing into the back of your butt, but still with your head lifted so you can pick a line and stretch the weight of your heavy brain as far forward as possible.
The next step is to pull back and down on the handlebars. This pull-back is a great way of adding directional stability and additional power. Once you have this positional sorted, you need to be ready to move according to the feel of the bike and the terrain.
If you feel your grip fading, you sit heavily back onto the saddle for one pedal rotation, keeping your chest low so you don’t wheelie out of control in the process.
If you need to clear an obstacle, you have to move your body weight back enough to pop a quick wheel lift, through one sudden, hard push on the pedals as you lift your chest slightly to unweight the front of the bike.
If the front wheel feels light and the steering starts to wander, you need to get some weight over the front. It comes back to those original exercises – if you can pedal smoothly with your sternum pressed to the front of your stem, it’s amazing what you can ride up.
Finally, you might just have to stop or bail when you get to extreme climbing terrain, so cover both brakes and be ready to prevent the bike from rolling back down the hill when you stop. Hopefully you’ll only be going forwards, but it’s good to be prepared for anything.
- Weight shift: The steeper the climb, the further forward and down your body weight needs to be to keep your centre of mass balanced for traction. By sitting on the nose of the saddle, you can scrunch your chest over the bars, stretching your chin out over the front wheel to keep it planted and tracking up the climb.
- Keep the power down: Pull down and back on the bars to increase directional stability while climbing. Get ready to sit heavily back in the saddle if you feel your front wheel grip fading.
- Smooth pedalling: Smooth application of power and a high cadence (the rate at which you turn your cranks ) are essential on loose terrain.
- Be prepared: Cover the brakes if there’s a risk of you coming off and rolling back down the hill.
Top tip: Session it
Break up your normal cross-country rides with some skill time by choosing a tough descent, climb or corner to work on. Spend 20 minutes riding it and watching your riding partners do it if you’re out with a group — it’s amazing what you can pick up in such a short time.
Meet Our Coaching Expert
Chris founded his company, CycleActive, in 1996 and set out to create a professional training and travel operation. He was the first to employ only qualified, professional instructors and now his team leads the way in delivering skills coaching.
Recently Chris has been working closely with the CTC on its MTB Instruction programme, using fundamental elements of this as part of his feature. Combined with his own research on vision in mountain biking, his level 4 coach status as an SMBLA tutor, expedition and night riding instructor, this really sets him apart as a coach – making him the perfect author for this What Mountain Bike series.
To find out about coaching or group courses with Chris and his team, visit www.cycleactive.co.uk.