Full-suspension mountain bikes can use single or multiple pivot locations, different linkages and swingarm designs to help dictate their suspension characteristics.
How many pivots and links are used and how they’re laid out helps to determine how the bike will work, how it’ll feel on the trail and what type of riding it may be best suited to.
Here we explain the various types of mountain bike rear suspension, the technical terms used to describe suspension kinematics and how bike brands adjust or change their suspension designs to create specific suspension characteristics.
You can skip to the different sections by hitting the links below:
- How do suspension designs affect a bike’s performance?
- Common suspension designs explained
- Mountain bike suspension terms explained
How do suspension designs affect a bike’s performance?
Although rear-suspension design can differ greatly from brand to brand, the job is always essentially the same: to absorb bumps and impacts as efficiently and effectively as possible.
Of course, it’s a little more complex, because the suspension must accommodate the rider moving about on top of the bike, pedalling and braking while navigating the trail beneath their tyres. Suspension designs need to factor all of these things in.
Impact absorption

The first job of a rear suspension system is to absorb impact forces caused by the rear wheel hitting a bump or obstacle, which causes the suspension to compress.
A bike’s ability to absorb an impact is largely influenced by several factors:
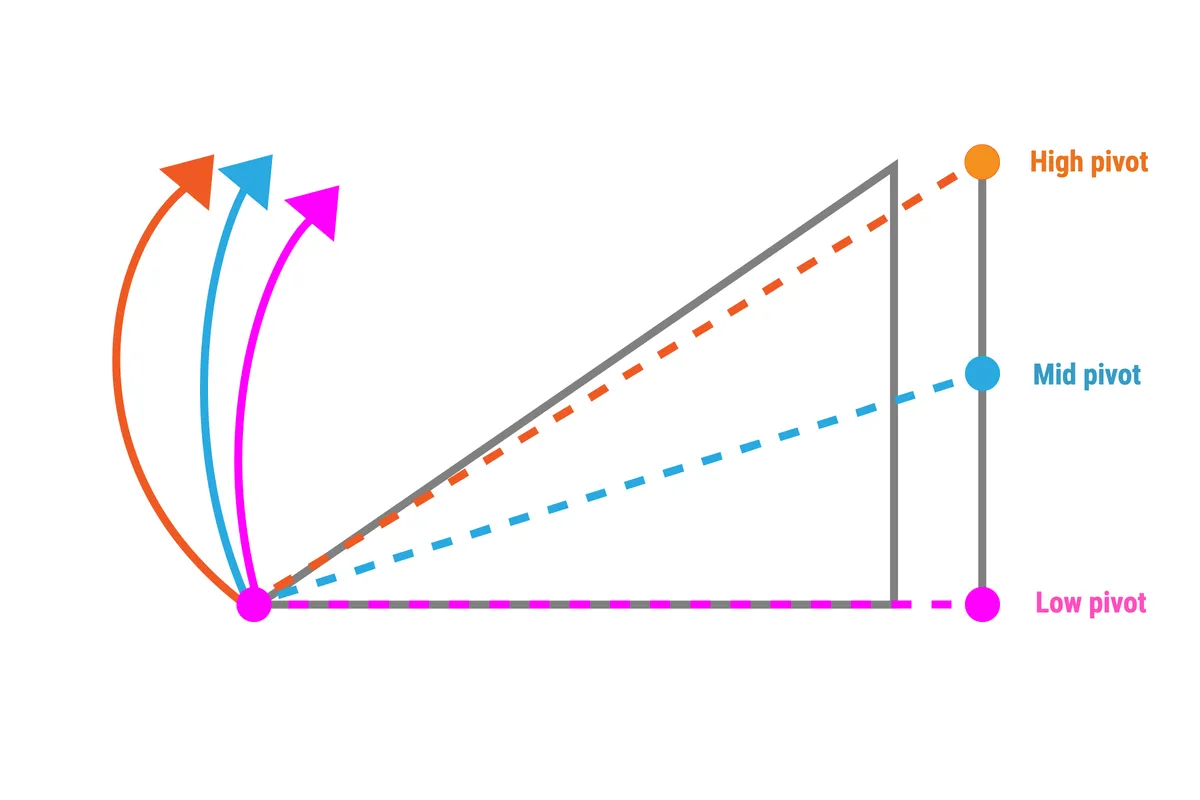
- The axle path is the line the rear axle traces as the suspension cycles through its travel. Axle paths can be forward, vertical, reward or S-shaped. Its path is dictated by the position of the frame’s pivot points.
- Pivot locations dictate the axle’s path at a given point in the travel.
- Leverage ratio/curve is the relationship between how much the rear wheel moves and how much the shock compresses as the suspension cycles. For example, if a bike’s average leverage ratio is 3:1, when the rear axle moves 30mm, the shock will compress by 10mm.
The leverage ratio can change throughout the bike’s travel (brands will plot this on a leverage curve graph to illustrate how this changes). This is arguably more important than the average leverage ratio.
Starting with a high leverage ratio means the shock can be compressed more easily, offering more initial sensitivity and potentially more grip. Towards the end of the travel, a lower leverage ratio helps to up the amount of force required to compress the shock, increasing the level of progression and making it harder to bottom out (use all of the suspension travel) - Shock absorber and spring. Without these, the suspension system can’t absorb impacts. Springs provide the resistance to absorb the compression forces from an impact and rebound or return the suspension system to its original, uncompressed (or sagged) position.
Nearly all rear shocks will feature some form of in-built damping. This controls the speed at which the shock compresses and rebounds, usually by pushing oil through a series of ports and shims to create resistance. Without any form of damping, the spring would oscillate uncontrollably.
Common suspension designs explained
Now we understand what a mountain bike suspension system is supposed to do, and the different factors that influence how it performs, let’s look at the main suspension designs on the market.
We’ll also outline the pros and cons of each.
Single pivot

The single pivot is the simplest suspension design in use today.
Here, the rear axle is connected to the main frame by a swingarm, with no additional pivots in between. The axle moves in a constant arc, centred on the single pivot point.
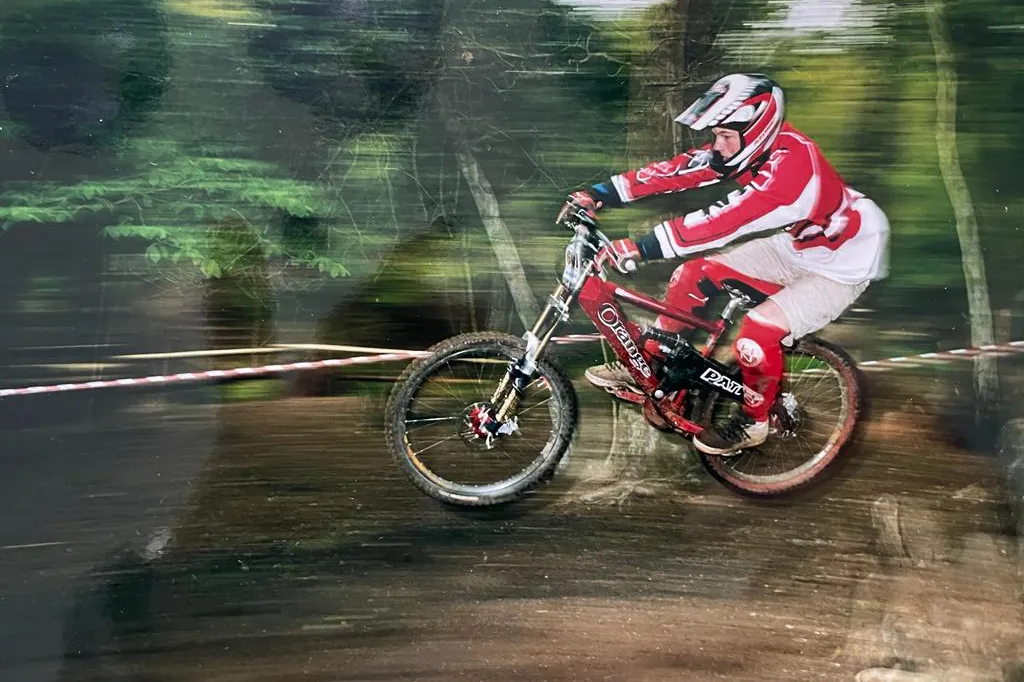
In the case of a true single pivot, the shock is connected directly to the swingarm – a design made famous by Orange Bikes.
One possible shortcoming of this design is that it offers little control over the leverage curve.
True single-pivot bikes are generally pretty linear. The force required to move the rear wheel through its travel does not 'ramp up' towards the end of the frame’s travel to resist bottom-out, as it would with a more progressive design.
Pros
- Simple
- Requires fewer bearings and makes for easier maintenance
- The suspension action is consistent through its travel
Cons
- Offers little control over the leverage curve
- Can be too linear for coil shocks
Linkage-driven single pivot
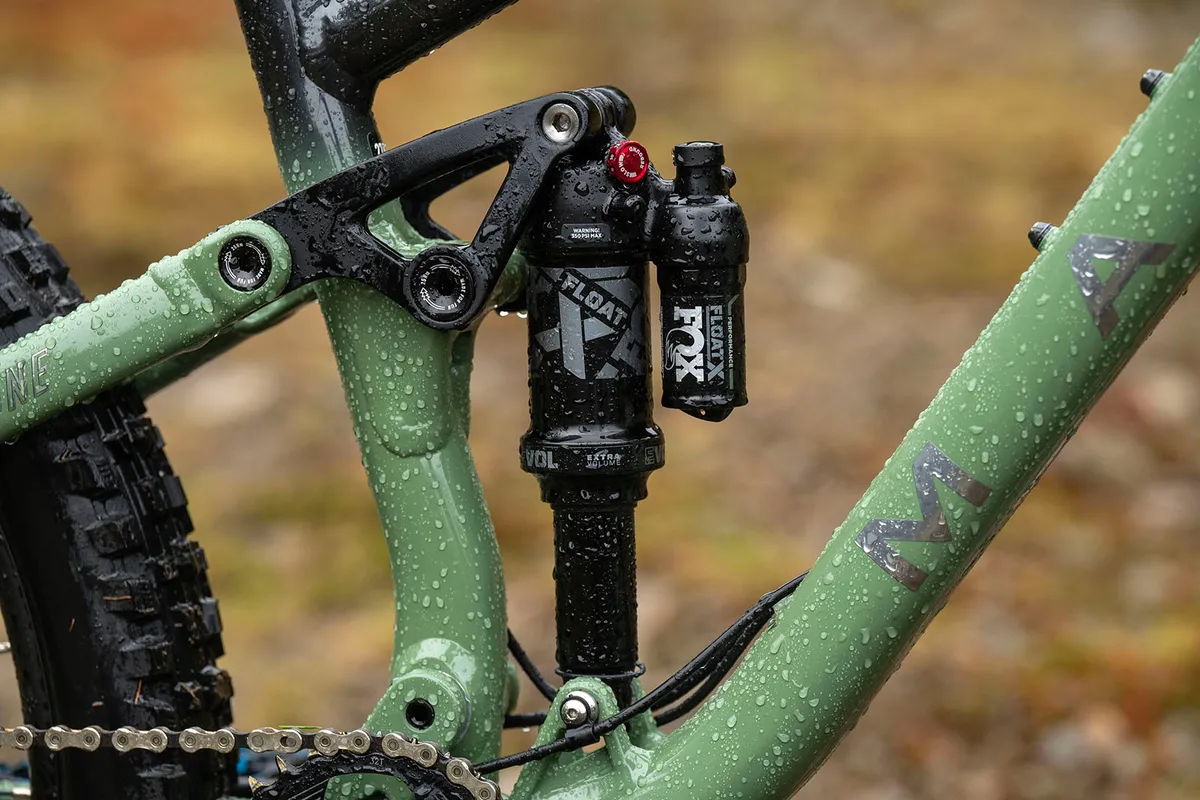
A linkage-driven single-pivot design, as seen on the Marin Rift Zone, still uses an uninterrupted swingarm, connecting the rear axle directly to the mainframe.
However, it incorporates some form of linkage to drive the shock. This enables the frame designers to manipulate the leverage curve and control the frame’s progressivity.
The design looks similar to a four-bar (Horst-link) design, so is sometimes referred to as 'faux-bar'. But the rear axle is still directly connected to the main pivot via the chainstay, so this is just another form of linkage-driven single pivot.
Pros
- More leverage curve tunability than a true single-pivot MTB
Cons
- Increased maintenance over single pivot
- Fixed instant centre limits the tuning of some suspension characteristics
Trek ABP and DW split-pivot systems

This design is essentially a linkage-driven single pivot, except that Trek uses a concentric dropout pivot at the rear axle. This enables Trek to mount the brake caliper to the seatstay rather than the chainstay.
Because the seatstays rotate less around the disc rotor than the chainstays as the suspension cycles, the effect of anti-rise is significantly reduced.
In other words, Trek’s design works like a linkage-driven single pivot in terms of pedalling forces, but like a Horst-link in terms of braking forces. It’s something of a hybrid.
Pros
- Significantly reduced anti-rise
Cons
- Increased maintenance over single pivot
High pivot
High-pivot bikes have a pivot point placed much higher than normal, but moving the pivot higher alone would result in unacceptably high levels of pedal kickback.
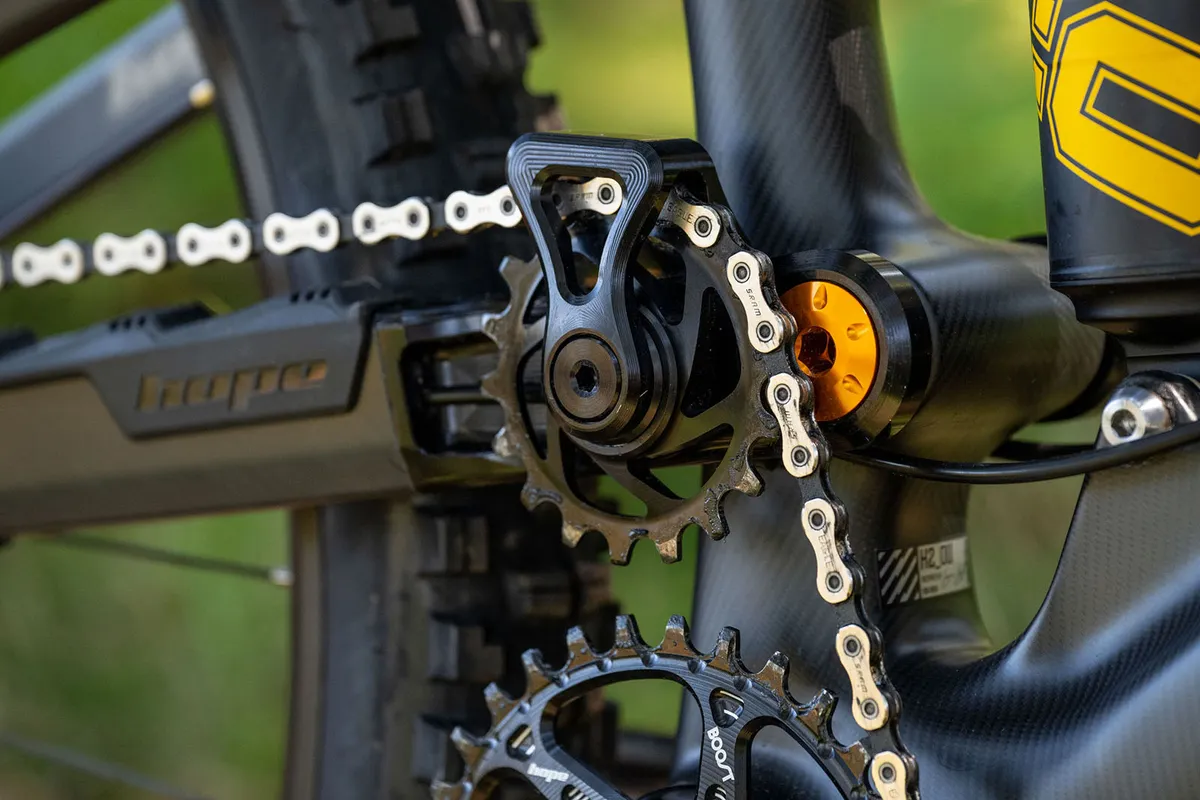
Using an idler pulley, which routes the chainline up past the pivot point, can help to mitigate pedal kickback and be used to tune anti-squat characteristics.
The advantages of this design are two-fold. First, it provides a rearward axle path. This in itself can help the rear wheel to deal with square-edge hits and contributes to the overall pedalling efficiency of the bike.
Second, because the chain passes right by the pivot point, there is next to no pedal kickback. This further improves suspension sensitivity.
Potential disadvantages of high-pivot designs could include increased drivetrain drag and maintenance thanks to the idler pulley, and some designs may have high levels of anti-rise due to the high pivot point.
Other designs need longer chains to accommodate the idler’s location, potentially adding cost and weight. Plus the rear centre grows during compression (by varying amounts, depending on the design used), potentially creating unusual handling characteristics.
Pros
- The rearward axle path helps the bike keep momentum over square-edge impacts
- Very low levels of pedal kickback
Cons
- Increased maintenance
- Potential for drivetrain drag
- High levels of anti-rise in some instances
- Rear centre increases in length, producing odd handling characteristics
- Some designs need longer chains than standard suspension systems
Horst-link (four-bar)

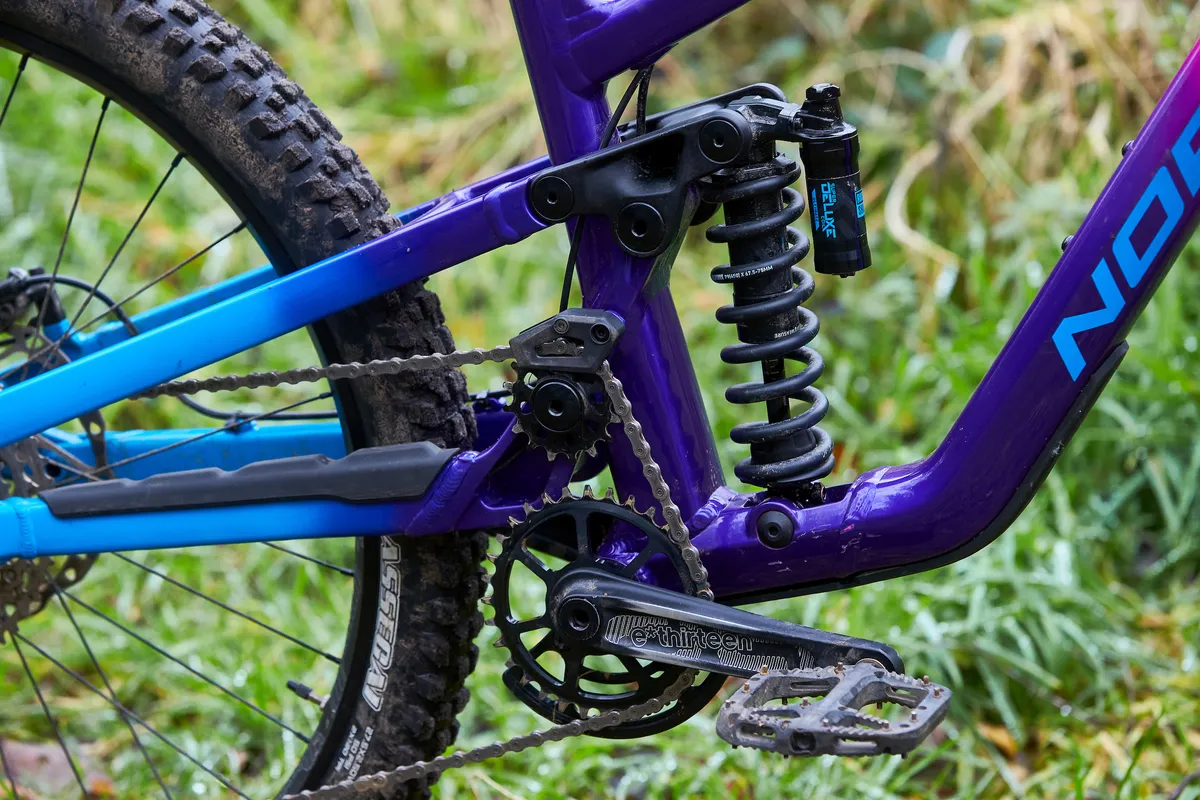
Horst-link (also known as four-bar) suspension – used by Specialized, Norco and many more – is marked out by a rear pivot located below and in front of the rear axle on the chainstay.
This means the rear axle is not directly connected to the mainframe, and so it moves in a path defined by its instant centre and centre of curvature.

The instant centre and centre of curvature may move as the suspension cycles through its travel.
Depending on the design, the effect of braking forces on the suspension (anti-rise) can be reduced and control over the levels of anti-squat can be increased, relative to a single-pivot design.
A variation of the Horst-link can be found on the high-pivot Forbidden Druid, which flips the four-bar system upside down.
Pros
- Offers high levels of tunability of all suspension characteristics and predictable suspension curves
Cons
- More pivots to maintain compared to a single-pivot design
Twin-link (virtual pivot)

Twin-link designs, also known as virtual pivots, use a rigid rear triangle, which articulates on a pair of short links connecting it to the mainframe.
It works in a similar way to a Horst-link design. Imagine moving the Horst-link’s chainstay pivot much closer to the mainframe and you have the basis of a twin-link system. The only real difference is the length of the lower link.
As with the Horst-link design, the axle direction of a twin-link system is tangential to a moving instant centre, while centre of curvature, or ‘virtual pivot point’, defines the way in which the axle path curves through its travel.
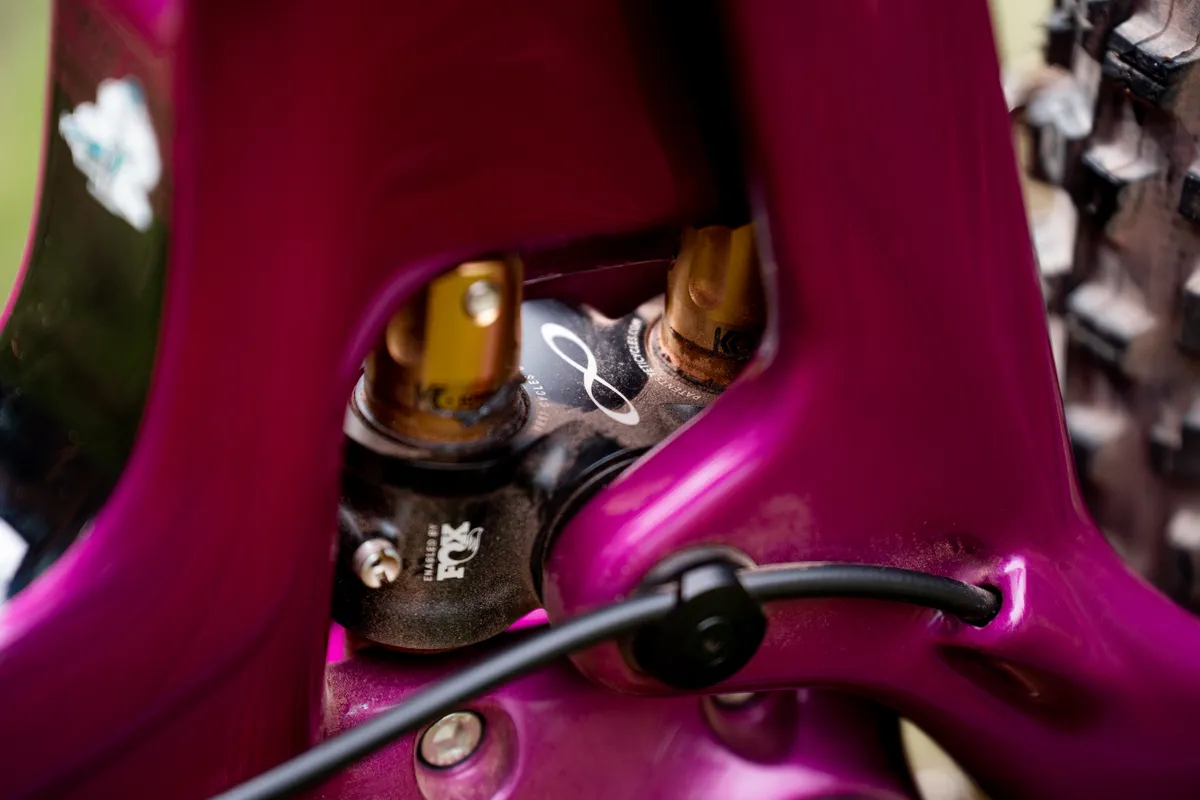
Some twin-link designs, such as Santa Cruz’s VPP system, use links that counter-rotate (turn in opposite directions), while many others, such as Giant’s Maestro system, have links that co-rotate (turn in the same direction).
The way the centre of curvature migrates as the bike moves through its travel is quite different for each configuration.
In fact, twin-link or Horst-link bikes with co-rotating links often exhibit anti-squat behaviour that’s very similar to a single-pivot bike.
Counter-rotating links can produce an anti-squat profile that peaks in the middle of the travel, which may be desirable in terms of balancing pedal efficiency against pedal kickback.
This distinction between counter-rotating and co-rotating links is more important in terms of suspension kinematics than the arbitrary distinction between Horst-link and twin-link designs.
Pros
- Offers high levels of tunability of all suspension characteristics and predicable suspension curves
Cons
- Increased maintenance and costs over single pivot
Six-bar suspension designs

Until recently multi-link six-bar suspension designs have been relatively uncommon, but bikes such as Felt’s Equilink prove the design has been used for quite some time.
Brands such as Atherton Bikes, Commencal and Yeti have been behind a resurgence of the six-bar design, putting it back in the limelight.

In some examples, such as the Canyon Sender, and Specialized's Enduro and Kenevo SL, the bike's instant centre is defined by the main four-bar system. The shock is driven from a separate linkage system, taking the overall number of links to six.
Looking closely at the linkage design seen on Atherton Bikes and Commencal, the extra two links are in between the chainstay and the main frame.
Pros
- Offers high levels of tunability of all suspension characteristics and predictable leverage curves
Cons
- Increased maintenance over single pivot
Yeti Switch Infinity
This system uses a low pivot, which slides up and down on a pair of vertical shafts, along with an upper link that rotates clockwise (if viewed from the driveside) as the suspension compresses.
The lower pivot acts like the rear pivot on the lower link of a traditional twin-link design, except that this pivot moves vertically in a straight line rather than a curving arc centred on the forward pivot point.
Imagine you could make the lower link of a conventional twin-link bike infinitely long and horizontal. Then its rear-pivot location would move up and down in a straight, vertical line with no curvature to its path at all. This is essentially what Yeti has simulated with its linear sliders (hence the name).
What’s the point of that? Well, Yeti claims this enables it to get the kinematics to behave how it wants all the way through the travel.
On paper, at least, there’s nothing drastically different about Yeti’s suspension kinematics compared to some regular twin-link designs.
Although it has managed to increase the anti-squat around the suspension sag point where it’s needed most, it then drops off drastically deeper into the travel to minimise pedal kickback, allowing the suspension to work more freely.
We explore this trade-off in the anti-squat and pedal kickback sections of this article. However, it’s not true that the Switch Infinity design has a particularly unusual or rearward axle path, as some media outlets may have claimed.
Pros
- Anti-squat peaks towards sag point
- Pedal kickback reduced deeper in travel
Cons
- Increased maintenance over single pivot
Mountain bike suspension terms explained
What is a suspension linkage?

A suspension bar or linkage is a rigid part within the suspension system that is connected to its other parts with pivots.
To calculate the number of bars in a suspension design, you must only count those links that define the system’s axle path, anti-squat and anti-rise.
A frame’s front triangle must be used when calculating the number of bars; the other bars are attached to it and their movement is defined by it.
Therefore, single-pivot bikes are two-bar designs. Horst-link or twin-link bikes are four-bar designs, and DW6 (found on Atherton Bikes) or Yeti Sixfinity designs (seen on the Yeti 160E) are six-bar layouts.
Bikes that use additional linkages to control suspension-leverage rates – such as faux-bar bikes (single pivots with a linkage) aren’t true four-bar designs.
The Specialized Enduro (a four-bar design with an additional two links to define kinematics) isn’t a true six-bar design despite the suspension having six links.
What is the instant centre?


Instant centre (IC) dictates the path in which the rear axle, wheel and everything attached to it, move at a given point in the travel.
For single-pivot bikes (including linkage-driven varieties), the IC is simply the main pivot point. It doesn’t move; it’s fixed on the mainframe. Therefore, the rear axle is constrained to move in a constant arc centred on the pivot.
In a Horst-link or twin-link design, the instant centre ‘floats’ at the point of intersection of hypothetical lines drawn through the pivots of the two links, which are connected to the mainframe. As the suspension cycles through its travel, the instant centre moves.
The location of the instant centre helps define the levels of anti-squat, pedal-kickback and anti-rise at a given point in the travel.
Because the instant centre moves as the suspension cycles through its travel, Horst-link, twin-link or six-bar designs afford their designers greater control over these parameters throughout the travel.
What is the centre of curvature?

The centre of curvature (CC) is the effective pivot point of a twin-link or Horst-link design.
Imagine a drawing compass where the rear axle acts as the pencil and the CC is the sharp point stuck into the paper – it defines the radius of curvature of the axle path.
If you draw a line from the axle to the IC, then move the axle a small amount through the travel, then draw that axle-to-IC line again, the point at which those lines intersect is the CC.
For single-pivot bikes, the CC is at the main pivot point, which is also the IC. For twin-link or Horst-link bikes, the IC moves relative to the mainframe. In some cases, the CC moves too. In others, it doesn’t.
For bikes with links that counter-rotate (e.g. VPP), the CC moves significantly. This results in varying curvature of the axle path, and anti-squat values that can be tuned to peak somewhere in the middle of the travel range.
At a given point in the travel, the CC always sits at some point along the swingarm line, connecting the rear axle to the IC.
Therefore, when calculating anti-squat at a given point in the travel (see below), the IC or the CC can be used interchangeably, because they both agree on the tangential direction of the axle.
But to see how the anti-squat changes throughout the travel, the position and movement of the CC is helpful to look at.
What is pedal bob?

Depending on the type of riding the bike is designed for, suspension systems can be designed to offer a firm pedalling platform or prioritise suspension performance.
The degree to which this is prioritised over impact absorption and braking performance depends on the intended use of the bike. A cross-country bike will prioritise a firmer pedalling platform over fine-tuned impact absorption, whereas an enduro bike would put more emphasis on the latter.
Every time you push down on the pedals, the bike accelerates. This acceleration causes your weight to shift backwards and compresses the rear suspension – just like in an accelerating car.
This happens with the rhythmic nature of every pedal stroke, so the bike’s suspension oscillates, or bobs, as you pedal. This oscillation is known as pedal-bob.
This movement wastes energy; the suspension dampers convert this energy into heat rather than propelling the bike forward.
As the rider puts weight on the pedals, they exert a downward force on the bottom bracket. This causes the suspension to compress, so the bottom bracket moves downwards as the pedals pass three and nine o’clock, and then it rebounds back up as they reach six and 12 o’clock.
So if you moved with the bike and looked at the cranks from the side, the pedals wouldn’t move in a circle, they’d move in an elliptical (oval) path because the bottom bracket moves up and down as the cranks turn.
This means the rider has to push the pedals further per revolution than they would if there was no pedal bob, yet the rear wheel still turns the same amount. This extra distance is proportional to the wasted energy.
Anti-squat

At the same time as pedal-bob, pedalling forces pull on the chain. This, in turn, influences the rear suspension, extending it and lifting the rider.
Anti-squat is a measure of how much the suspension resists pedal bob. As the squat force (due to acceleration) compresses the rear suspension under power, the anti-squat force counteracts this.
This force comes from two sources: the driving force from the rear wheel and the chain-pull force.
The driving force is discussed little, but it is easy enough to understand.
For any bike, think of the effective swingarm as a straight line connecting the rear axle to the instant centre. This is known as the swingarm line. By definition, this line will also pass through the centre of curvature, but for simplicity, we’ll just refer to the IC here.
The driving force pushes through the swingarm line. The force is composed of the traction force propelling the bike forward, plus the compressive force generated by the chain tension.
If the instant centre is higher than the rear axle – so the swingarm line is angled upwards – a component of this driving force acts to push the mainframe upwards when pedalling, counteracting its tendency to squat down under acceleration.
The chain-pull force comes from the tension in the chain, which generally also pulls the rear wheel downwards relative to the mainframe, and so acts to hold the mainframe up, countering its tendency to squat under pedalling load.
Thinking of it another way, (for most bikes) the cassette moves up and away from the chainring as the suspension compresses, therefore the tension in the chain resists this motion by pulling the swingarm down.
The amount of anti-squat force depends on the angle of the swingarm line, while the amount of chain-pull anti-squat depends on the angle of the chainline relative to the swingarm line.
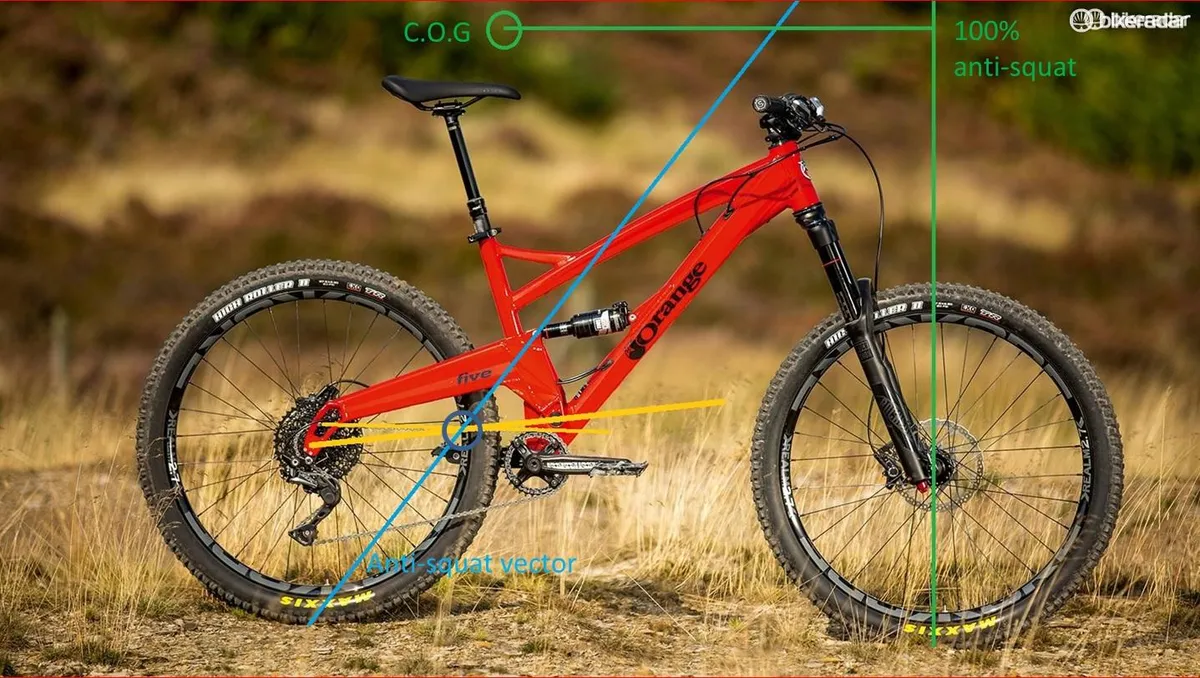
The total amount of anti-squat can be worked out by the intersection of the swingarm line and the upper chainline.
The point where they intersect is the key. A third line can then be drawn from the rear contact patch through this point of intersection. This is known as the anti-squat vector, and its gradient defines the amount of anti-squat.
Comparing this line to the centre of gravity and the front contact patch tells you how the anti-squat force compares to the squat force due to acceleration. In simplistic terms, 100 per cent anti-squat would imply that the squat and anti-squat forces cancel out exactly. In theory, this results in zero pedal bob.
If the anti-squat vector is higher than the centre of gravity when it’s directly above the front contact patch, you have more than 100 per cent anti-squat. If it’s below the COG when it’s above the front axle, you have less than 100 per cent anti-squat.
Importantly, the anti-squat percentage is independent of how hard you pedal. If you pedalled twice as hard, you’d accelerate twice as fast, and so the squat force would double. At the same time, the anti-squat force would double because there would be double the tension in the chain. So the anti-squat percentage would remain the same.

So why aren’t all bikes designed to have 100 per cent anti-squat? Wouldn’t that mean an end to pedal bob? Well, as you may have guessed by now, it’s not that simple.
For starters, there is no way to accurately estimate the position of the rider’s centre of gravity (it varies depending on the rider and how they move about when riding).
Even if you could estimate the rider’s centre of gravity, the position of the bike’s front centre affects the percentage of anti-squat. That changes with the frame size, so you’d need to account for that too. Most bike designers don’t.
For most bikes, the amount of anti-squat also depends on what gear you’re in.
The exception to this is the case of a bike where the CC is exactly in line with the top of the chainring. Otherwise, the choice of rear sprocket will give different amounts of anti-squat, because the intersection of the chainline and the swingarm line will change.
Different chainrings upset things too, with smaller chainrings resulting in higher anti-squat. This is an argument in favour of multiple chainrings, because higher anti-squat is generally beneficial when climbing.
Another complication is that, for most bikes, the levels of anti-squat vary as the bike moves through its travel – sometimes by a lot – so how much dynamic sag you run will affect anti-squat and therefore pedalling efficiency.
So changing spring pressures, or riding up different gradients, will result in different anti-squat percentages.
Let’s imagine for a minute that you could design for one frame size, one gear, one point in the travel, and for a rider whose centre of gravity was fixed.
In that case, you could design a bike to resist squat exactly, if the power was applied smoothly via a motor. That’s why it is possible, although not necessarily advantageous, to design a motorbike that resists acceleration-induced squat almost entirely.
But mountain bikes are not motorbikes. When pedalling, a rider’s weight moves up and down slightly as their legs turn. This introduces another oscillation-driving force, which causes the bike to bob more than the acceleration force alone, especially when pedalling standing up.
For this reason, many bikes have more than 100 per cent anti-squat to help counter the combined squat forces from acceleration and the rider’s weight movement.
Because downhill bikes are designed to be pedalled standing up only, they often have anti-squat levels far higher than 100 per cent.
In theory, if you could pedal perfectly smoothly without jerking up and down, bikes with more than 100 per cent anti-squat would rise upwards, like an inchworm, rather than squat down when pedalling. This has led some suspension analysts to say that 100 per cent anti-squat is the right amount for the best possible efficiency.
But the jerky bodyweight movements of the rider mean bikes need a bit more anti-squat to overcome this. Because this force changes depending on the rider’s pedalling style, and isn’t necessarily in phase with the acceleration squat force, there’s no way to say what the best anti-squat value is.
So don’t be fooled by any marketeer claiming their bike has “optimised pedalling efficiency”. It’s much more complicated than that.
Pedal kickback
There can be a downside to high levels of anti-squat. The anti-squat force relies on the cassette moving away from the chainring as the suspension compresses. This is known as chain growth.
Most of the time, the cassette rotates forward to allow the chain enough slack for the suspension to compress.

However, if the cassette can’t spin forward because the rear wheel is locked up (under heavy braking, for example), the crank will be forced to rotate backwards.
The movement of the crank in the case of a non-rotating cassette is known as pedal kickback, which can cause a very harsh ride feel.
The more chain-pull anti-squat a bike has, the more pedal kickback it generates. These terms can roughly be thought of as two names for the same thing.
For single-pivot bikes with an instant centre that’s higher than top of the chainring (for example, high-pivot bikes without an idler pulley), the amount of pedal kickback is proportional to the anti-squat.
For bikes with high pedal-kickback values, its effect can occasionally become noticeable – especially on rough tracks with lots of sudden impacts or when hitting bumps with the rear wheel locked up.
It can also be felt when climbing. As the chain is always under tension when pedalling, the anti-squat by definition, resists the suspension’s movement. So bikes with high anti-squat can be harsh and unreactive when pedalling over bumps.
In many riding situations, pedal kickback in itself is not something you’re likely to notice.

But the more chain growth/pedal kickback you have, the more the chain, cassette and derailleur cage have to move in order to allow the suspension enough slack in the chain to react. This can have a detrimental effect on suspension sensitivity, especially when using a clutch derailleur.
So there’s a balance to be struck here: more anti-squat generally means greater pedal-efficiency, but tends to mean worse sensitivity.
This is where Horst-link and twin-link designs have a potential advantage over single-pivot systems.
All such designs feature instant centres that migrate as the suspension moves through its travel.
Some, particularly those with counter-rotating links, can be designed such that the centre of curvature migrates significantly as well. In that case, the angle of the swingarm line varies with travel in a way that isn’t possible with a single-pivot design.
This makes it possible to have high levels of anti-squat near the sag point (where it’s needed to resist bob), while having less anti-squat, and therefore less pedal kickback, elsewhere in the travel.
This is by no means true of all multi-link bikes, but those with counter-rotating links boast anti-squat values that peak between 20 and 45 per cent travel where it’s needed most.
This bell-shaped anti-squat profile is typical of twin or Horst-link designs with counter-rotating links. The result is good pedalling efficiency throughout the pedalling zone, with minimal extra pedal kickback further into the travel.
There are also similarities in the anti-squat profile between some single-pivot and twin-link bikes.
In cases where the links co-rotate, the centre of curvature doesn’t move significantly relative to the mainframe throughout the travel. This means the rear axle moves in an arc with a constant radius about the CC, much like a single-pivot, resulting in similar anti-squat behaviour. Namely, the anti-squat usually drops off throughout the stroke.
The steeper the anti-squat drops off, the less pedal kickback there will be towards the end of the stroke, but the more the pedalling efficiency will be affected by dynamic sag.
However, the centre of curvature can be designed to sit in a position which would be impractical to place a physical pivot (such as within the radius of the wheel, or in the middle of the front triangle).
In this sense, the designers can produce kinematic behaviour which would be difficult, in practice, to replicate with a single pivot.
Without redesigning your bike, you can tune the amount of anti-squat it has by swapping chainrings. Bigger rings will result in reduced anti-squat but less pedal kickback, or vice versa.
More simply, riding over rough terrain in the smaller cassette cogs (and bigger chainrings if you have multiple) will result in less pedal kickback. So shift into the harder gears before dropping into a rough descent for maximum sensitivity and minimal feedback.
High-pivot bikes bypass this. The idler means they exhibit virtually zero upper-chain growth or pedal kickback. Yet, due to the high IC, they still have significant levels of anti-squat thanks to the driving force alone.
What is anti-rise (or brake jack)?
Another concept that affects suspension performance is anti-rise, commonly referred to as brake jack. This is basically the effect of the rear brake force on the suspension. It works a bit like anti-squat but in reverse.
Under braking, the rider’s weight shifts forward due to deceleration, which causes the rear suspension to rise or extend. However, the force going through the rear brake caliper acts to compress the suspension, pushing the mainframe down. This resists the bike’s natural tendency to want to lift at the rear, so it stays more level under braking.
If you compress the rear suspension while the rear wheel stays still, the caliper will move around relative to the disc. If you pull the rear brake when riding forwards, the braking torque from the caliper acts to compress the suspension by an amount proportional to this movement, relative to the disc.
The amount of anti-rise depends on the extent to which the caliper wants to move around the disc and this depends on the position of the instant centre.
Imagine a line between the rear contact patch and the IC: the shallower the gradient of that line, the lower the amount of anti-rise. This is called the anti-rise vector and can be used to calculate the percentage anti-rise in the same way as the anti-squat vector in the diagram above.
Here, more than 100 per cent anti-rise implies that pulling the rear brake only would cause the rear suspension to compress, while less than 100 per cent anti-rise implies it would extend.
Horst-link or twin-link bikes with roughly parallel links have an instant centre that’s very far forward.
Therefore, the anti-rise vector sits at a shallow angle, resulting in low levels of anti-rise. Bikes with instant centres placed high up and rearward have more anti-rise.
Trek’s ABP design sees the brake caliper attached to the seatstay, rather than the chainstay. The seatstay moves on an arc that's defined by a floating instant centre, like a Horst-link, which is further forward of the main pivot, so anti-rise is reduced relative to a chainstay-mounted caliper.

Brake arms have been used to similar effect – they reduce anti-rise by limiting the brake’s effect on the suspension.
High levels of anti-rise are generally thought to make the suspension feel firmer and less reactive over bumps, resulting in a harsh feeling when braking. The significance of this effect is debatable.
On the other hand, anti-rise also helps the rear suspension sit deeper into its travel, so it’s disputable whether high anti-rise values result in more or less traction under braking.
Just like anti-squat, the amount of anti-rise is a trade-off between preserving the bike’s geometry and the suspension sensitivity. No bike is completely independent of braking forces and it’s debatable whether those braking forces are necessarily a bad thing.
Axle path explained
The axle path is basically the line the rear axle takes as the suspension moves, measured relative to the mainframe. The direction of the axle path at any point in the travel is at right angles to the swingarm line, which connects the axle to the instant centre, via the centre of curvature.
Therefore, you can think of anti-squat purely in terms of axle path – the more the axle path moves away from the bottom bracket, the more anti-squat. This is very much the same as saying a higher instant centre results in more anti-squat, as described above.
A more rearward axle path may also help a bike to absorb certain bump forces for reasons unrelated to the chain. But for most bikes, the axle path only moves rearwards by a few millimetres at most.
Once again, high-pivot bikes are a notable exception. Their axle path moves significantly rearwards throughout the travel.
It makes intuitive sense that a rearward path allows the wheel to move out of the way more easily when faced with large bumps. The force produced by these is rearward as well as upward (the force vector points in the direction at right angles to the point on the wheel where it contacts the bump).
Therefore, it stands to reason that a more rearward axle path will be better able to absorb these large bumps, because the axle moves in a direction that’s better aligned with the bump force.
For an analogy, it’s useful to think about suspension forks with different head angles. The head angle defines the axle path of the front wheel. Slacker head angles, and therefore forks, tend to absorb kerb-sized bumps more smoothly but are more prone to flex and binding when pushing vertically downwards in the car park or when landing to flat.
The same thing is happening with a high-pivot bike – large bumps push the axle in the direction it wants to go. The flex and binding issue doesn’t apply to the rear suspension because they use a linkage rather than telescoping through bushings.
Think of it another way. A rearwards axle path means the rear wheel travels backwards relative to the mainframe as the suspension compresses. This means the wheel moves more slowly relative to the bump and so moves up and over it more slowly too.
Having said that, one study demonstrated a full suspension bike required 30–60 per cent less power than a hardtail to ride over simulated rough terrain in a lab.
So, if high-pivot suspension absorbs bumps more effectively, it stands to reason that those bumps will rob the bike of less forward momentum, but this is largely unproven.
Either way, for bikes without an idler pulley, this is all fairly academic. In that case, the potential bump-absorption advantage of a (slightly) more rearward axle path is negated by the increase in chain growth and anti-rise they produce.
Leverage curves vs spring curves
Arguably the most important aspect of suspension kinematics, in terms of ride feel, is the leverage curve – the way the leverage ratio changes through the travel.
The leverage ratio is the ratio between the distance the rear wheel moves and the distance the shock moves as the suspension cycles.
The average leverage ratio is therefore the ratio of rear-wheel travel to the stroke of the shock. Bikes with higher average leverage ratios (short stroke shocks for the travel) may have an advantage in terms of sensitivity because there’s more leverage to overcome the friction in the shock.
On the other hand, high leverage ratios demand higher spring pressures and higher forces in the damper. There’s also generally less oil inside the damper to deal with heat on long runs. As a result, bikes with lower average leverage ratios (longer stroke shocks for a given travel) tend to be more reliable and more consistent.
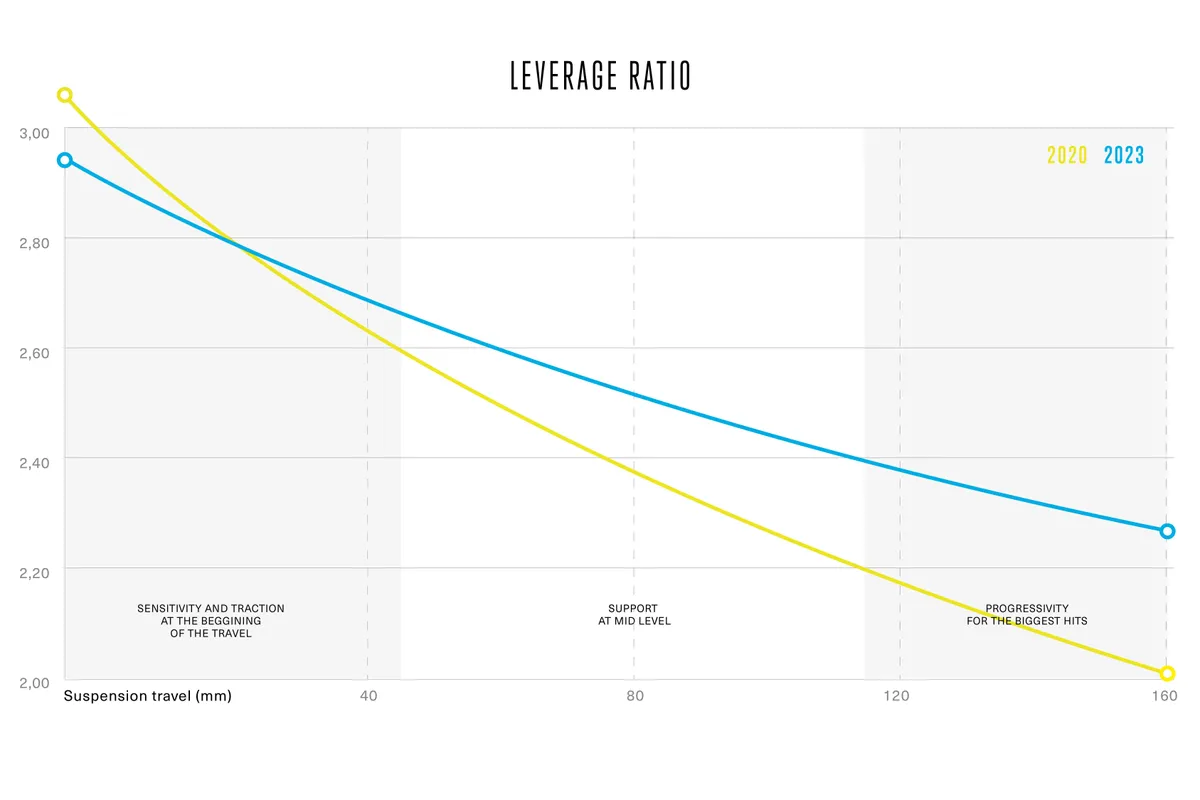
The most important aspect of the leverage curve is not the average ratio but how the leverage ratio changes throughout the travel. The higher the ratio, the easier it is to compress the shock, so bikes that start with a high leverage ratio and end with a lower one result in a progressive suspension action, meaning it’s harder to access the final part of the bike’s travel.
It’s counter-intuitive, but for a bike to be progressive the leverage graph slopes downwards as you go through the travel.
By comparing the leverage ratio at sag with the leverage ratio at bottom-out, the frame progressivity can be calculated as a percentage.
Whether you have a coil shock or air shock will also influence leverage and spring curves.
With a coil shock (which has a constant spring rate), the amount of progressivity is defined by the leverage curve alone. With an air shock, the end-stroke progressivity can be fine-tuned (to some extent) with volume spacers. Reducing the spring volume with volume spacers creates more progression.
The overall firmness of the suspension at the wheel is known as the wheel rate. This is a function of the shock’s spring rate and the leverage curve – both of which may vary throughout the travel. A leverage ratio that decreases towards the end of the stroke has a similar effect on the wheel rate as a spring rate that increases towards the end of its stroke. Both result in a progressive suspension action.
A linear leverage ratio with a progressive shock may provide a similar wheel rate (overall progressivity) to a progressive leverage ratio with a linear shock. But these two setups will still offer different characteristics.
For starters, fitting a very progressive air shock (full of volume spacers) to a bike with a linear or regressive leverage curve will result in a faster end-stroke rebound due to the high spring force deep in the travel.
A progressive leverage curve also generates more resistance from the damper towards the end of the stroke, so both spring and damping forces are used to resist bottom-out. Whereas, in the case of a linear leverage curve, only the spring force ramps up towards the end of the stroke.
The percentage progressivity doesn’t tell the whole story – what matters most is where in the travel the frame is progressive. In other words, the shape of the leverage curve.
For example, bikes with a 'hanging' leverage curve have a high leverage ratio at the start of the travel to soften the initial stroke and drop quickly to a lower ratio in the middle of the stroke to add support after sag. This is particularly relevant when using an air shock because they tend to be firmer in the beginning stroke and softer in the mid-stroke, relative to a coil.
The opposite case is a kind of humped shape, where the maximum leverage occurs in the middle of the stroke. As you might expect, this results in a firmer beginning stroke and a softer mid-stroke than the “hanging” curve.
Combined with an air shock, this lack of mid-stroke support can result in a wallowing feel in compressions, as well as increased pedal-bob – it’s not only anti-squat that affects pedal efficiency.
The leverage curve may still be progressive towards the end of the stroke, but this is not where the support is needed with an air shock. Bikes with this shape of leverage curve may work better with a coil spring. Bikes that lack support in the mid-stroke tend to require higher levels of compression damping to resist mid-stroke wallowing, but this negatively affects sensitivity throughout the stroke.
How progressive your bike needs to be is entirely personal – it depends on the rider’s strength, terrain and riding style.
Thanks to modern air shocks, progressivity is easily tunable by the end user, but a bike’s leverage curve still plays a huge role in how it feels, particularly in the mid-stroke, and that’s something that can’t always be remedied with shock setup.
Should I choose a bike based on its suspension design?

While suspension design is important to consider when choosing a mountain bike, it shouldn't be the deciding factor.
You should first have an idea of how much suspension travel you need for the trails you will be riding, as well as an idea of the sizing and geometry required.
Whether single-pivot, Horst or twin-link, it’s the details of pivot placement that make all the difference.
Bikes with the same basic layout often display very different kinematics and ride feel, therefore it would be foolish to say one design performs better than any other.
Single-pivot suspension offers simple reliability but provides designers little control over the bike’s kinematics.
Adding linkages makes it possible to manipulate the frame’s leverage curve and progressivity, while Horst or twin-link layouts can boost control over the pedalling and braking behaviour too, especially if the links counter-rotate.
But is that an advantage? It depends entirely on what the designers do with that control because it’s not always for the best.
While the rear shock setup remains the most important aspect of rear suspension performance, a good shock tune won’t make up for a flawed suspension design.
This is particularly true if a frame has excessive chain growth or a leverage curve that’s not supportive enough for the rider’s needs. In that case, the shock setup will be at best a sticking plaster for poor design.
Ultimately, the suspension characteristics that work best for you will depend on how you ride. For example, one criticism levelled at true single-pivot bikes is they are generally pretty linear, but that may suit some riders who prefer a plush feel.
Similarly, those who like to hammer down rough terrain may not like a bike with too much pedal-kickback, while some might like the pedal-efficient and interactive feel that comes with high levels of anti-squat.
It’s largely a matter of taste and that probably explains why we still see such a vast array of designs on the market.