This week’s BikeRadar build focusses on my recently refreshed tandem, Cecil – a mid-nineties Orbit Twin tandem that my partner, Laura, and I bought back in early 2017 and have since spent many, many happy days cruisin’ on.
I’ve written at length about why we decided to buy a tandem in the first place, and I’ve pushed my aggressive pro-tandem agenda at every given opportunity in recent years, so I won’t dwell on that here.
During our time with Cecil, we’ve done everything from fully-laden multi-day touring to, on one very special day, having a go at taking a local KOM with a crack team of BikeRadar’s best riders.
I’ve made gradual changes to the build of the bike that have reflected these evolving needs, eventually culminating in a major rebuild a few months ago that suits the slow-paced gravel-flavoured adventures we enjoy most.
Cecil, the Orbit Twin tandem custom build specs
- Frameset: Mid-nineties Orbit Twin
- Rear derailleur: Shimano Deore XT RD-M772, 9-speed
- Front derailleur: Shimano Deore XT M780
- Cranksets: Shimano XT FCM730 tandem crankset
- Cassette: Shimano Acera CS-HG400 11-36
- Chain: Three (three!) Shimano CN HG-53 chains
- Shifters: Shimano Dura-Ace SL-BS77 bar-end shifters
- Pedals: Crankbrothers Stamp 3
- Brakes: Shimano Deore XT BR-T780
- Drag brake: Arai drag brake
- Brake levers: Shimano Deore T610
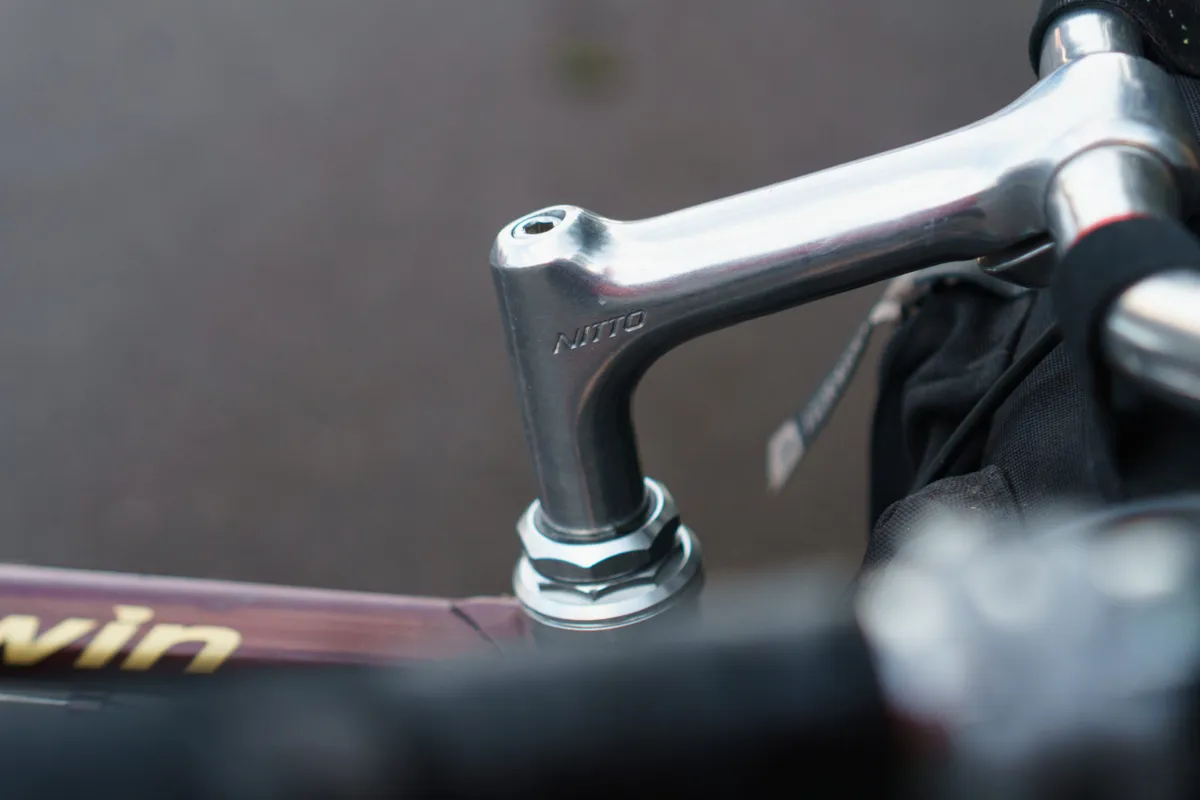
- Cockpit (captain): Nitto MT-11 stem, Nitto B352 Albatross handlebars
- Cockpit (stoker): Specialized tandem stem, Nitto B2522AA handlebars
- Wheelset: DCR Tandem hubs, Sun Ringle Rhyno-Lite rims (40h)
- Tyres: Continental Contact Plus 42mm
- Mudguards: SKS Bluemels B65
- Racks: Blackburn Outpost
Cockpit conundrum

The key thing I wanted to address when rebuilding dear Cecil was the cockpit and overall fit of the bike.
Cecil’s original build featured a pair of matching and very handsome vintage SR Randonneur handlebars.
While these had a lovely shape and beautiful engraving, Cecil’s geometry just doesn’t really suit drop bars – I would have had to use a ludicrously tall stem to get my bars up to anything approaching a touring-friendly position. Likewise, even with a long stoker stem, the drop bars also put Laura’s position too close to my perfect peach.
Even if I were able to get the bars high enough, a traditional drop bar position simply doesn’t suit the chilled-out pace we try to adopt when riding Cecil.
Thus began the search for the perfect handlebar that would fulfil my exacting requirements:
- The bars had to have lots of stack to get the position as high as possible
- They needed lots of backsweep to further chill-ify my position
- The bars had to be compatible with commonly-available short-pull flat bar brake levers
- They had to work bar-end shifters
Let’s not forget that these criteria only covered the captain’s position – I still had to consider Laura’s cockpit, which, given its more constrained size, was more challenging than you might imagine.
Welcome to BikeRadar Builds
BikeRadar Builds is our occasional look at the team’s personal bikes, including custom rigs, commuters, dream builds, component testbeds and more.
This is our chance to geek out about the bikes we’re riding day-to-day, and explore the thinking (or lack of it!) behind our equipment choices.
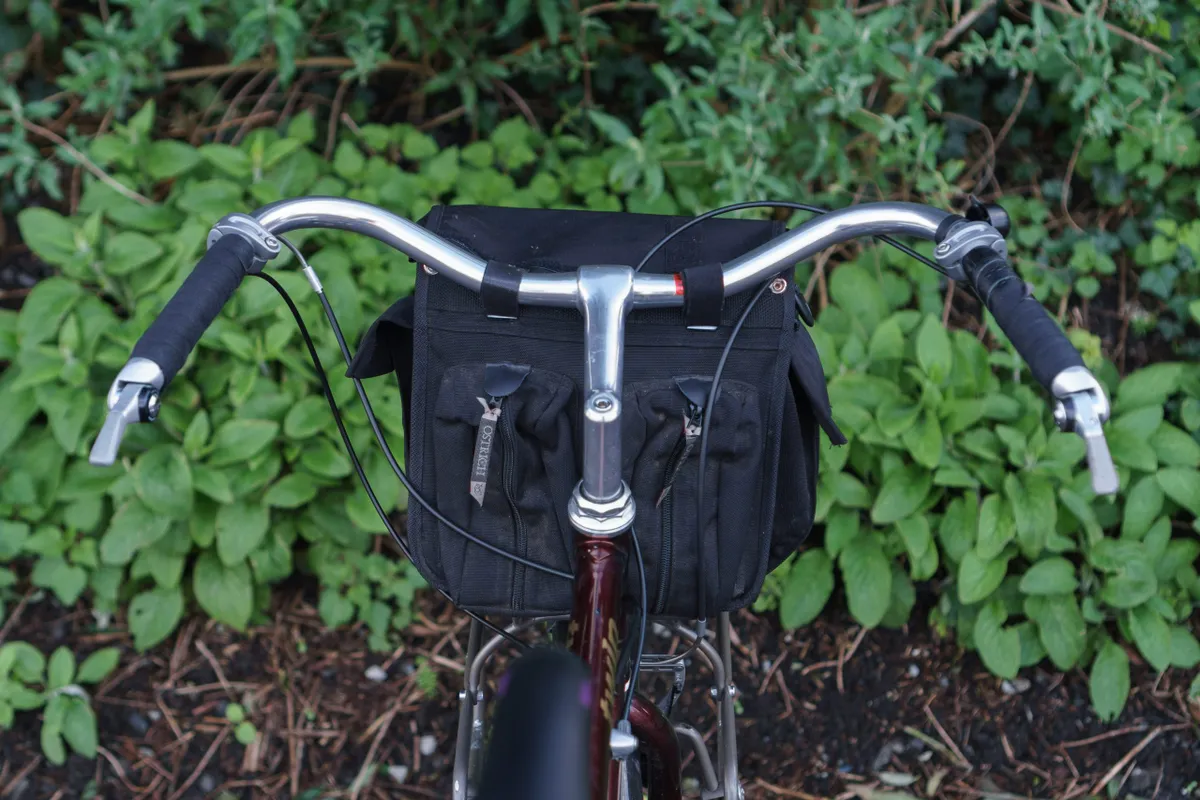
I agonised – and I really do mean agonised – over what bars to order for the bike for weeks, but eventually settled on the Nitto Albatross for the captain’s cockpit.
These are much loved by alt-bar fans the world over and give a really relaxed upright riding position matched with just enough width to improve control when riding on unpaved surfaces. It’s also possible to wrap the entire bar right to the stem to give an additional lower hand position.
I have wrapped the bars with some leather bar tape from Fabric (that I have swapped between three different sets of bars now) which has then been covered with Velox cloth tape… except I ran out and need to buy more to finish the job!
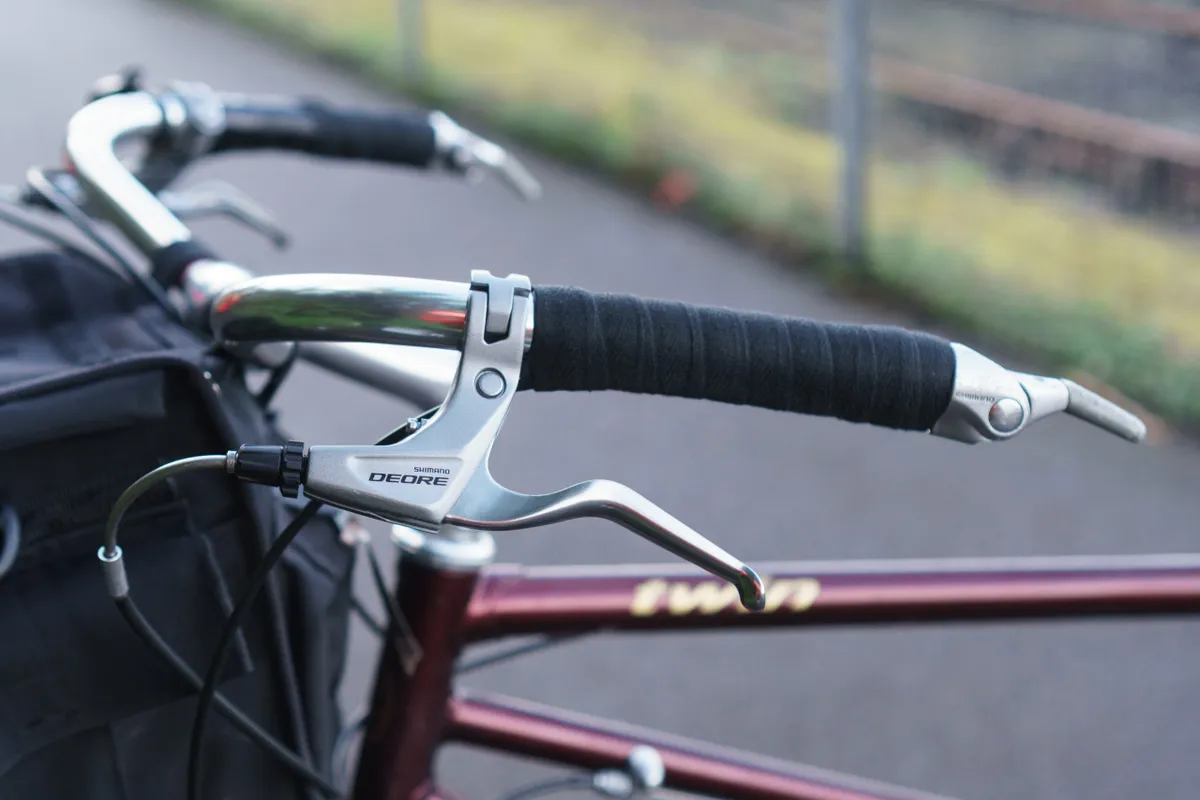

As a fun aside, to avoid putting any awkward kinks into the cable and to improve routing when using a handlebar bag, I used two V-brake noodles at the brake lever to smooth out the run of the cable.
I would be lying if I said I wasn't excruciatingly smug with how well this worked out.

For Laura, we settled on Nitto's B2522A handlebar, which gives a comfortable hand position with a more swept back position than a typical flat bar.
All aboard the trundle bus
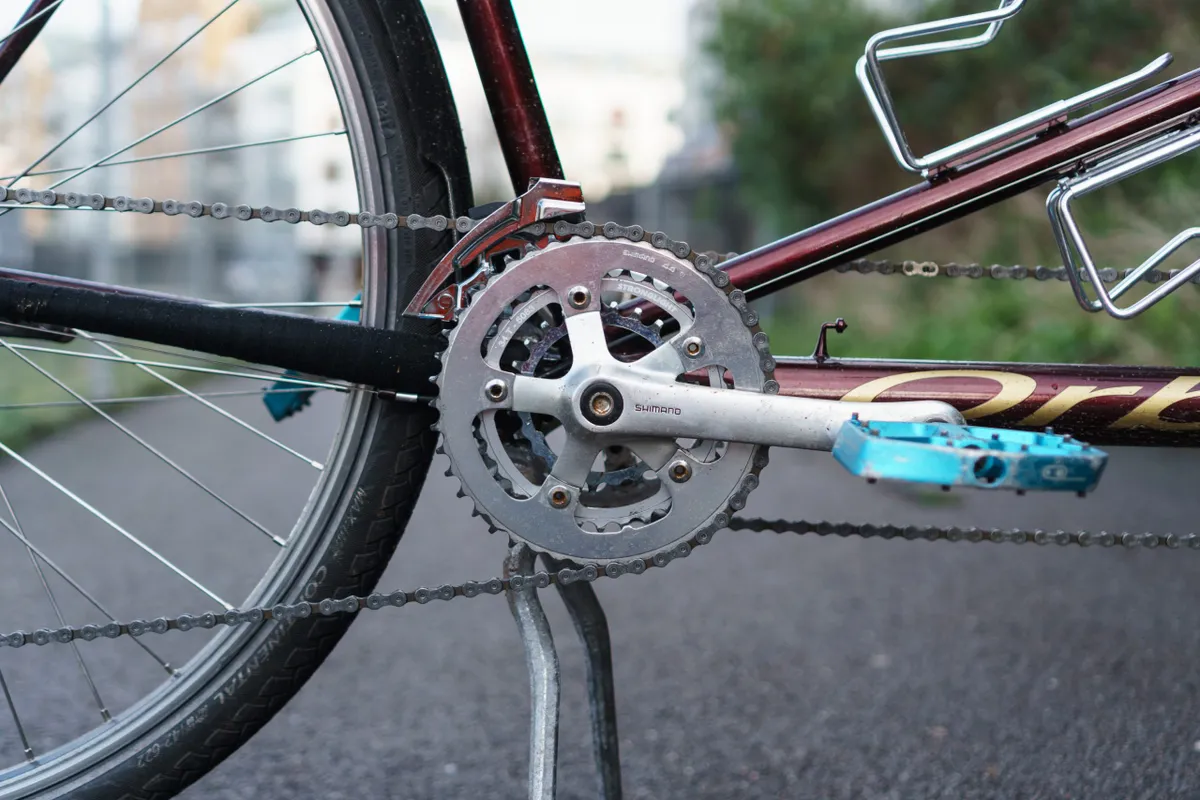
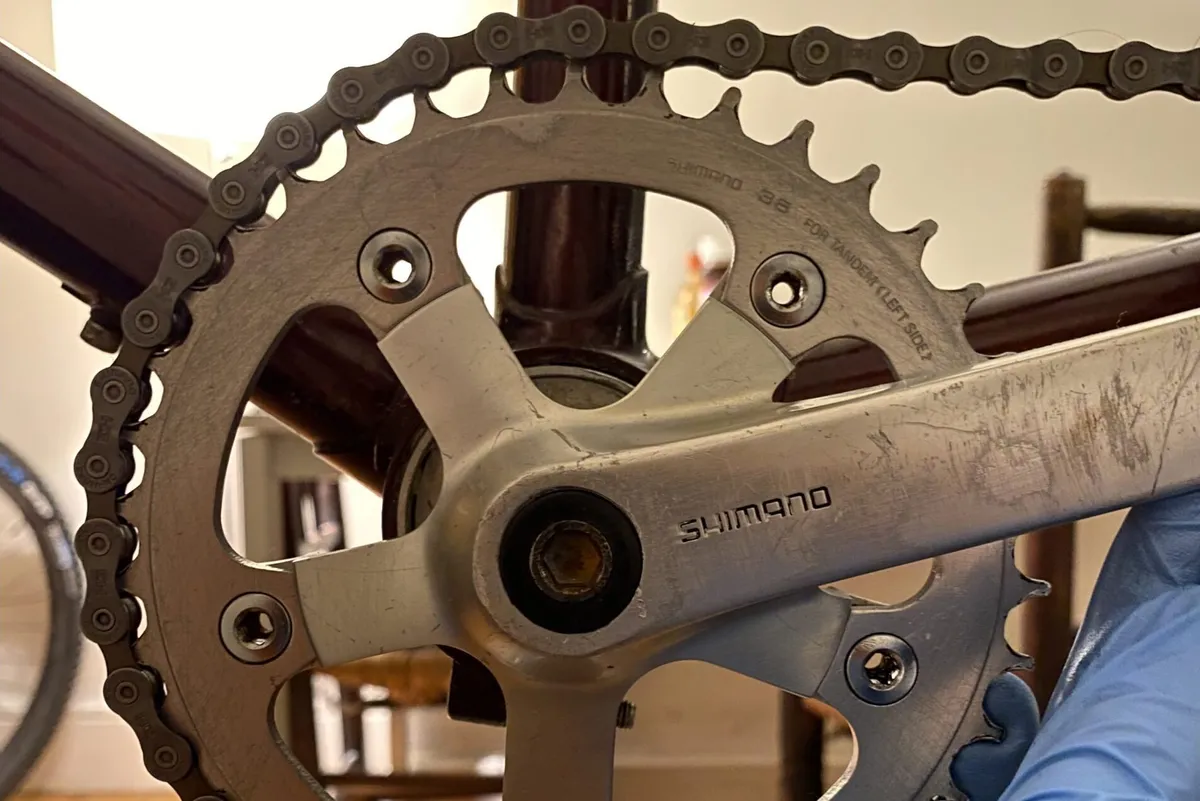
The drivetrain was also well overdue for a refresh, so a new 11-36t cassette, shiny new 44/34/24t Stronglight chainrings, a pair of 38t Stronglight timing chainrings and three chains (!) were procured, as well as new cables throughout.
If a 36/24 gear sounds insanely low… well you’ve clearly never tried climbing with a loaded touring tandem.
While a tandem can be ludicrously fast on the flats and terrifyingly quick on the descents, climbing on one – no matter how strong the team – is an exercise in pure frustration.
The enormous flex in Cecil’s frame absorbs power like some kind of FTP-sucking black hole, so sitting down and spinning away on the struggle bus at a billion RPM is the least unpleasant way to get up the hills.

To be honest, I would gladly fit a 40t cassette and a WolfTooth Goat Link if I ever planned on doing a long loaded tour with a less strong stoker. The chain runs very close to the chainstay in the highest gear, so I wrapped this in a suitably fashionable cloth tape which is finished with waxed thread to protect it.
While I had the bike apart, I also decided to replace the ageing LX front derailleur. This had fairly old-school geometry which was better suited to the larger chainrings that were previously fitted to the bike.
It’s been approximately one zillion years since I have had to buy a front derailleur for a triple drivetrain, so this was not an entirely drama-free process.
The first Sora-level derailleur I bought simply didn’t work with the chainline of the mountain bike crankset (there is nobody to blame but myself here).

Working out which replacement to get involved taking photos of the crankset and superimposing a drawing of a protractor over the image (apparently I don’t own a protractor?) and obsessively poring over spec sheets.
In the end, I opted for a Shimano Deore XT M780 front derailleur. The indexing on this isn’t perfect because the cable pull is designed for a road triple front derailleur, but we survived using friction shifting for a long ol’ time, so I’ll make do.
Eccentric headaches

The timing chain (the chain that connects the captain and stoker’s cranksets that runs on the non-driveside of the bike) is tensioned using an eccentric bottom bracket at the captain’s cranks.
For some unknown reason, the eccentric shell on Cecil measures roughly 57mm in diameter. The old Haden eccentric bottom bracket fitted to the bike is 54mm in diameter, and this had been shimmed with two very crudely bent layers of sheet aluminium.
This extremely janky solution means that, to tension the chain, I had to roughly line up where the shell would need to sit in the frame then press or hammer the whole lot in place. This was extraordinarily frustrating and, obviously, not a field-serviceable solution.
I searched endlessly for a 57mm eccentric BB that would work sans-shim, but nothing of the sort ever seems to have been produced, suggesting the bike originally used a shim.

With no access to a lathe, I sought help via Instagram where my colleague Andy, from our ads team, informed me his dad, a retired engineer, was happy to knock up a shim for me.
A few weeks later and the perfect custom shim was sat on my desk. The fit of this is absolutely perfect and, after hours of use, I haven’t even had to resort to using grip paste to stop it from slipping. Thanks, Papa Nelson!
Drum (brake) roll – we’re almost finished

The eagle-eyed will notice that the wheels are different from the original build.
I actually built these a little over a year and a half ago and I’m glad I went through this process far in advance of the major refresh – lumping that much self-inflicted agonising and dithering into one go could have actually killed me.
To start, the bike requires a 145mm rear hub with threading for a drum brake on the non-driveside.
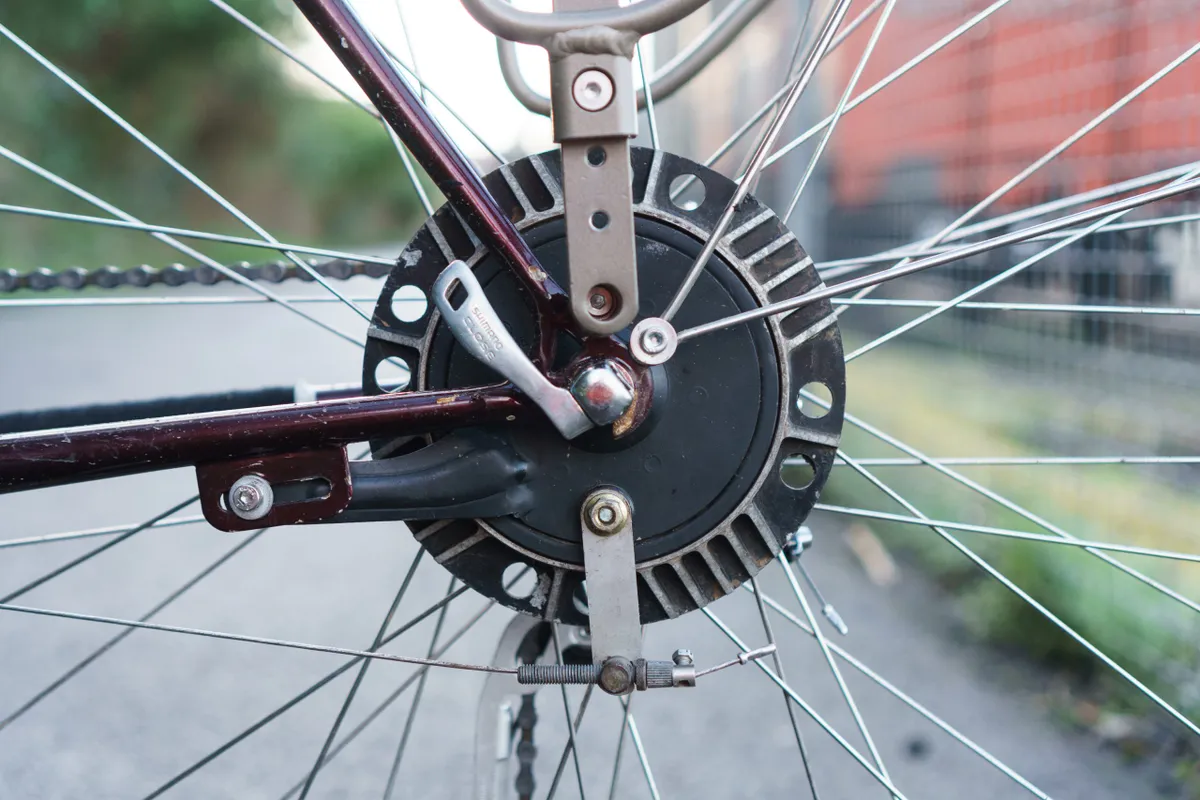
The drum brake is used on long descents to provide additional braking power and to stop the rims from overheating. It also doubles up as a helpful parking brake.
The Mendip Hills – which are just south of BikeRadar’s home in Bristol – are hardly alpine in scale, but even there the additional braking power is very welcome.
Before I even got to building the wheels, I had to get the bike’s old Arai drum brake re-shoed. The original shoes had glazed over and are rumoured to be filled with asbestos and all sorts of nasty guff, so I was happy to hand this task over to the professionals.
I ended up sending the brake to Custom Brakes in Sheffield, with the whole refurb job costing around £25. I highly recommend having this done if you are one of the three people reading this that also rides a tandem because it has made a considerable difference to the power of the brake.
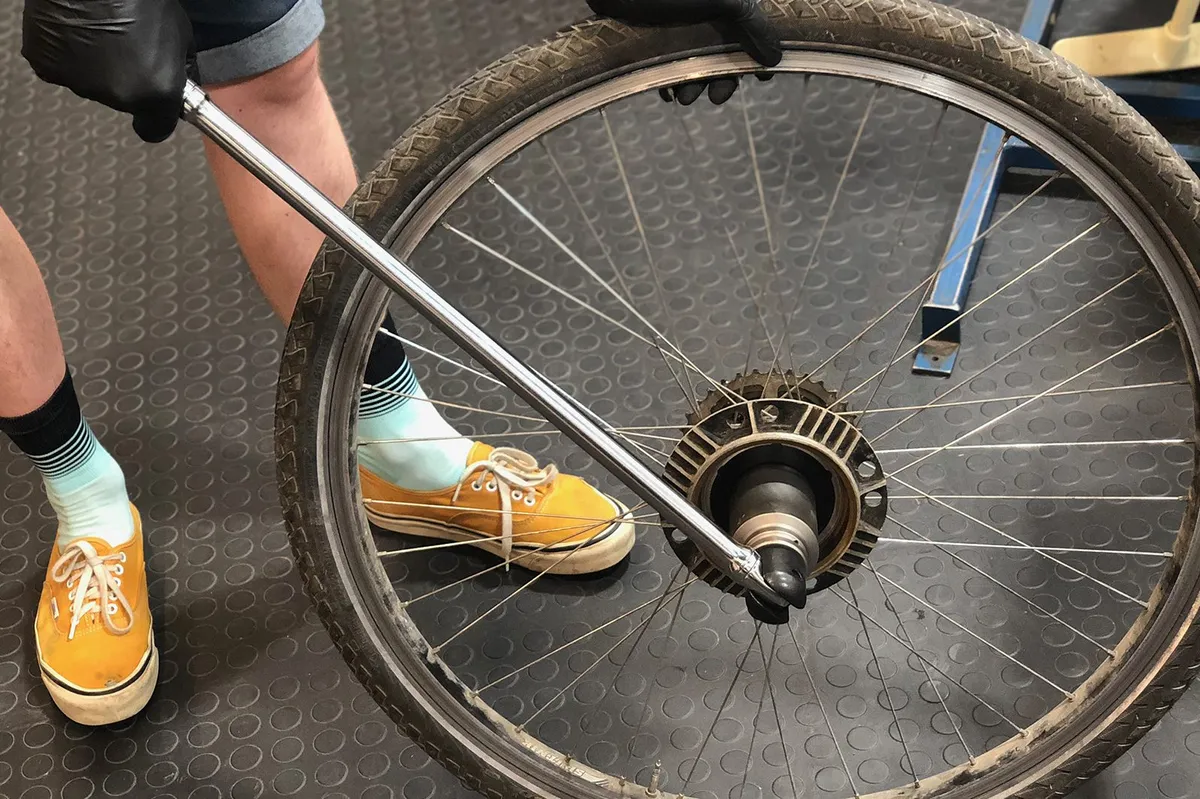
Moving onto the wheels themselves, I trawled eBay obsessively for months to try and find a pair of hubs that would suit Cecil. No surprises, but nothing suitable came up.
I then emailed Hope and White Industries to see if they had any old stock of their discontinued Arai-threaded tandem hubs. Again, no luck.

I finally stumbled on DCR wheels, which sells a pair of reasonably-priced tandem hubs that fitted the bill perfectly. Better still, they were silver.
I then procured a set of 40h Sun Ringle Rhyno Lite rims (supposedly the last set in Europe in this spoke count) and built them up using Sapim Strong spokes in a 4x lacing pattern.
The wheels are fitted with a set of ludicrously heavy-duty 42mm-wide Continental Contact Plus tyres.
These are rated for use on loaded ebikes, which make them a perfect fit for the tandem, not only because they are seemingly impervious to punctures (*touch wood*), but the ultra sturdy and stiff sidewalls also improve handling in any off-camber terrain.
I’m sure a lighter tyre would roll faster, but I’ll take stability over speed on a loaded tandem thank-you-please-very-much.
Accessorise me

As we intend to indulge in some longer touring adventures later in the year, Cecil currently sports a pair of Blackburn Outpost pannier racks on the front and rear.
These are my all-time favourite pannier racks for bikes without rack bosses or where you require an extra bracing point.
I particularly like the ability to use cantilever brake bosses as an additional mounting point, using the included spherical bolts and washers.
I have taken this a step further and used a pair of Velo Orange rack bolts, which I have found provide a more secure attachment.

The bike also features a Pletscher Twin ESGE KS12 kickstand. Fitting this was a complete revelation because tandems are insanely unwieldy to park and picking up a fully loaded one is almost guaranteed to give you a hernia.
Finally, the build is finished with a set of SKS Bluemels B65 mudguards. I am an advocate of mudguards on every type of bike, especially a touring bike, so to see these here should come as absolutely no surprise.
What’s next for Cecil?
If you exclude the hours and hours spent obsessively researching every single new component, I think I spent something close to 15 hours refurbishing Cecil. No bolt was left un-greased, no cable left un-tensioned and no nipple left un-tweaked.
This may sound excessive, but all of this effort was undertaken with a view to taking Cecil on a tour around our homeland north of the border on an extended mixed-terrain, trans-Scotland expedition. This has been put on hold for obvious reasons.
With those plans parked for now, we’ve been enjoying some longer days on Cecil, including some truly daft days spent dragging him up and over the bigger hills in the Mendips.

I’m pleased to report that all of the hard work was well worth the effort. Cecil rides and runs smoother than ever before and the new cockpits have massively increased all-day comfort.
Hopefully, we’ll get a chance to go on our mega tour later in the year, but for now, I’m happy knowing that what is probably my favourite bike of all time is good for many more years of riding.